November 24, 2023 10:22Updated by Selena Thomas to Play Video
Windows Media Player is a video player that allows you to play video, movies, and audio files on desktops. It is software that Microsoft developed for Windows-based computers only. Furthermore, it comes with fair enough features that include subtitle displays. The supported Windows Media Player subtitles are SRT, SSA, SUB, and ASS. This means you will need these types of file formats for you to succeed in syncing the subtitle to your video.
Suppose you already have these subtitle formats, and your only concern is knowing how to add, change or just turn off the subtitle on your video. In that case, this article post can greatly help you. See the outlined instructions below to teach you how to do the aforementioned concern you have.

Part 1. How to Add Captions to Windows Media Player Videos
Before you try to add subtitles to the video in Windows Media Player, you must prepare both the video and the subtitle file that uses the following file format name, .srt, .ass, .ssa, .sub. Thus, if these are already organized, you can proceed to the steps below.
Step 1.As part of the preparation, please ensure that the video and subtitle files have the same name and are in the same folder location. This will make your media player detect the caption file, which is important to add the subtitle manually.
Step 2.Next, start importing the video by locating it on your device. When you reach the video file, right-click it and select the Open With prompt to choose the Windows Media Player.
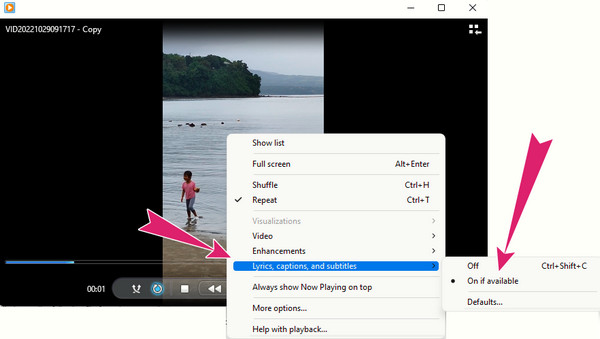
Step 3.Since you have prepared the video and subtitle files containing the same name, Windows Media Player will automatically open and display the captions. Otherwise, right-click on the playing video and select the Lyrics, Captions, and Subtitles dialogue. Then, click the On if Available option tab.
Part 2. How to Change Subtitle Color with Windows Media Player
Now let’s learn something technical as we learn how to change subtitle color in Windows Media Player. But first, let’s be clear if Windows Media Player can do so. Unfortunately, WMP doesn’t have a built-in option to change the subtitle color, but it can determine the style and design of the subtitle file. However, you can try the following workaround methods below in trying to change the subtitle color.
Step 1.Locate the subtitle file and open it with your chosen text editor. Once opened, navigate the color setting.
Step 2.Now modify the color code by replacing the color design of the subtitle by adjusting the font color tab.
Step 3.Once done, do not forget to save the file.

Part 3. How to Turn Off Subtitles on Windows Media Player
Do you wish to know how to turn off subtitles in Windows Media Player? In that case, we have prepared the detailed steps you can follow below.
Step 1.Launch the video using the Windows Media Player. Now, you see that the subtitle also plays along with the video.
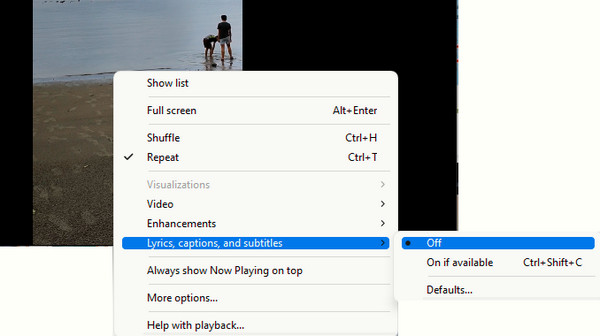
Step 2.Move your cursor anywhere on the playing video, and make a right-click. Then, click the Lyrics, Captions, and Subtitles option on the context menu.
Step 3.Then, click the Off option on the shown caption on the side.
Part 4.Best Alternative to Use Windows Media Player Subtitles
Do you wish to play your video in a much better way but don’t want to compromise the subtitle of Windows Media Player? Then, here’s Blu-ray Player. The best alternative to Windows Media Player is to sync subtitles. How can you refuse a media player that caters to all types of digital videos, including Blu-rays and DVDs? Moreover, Blu-ray Player gives you a neat, elegant, and full of playback control where you can handily play, pause, stop, forward, next, backward, and previous your footage. Amazingly, it also comes with a snapshot tool and its file destination on the side, letting you access it quickly whenever you want. You will be amazed to learn how high the output quality is for every captured scene you make.
Another reason for choosing this media player is its extensive array of ribbons. From this ribbon option comes the video setting where the subtitle navigation lies. Wherein you can easily add and sync captions on the video, and you play easily. You can also add the subtitle tracks to your playlist if you want!
Main Features
- Professional-looking interface with easy navigation.
- Full-packed playback control that includes a snapshot tool.
- One-click playlist maker.
- Support for high-quality video content.
Free Download
For Windows
Secure Download
Free Download
for macOS
Secure Download
How to Use Subtitles in Windows Media Player Alternative
Step 1.Begin by grabbing the Windows software version on your desktop by clicking the available Download buttons above. When you already secured the software on your computer, launch it.
Step 2.Then, hit the Open File button at the center of the interface and bring the video you want to play in.
Step 3.While playing the video, reach for the Video tab from the ribbon. And click the Subtitle Track option followed by the Add Subtitle dialogue box. Then, upload the subtitle file you have on your device.
Step 1.Once uploaded, it will automatically sync on your playing video. After that, feel free to navigate to the playback control seen on the screen.
Further Reading
Part 4.FAQs Regarding Subtitles on Windows Media Player
-
How to put subtitles in Windows Media Player?
Putting subtitles in Windows Media Player will only require you to save a separate file using the same name as the video. When you play the video, Windows Media Player will also play the captions automatically.
-
Is it possible to use Windows Media Player to download subtitles?
No. Unfortunately, Windows Media Player doesn’t provide a feature to download subtitles or even other media files.
-
Why doesn’t my subtitle with BUP format play on Windows Media Player?
It is because Windows Media Player doesn’t support BUP files, for it only supports SRT, ASS, and SSA.
Wrapping up
That’s how to add, change, and turn off the captions on WMP. Adding captions to Windows Media Player video requires you to use only the supported file formats, especially SRT. Therefore, you have to make sure beforehand that the caption files are saved in that type. On the other hand, if you are not that fascinated with Windows Media Player subtitles and do not have the confidence to let it play your video files, then you still have another resort, which is the Blu-ray Player.