December 01, 2023 10:45Updated by Brittany Garcia to Tips
A single window is not always sufficient, primarily if you work from home and need to finish tremendous tasks. Having numerous windows open makes it easy to switch between various jobs. Whether you need to look at data to create a report, have a chat window while surfing, or watch videos while working on your novel for creativity and inspiration. With the number of tasks you need to do, you definitely or occasionally need numerous items open simultaneously. On the other hand, juggling between full-screen windows may be laborious and time-consuming.
Fortunately, Macs provide a split screen option that allows you to put two programs or two independent browser windows on opposite sides of your screen. You may switch between windows without using your mouse or hit different keys on your keyboard. In line with that, be with us in this article, and let us unveil the most straightforward and effective ways to split screen on MacBook. We will give you different ways and shortcuts to do it.

Part 1. How to Split Screen on Mac
Default Way to Split Screen on Mac (OS X EI Capitan)
Step 1.Check the settings first to ensure that Split View mode will operate on your Mac.
Step 2.As we make it possible, please go to the Apple menu, then locate the System Preferences.
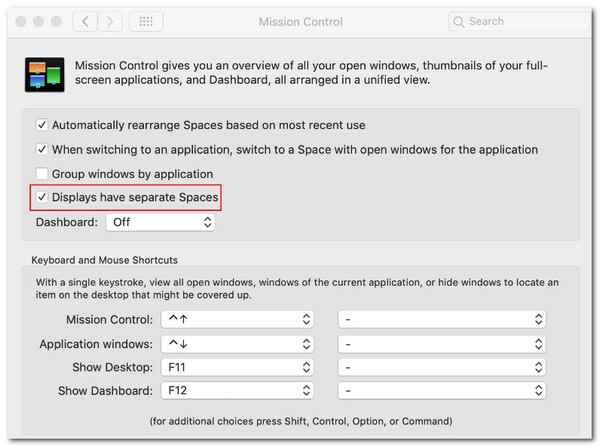
Step 3.From there, find the Mission Control tab in the screen’s upper left corner. Check the item next to Displays with Separate Spaces is checked.
All operating systems, beginning with OS X El Capitan, feature the Split View mode. The sequence of operations necessary to activate the method alters in the latest macOS – macOS Catalina. In line with that, if you have different macOS versions, the processes for macOS Catalina and other OS versions are outlined in the following sections. Kindly check out the suitable methods on your macOS version below.
Split Screen on macOS Catalina
To use split screen on macOS Catalina, here are the instructions we should follow to make it possible.
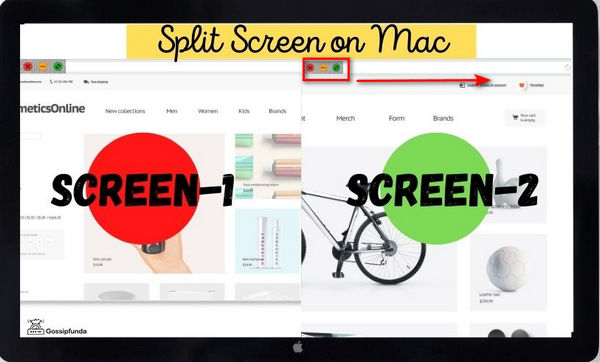
Step 1.Please direct to the upper left corner of the currently open window and click and hold the green circle with outward-facing arrows.
Step 2.After that, you can choose Tile Window to Right of Screen or Tile Window to Left of Screen from the open options. The window will fill the specified space. This step is choosing the application needed for splitting the screen on your macOS Catalina.
Step 3.In the next step, kindly select the second window you want to launch on the empty side of the screen and see how your screen will split into two to see if the booth application runs concurrently.
Split Screen on Mac: Other Version
In prior Mac OS X versions, apart from macOS Catalina, you can use the following command to activate the split screen:
Step 1.The first step we must to do is to click and hold the green circle with outward-facing arrows in the upper left corner of the window.
Step 2.After doing it, the window will shrink, and you may move it to one side of the screen by dragging it to your preferred side where you want to see the first software.

Step 3.Next, as we attach the window to the left or right side, release it. It will now allow us to begin concurrent use. From there, selecting another window for the opposite half of the screen is a must to finish the process.
Part 2. Keyboard Shortcut for Split Screen on Mac
Method 1. Mission Control
On the other hand, we also have an easier way to split the screen on your macOS computer. It is called Mission Control, which can also be the Mac split screen shortcuts. This feature will allow you to quickly examine and switch between all active windows in Split View and full-screen mode. It makes accessing any of the open windows on your Mac more accessible and more effective with only a few clicks from your keyboard. Without further details, here are the steps we need to make to do the process successfully.
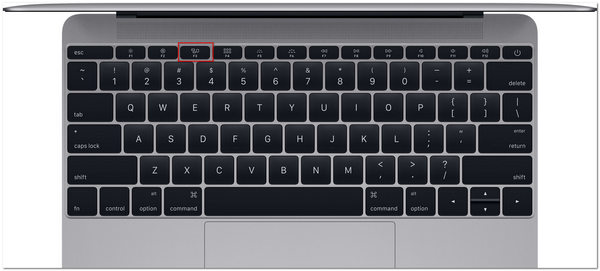
Step 1.For the first step, we will need to hit the F3 key on your keyboard. It is the Mission Control button on your MacBook’s keyboard, so you should press it immediately.
Step 2.After that, we will hold down the Control and Up arrow keys at the same time. Then, it is about time to swipe up on the Magic Trackpad or Multi-Touch with four or three fingers.
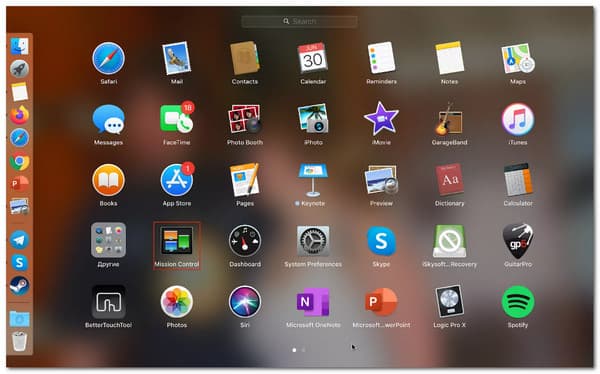
Step 3.Now, please click twice with both fingers on the Magic Mouse’s surface. It will now allow us to navigate to Mission Control in the list of programs in Launchpad. Then, drag the window to the top of your screen if you use OS X El Capitan.
Notes:
You may reach the following destinations on your Mac by browsing the top pane in Mission Control:
- The primary and secondary desktops.
- Programs are displayed in Split View.
- Applications launch in regular mode.
Method 2. Easiest Command
On a Mac, the keyboard shortcut for splitting screen is to first enter full-screen mode by pressing Control, then Command key plus the key of F. From there, press F3 to bring up Mission Control and drag another program onto the app is now full-screen. Return to Split View by clicking back inside the freshly tiled applications.
Part 3. Why Can’t My Mac Do Split Screen?
The issues that hinder you from doing split screens on macOS can vary for different reasons. Here are the few things we need to bear in mind to prevent any problems in the process.
Reason 1. Disabled/Incorrect Setup of Split Screen on Mac
One reason you may be unable to use split screen on your Mac is if your System Preferences settings are incorrectly set up. To ease this problem. We need to go to the Apple menu. Then see the System Preferences. Now, locate Mission Control to check your settings. Make sure the Displays have Separate Spaces option is ticked.
Reason 2. System Requirement in Split Screen on macOS
With the introduction of OS X El Capitan in 2014, the split screen view became accessible. Unfortunately, early versions of OS X do not allow you to see two apps simultaneously. It might be the reason why you cannot do it. We should remember that Split screens are not supported by some programs, particularly third-party apps obtained from the Internet. If an app refuses to take up half of the screen, even if all settings appear to be OK, it was most likely not meant to be seen in this manner. However, you will be relieved to know that the majority of the default programs for the MacBook are entirely supported.
Part 4. How to Make Side by Side Videos on Mac
On the other hand, Blu-ray Master picked Video Converter Ultimate can combine many movies and photos simultaneously to make a split-screen video for your macOS preview. We can now select a style and quickly put video clips or pictures into the frame. In addition, it can easily customize each screen. Once you have completed editing your video collage, you may share it on TikTok, Instagram, and other social media platforms. All of these features are only a few steps away. Try to look at these steps to make it.
Step 1.Download and install the excellent Video Converter Ultimate on your PC.
Free Download
For Windows
Secure Download
Free Download
for macOS
Secure Download
Step 2.Access the tool’s Collage feature menu from there.

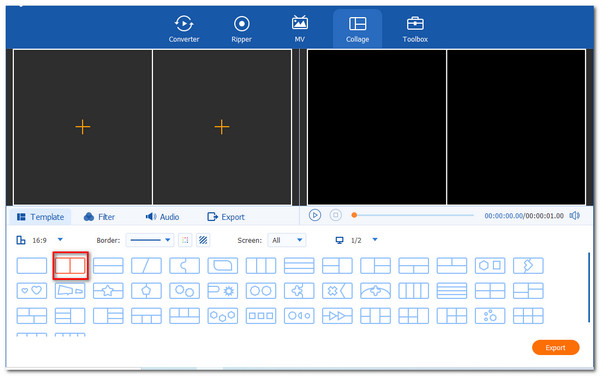
Step 3.Please click the Start button in the new tab to formally begin the procedure. Then, from the available templates, select the Two Cell template or other templates.
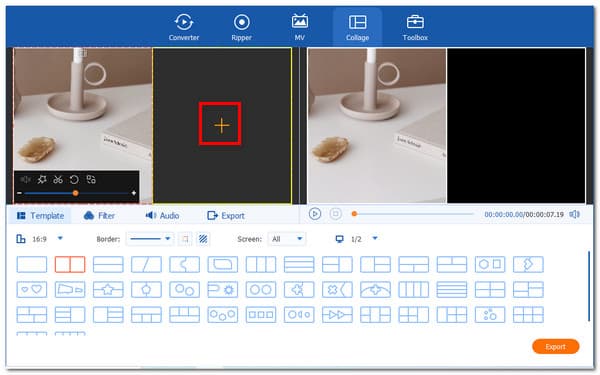
Step 4.To create the split screen vision, click the Add button. Choose two media files and determine which should be on the right and the left.
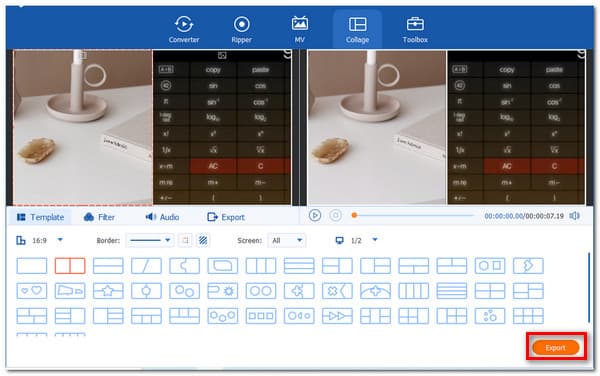
Step 5.If you have already put the files, it is time to save your file by clicking the Export option. After that, we need to enable the tools to begin exporting and wait for the results.
Part 5. FAQs About How to Split Screen on Mac
-
On a Mac, how can I get from Split View to Full Screen?
As we disable the Split screen on Mac after your tasks, we need to expose the window buttons and move the cursor to the top of the screen. In each window, click the full-screen icon. For that, split View is no longer active in that window. The other window becomes full-screen.
-
Why doesn’t iOS support split-screen mode on all phones?
Many iOS users do not utilize the split screen capability daily. Even though iPhone screen splitting is a beneficial function, it is barely known to a small proportion of Apple consumers. What is the reasoning for this? In reality, the answer is simple: not all phone models enable the iPhone split screen option. Only the latest version of iOS and models only support this feature.
-
Do Android phones have Split screen features?
Yes. There are many latest versions of Android that support Split screen features. Some models are Samsung, OnePlus, Huawei, and others with built-in features. All we need to do is press and hold the app and click the Split screen button to select the second application.
Wrapping up
You may now multitask and create a more visual presentation using the split screen feature on Mac. This feature can be possible using the methods above. In addition, we can now see the ability of Video Converter Ultimate to split the video into two. You can now visit our website for more tips and tricks.