December 06, 2023 16:52Updated by Selena Thomas to Record Video
Movavi Screen Capture, also named as Movavi Screen Recorder, is the screen capture software, which can grab audio and video on computer. It also gains likes from many of its users. However, some users reported there are some audio recording problems in Movavi Screen Recorder, and audio problems are one of them.
This post focuses on explaining why the Movavi Screen Capture problems occur and how to solve them.
- Part 1. No Audio on the Output File on Mac
- Part 2. Recording File Has No Audio and Only Video Playing
- Part 3. Failed to Record System Audio on Windows
- Part 4. Cannot Enable Recording from Audio Device on Windows
- Part 5. Cannot Record Sound from a Microphone (Windows 10/11)
- Part 6. Movavi Screen Recorder Audio out of Sync
- Part 7. Movavi Screen Recorder Black Screen
- Part 8. Best Movavi Screen Capture Alternative
- Part 9. FAQs of Movavi Screen Capture Problems
Part 1. No Audio on the Output File on Mac
The speaker icon on the task bar used to turn gray in all the Movavi Screen Recorder version earlier than 5.4, because Movai Sound Grabber visibly control over your sound device.
There are some cases that may lead to the sound loss.
Step 1. The installation error.
For the error, you should exit Movavi Screen Capture and re-install the Sound Grabber application.
Step 2. Other applications may take control of the sound.
You had better close other programs that are using your sound card to avoid a conflict.
Part 2. Recording File Has No Audio and Only Video Playing
Before that, you need to confirm that problem occurs in the output file or preview window. While you preview the recording video without audio, make sure your sound device is active.
If it is the output video that comes without audio, you can follow the tips below.
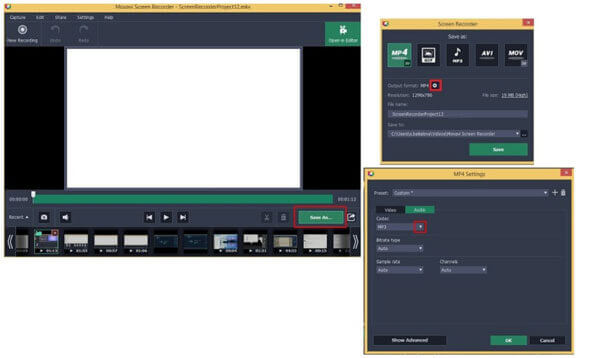
Step 1. Save video recording using another codec.
When you click Save as to export the video recording from Movavi Screen Recorder, choose MP3 as the audio codec.
Alternatively, you should choose the supported video and audio formats for the device where you will play the video recording file.
Step 2. Change a different media player.
Many users reported that video recording without audio on the default player, Windows Media Player. It is possible to use the one that does not use the system codecs. You can get the Windows Media Player aternatives.
Step 3. Install the codec pack.
Once the video codec is not compatible with your media player on Windows, you can solve this problem by installing the codec pack, e.g. KLite codec pack.
Step 4. Disable all active devices.
Program conflicts may also lead to the audio failure while recording. You can exit all other active programs. Or choose these devices in the drop-down menu next to the microphone icon.
Part 3. Failed to Record System Audio on Windows
As the old OS for Windows users, the steps of recording system audio are slightly different from other OS on Windows computer.
You should follow the steps below.
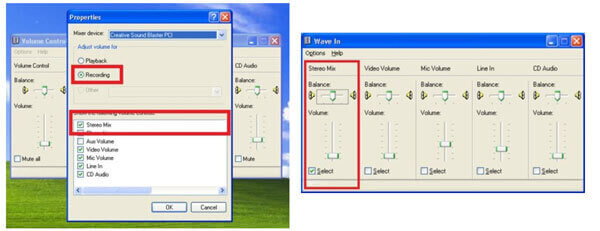
Step 1Toggle on Microphone recording, select Stereo Mix / Speakers / Mix out / Wave out from the dropdown list depending on your sound card model and configuration.
Step 2Click Start on Windows computer, select Settings to choose Control Panel, and find Sounds and Audio Devices.
Navigate the Audio tab and then click Volume on the Sound Recording panel.
Else, right-click the speaker icon at the system tray and select Open Volume Control to configure the system sound and enable Stereo Mix prior to recording.

Step 3In the Options tab, click Properties. Select your audio input device from the Mixer device drop-down list. Then, select Stereo Mix.
Part 4. Cannot Enable Recording from Audio Device on Windows
Some users also complain that they cannot enable recording from any device on Windows computer. There are 3 reasons for this problem.
Step 1. Third-party audio enhancing software.
Commonly this problem is caused by the 3rd party audio enhancement software. For solving it, you need to check and close your Windows system tray at the bottom-right side of the screen.
After that, you can restart Movavi Screen Recorder to enable the audio recording.
Step 2. Outdated sound card drivers.
The outdated sound drivers may lead to the issue and you need to update the sound card drivers.
Step 3. Difference between sound quality settings between Movavi Screen Recorder and system.
If the reasons for the problem, you should follow the steps below:
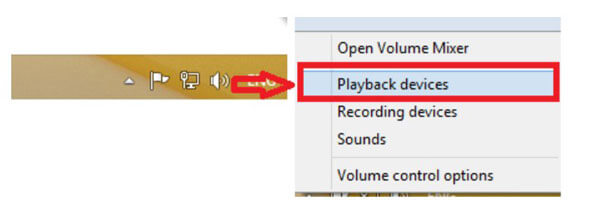
Step 1Right-click the speaker icon on your system tray and select Playback devices and disable the sound device temporarily.
Step 2Right-click your current playback device and select Configure to select Stereo option, and click the Next button to finish configuring the device.
Step 3After that, right-click your playback device to select Properties, navigate the Advanced tab and set 24 bit, 48000 Hz for your speakers.
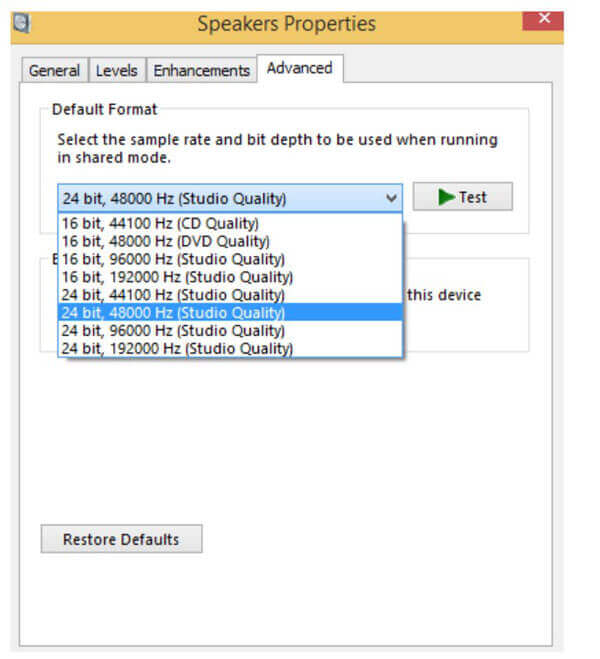
Step 4Tick all the options under Exclusive mode and click Apply.
After that, you can try recording the audio again to see if the problem has been solved.
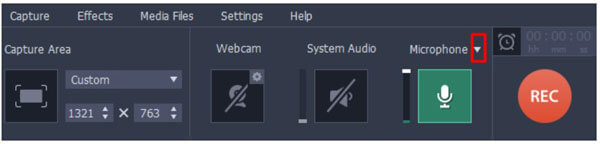
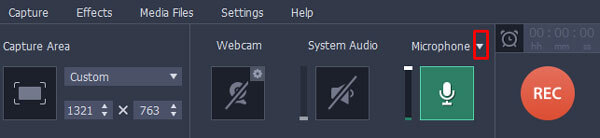
Part 5. Cannot Record Sound from a Microphone (Windows 10/11)
For recording sound on Windows via Movavi Screen Recorder, you should get the permission.
Windows 10/11 has created a security that disables the access of the third-party applications to your microphone and web camera.
Here, you should allow Movavi Screen Recorder to access your microphone firstly.
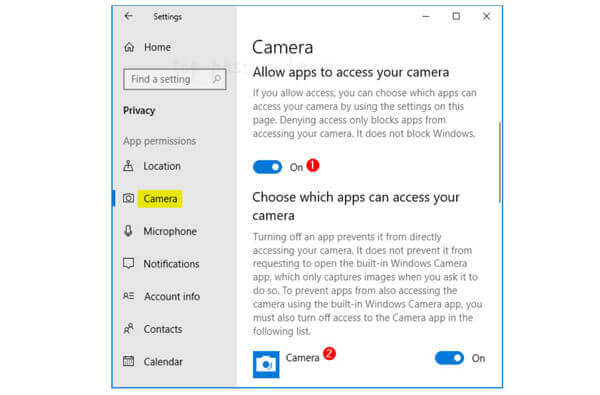
Step 1. Click Settings from your Start menu.
Step 2. Click on Privacy.
Step 3. Select Microphone from the left pane and then click the Change button.
Step 4. Toggle on Microphone for this device and turn on Allow apps to access your microphone.
Step 5. Check Choose which apps can access your microphone to select the Movavi and other screen recorder applications to use your microphone.
Part 6. Movavi Screen Recorder Audio out of Sync
There are 2 ways to fix the problem.
Step 1. If your original video or webinar is in sync with audio, but they are out of sync in the preview, you can try to select any other formats or change the video and audio codec.
Step 2. When your original video or a webinar starts to desync when the recording starts, you can close the unnecessary tabs from your browsers, decrease the frame rate, update your drivers and get the Movavi Screen Recorder alternative.
Part 7. Movavi Screen Recorder Black Screen
When you are recording a video with Movavi Screen Recorder, the screen is black, then the video or screen is protected without recording permission.
To fix it, you need to close the preview, open Settings, choose Preferences, locate the Video menu under Screen Capture and enable Use alternative capture mode or use DirectX for capturing option.
When you try to playback the video recording, the screen is black, but you can hear the audio, then you had better check the output video codec to see if it is a video format.
Part 8. Best Movavi Screen Capture Alternative
Though Movavi Screen Capture has powerful recording features, there are a variety of audio recording problems. If you do not want to spend money on it, you should get the Movavi Screen Recorder alternative, AnyMP4 Screen Recorder.
Screen Recorder is the Movavi Screen Recorder similar software, which you can use it to record screen and edit it in real-time. Whether you want to record videos and music from YouTube, Facebook, Twitter, SoundCloud, Pandora, Spotify, etc., or record screen for making video tutorial, gameplay, business presentation and more, it can do you a great favor.
Free Download
For Windows
Secure Download
Free Download
for macOS
Secure Download
- Record any video and audio from desktop, programs, browsers and webcam.
- Record video and audio from microphone/system separately.
- Real-time editing while recording like draw a shape, add the text, etc.
- Various recording modes to select or exclude any windows and region.
- Timer recorder can complete the recording without sitting in front of computer automatically.
- Phone recorder to mirror and record iPhone and Android screen on computer.
Now, let’s streamline the process of using it to record video with audio on your computer.
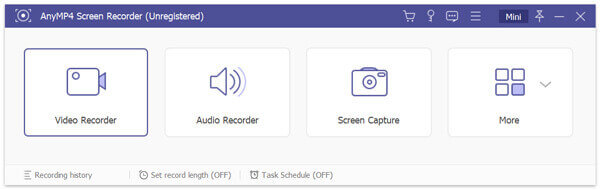
Step 1. Select Video Recorder
Free download this software by clicking the download link above. Run it. Initiate the window, you can see 4 tabs, Video Recorder, Audio Recorder, Screen Capture and More.
For recording video with audio, you should select Video Recorder.
Step 2.Select recording region and audio source
Here, you should make the simple settings for the video recording.
Customize the video window by clicking Full or Custom.
In addition, toggle on/off System Sound and Microphone basing on your own needs.
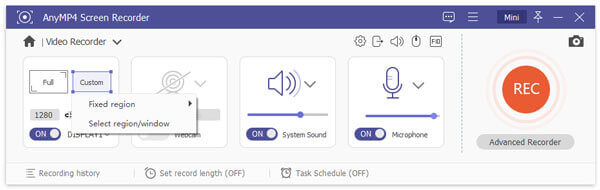
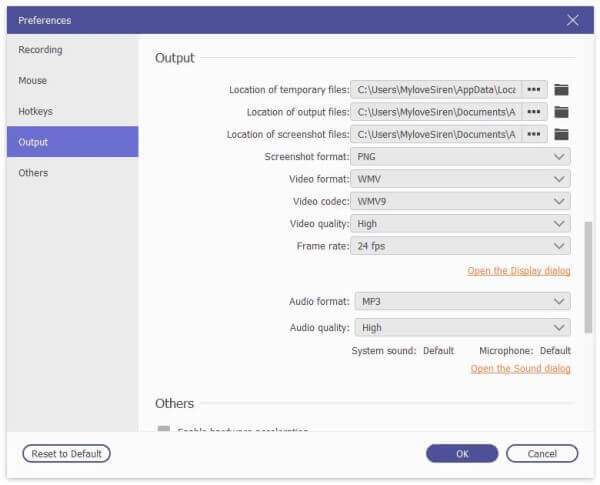
Click the gear icon above the Microphone icon to adjust the output and recording settings.
Step 3.Record a video
While everything is done, just click the REC button to start recording. The float bar gives you the controls of editing features.
Step 4.Preview and save the video recording
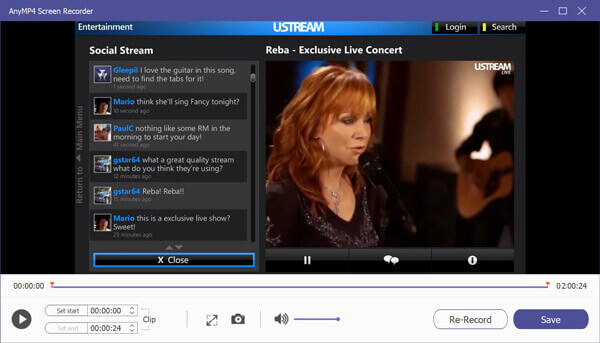
The stop button will direct you into the preview window. Click Save to export the recording video on your computer. Before that, you can use the clip functionality to split the video recording.
Part 9. FAQs of Movavi Screen Capture Problems
-
Is Movavi Screen Recorder worth buying?
If you want to record video with audio with no charge, the free trial version of this Movavi Screen Record is enough. However, the free trial version will not record system sound and add the watermark in the output file. For avoiding that, Screen Recorder will be a better choice that it only charges $29.95, and you can benefit all the features similar to Movaiv Screen Recorder with $64.95.
-
Failed to record system audio from free version of Movavi Screen Recorder?
All the free trial versions of Movavi Screen Recorder will not support audio recording from computer system. You need to purchase it to activate the feature.
-
Is Movavi Screen Recorder safe?
Yes. As a screen capture software, Movavi Screen Recorder is safe to download an use. Free virus and ad, and you can feel safe to use it.
-
Is Movavi Screen Recorder good?
After testing it for 2 hours to record a game, i will rate it 95 scores. It is a good screen recorder tools, but it does have some recording problems.
Wrapping up
Movavi Screen Recorder, as the video recorder receive many error reports from its users. When you encounter the Movavi audio out of sync, or playback problems, you can follow the solutions mentioned in this post to fix them. Besides, if you do not consider purchasing this software, you can find the alternative to Movavi Screen Capture.
Now, it is you turn.
Do not hesitate to share this post with your friends if it does help you.
Leave your comments if you have other Movavi Screen Recorder problems, and we will try hard to help you.
More Reading