

Aug 27, 2026Posted by Kevin Miller to Rip DVD
Quick Guide:
If you have an HDMI cable: Plug into TV & DVD > Change Roku Input to HDMI.If you have Red/Yellow/White cables: Plug into AV IN (use a 3.5mm adapter if required) > Select AV Tile.
Got a box of classic DVDs or home movies sitting in the closet, but your new TCL or Hisense Roku TV doesn't seem to have the right ports? You’re not alone. While streaming has taken over, getting your physical disc library to play on a modern smart TV can be surprisingly confusing—especially when you’re staring at a mess of red, yellow, and white cables with nowhere to plug them in.
Whether your DVD player uses a standard HDMI cable or legacy AV composite cords, this step-by-step guide will show you exactly how to connect DVD player to Roku TV, and fix common 'No Signal' issues in less than five minutes.
Table of Contents
- Part 1. What You’ll Need Before Getting Started
- Part 2. How to Connect DVD Player to Roku TV with HDMI Cable
- Part 3. How to Connect DVD Player to Roku TV with AV Cable (without HDMI)
- Part 4. Troubleshooting on Hooking Up DVD Player to Roku TV
- Part 5. How to Play DVDs on Roku TV Via USB Drive
- Part 6. FAQs on How to Connect DVD Player to Roku TV
Part 1. What You’ll Need Before Getting Started
Before you start plugging in cables, check the back of your DVD player and Roku TV to see which connection type you have. Preparing the right gear now will save you from making an extra trip to Best Buy or Amazon.
Option A: For Modern DVD Players (Best Quality)
- HDMI Cable: High-Speed HDMI cable (1.4 or 2.0).
- TV Port: Any open HDMI port on your Roku TV (labeled HDMI 1, HDMI 2, or HDMI eARC/ARC).
Option B: For Older DVD Players (Legacy Setup)
- Standard AV Composite Cable: The classic Red, Yellow, and White RCA cables.
- 3.5mm-to-RCA AV Adapter (Crucial for Newer Roku TVs): Most modern Roku TVs (like TCL, Hisense, or Westinghouse) no longer have the big yellow/red/white jack panels. Instead, they have a single 3.5mm 'AV IN' port that looks like a headphone jack. If your TV doesn't have colored ports, you must have this adapter cable.
Optional / Troubleshooting Backup
- HDMI Converter Box (RCA to HDMI): If your TV only has HDMI ports and your DVD player only has RCA outputs, you’ll need an active RCA-to-HDMI mini converter box (and an extra USB cable to power it).
Part 2. How to Connect DVD Player to Roku TV with HDMI Cable
A Roku TV can be connected to a DVD player with or without HDMI cables. However, the HDMI connection method can provide higher image and sound quality, so it is advised to utilize it if your device is compatible with HDMI. Read the steps below on how to connect a DVD player to a Roku TV with an HDMI cable:
Use Cases
• High quality: Best video and audio from DVDs.
• Simple setup: One cable, plug-and-play.
• Modern compatibility: Works with most TVs and sound systems.
Step 1. First, switch off your Roku TV and DVD player then unplug their power cords.
Step 2. Connect the other end of your HDMI cable to one of the 3 HDMI jacks in the back or side of your Roku TV. After that, connect the other side to the HDMI OUT jack on your DVD player.
Step 3. Once done, plug the power cords of your Roku TV and DVD player, then switch them on. On the Home screen, select between HDMI 1, HDMI 2, or HDMI 3 input on which you have inserted the jack on your Roku TV.
Step 4. Lastly, try to insert a DVD into the DVD player. This is to test if you can now play and watch DVDs on Roku TV through the DVD player and if they are now successfully connected.
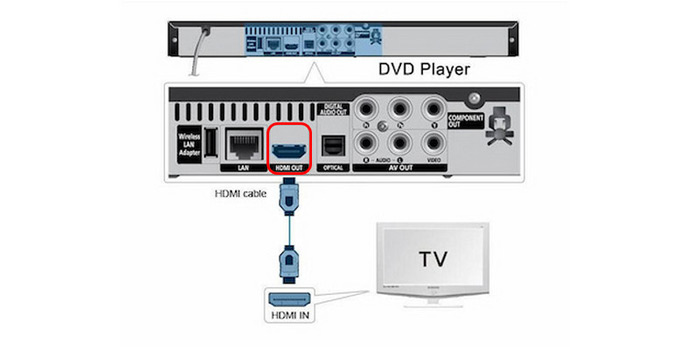
In all, you know the clear steps to hook up DVD players to the Roku TV with HDMI cables. This method can be used on most modern devices that only require you to connect several cables.
Part 3. How to Connect DVD Player to Roku TV with AV Cable (without HDMI)
If your DVD player is an older model without an HDMI port, don't worry—you can still hook it up using standard AV composite cables. Compared to HDMI cables, standard AV (composite) cables force all video data—colors, brightness, and sync—through a single yellow wire, causing signal interference and capping quality at blurry 480i. Always opt for HDMI if your DVD player supports it!
Always opt for HDMI if your DVD player supports it!
Before you start, please check the back or side of your Roku TV. Many modern Roku TVs made after 2020 (especially from brands like TCL, Hisense, and Onn) no longer have the bulky red, yellow, and white RCA jack panel. Instead, they feature a single 3.5mm mini-jack port labeled 'AV IN' that looks just like a standard headphone jack. If your TV has this setup, you will need a 3.5mm-to-3-RCA AV Adapter Cable (often included in the TV box, or available cheaply on Amazon) to connect your standard red/yellow/white cables.
Use Cases
- Legacy support: Great for older DVD players.
- Budget-friendly: Cheap cables and converters.
- Preserve memories: Play vintage or homemade discs.
Step 1.Turn off and unplug both your Roku TV and your DVD player.
Step 2.Identify your TV's AV port.
- If your TV has 3 colored jacks (Yellow/Red/White): Plug one end of your AV cable into the AV OUT ports on the DVD player, and the other end into the matching color AV IN ports on your Roku TV.
- If your TV only has a single 3.5mm 'AV IN' jack: Plug the single 3.5mm end of your 3.5mm-to-RCA adapter into the TV’s AV IN port. Then, connect your standard AV cables from the DVD player's AV OUT to the colored RCA female ends of the adapter (Match Yellow to Video, Red to Right Audio, White to Left Audio).
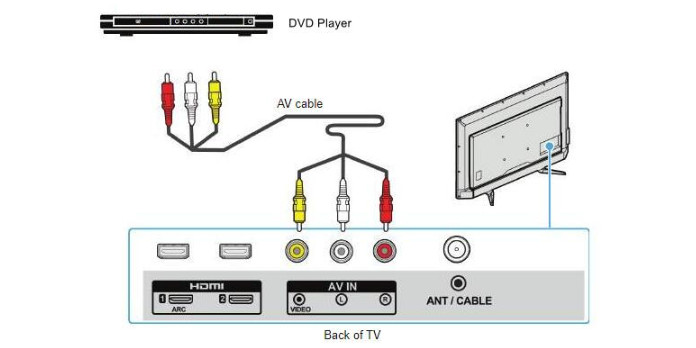
Step 3.Make sure all plugs are pushed in firmly. If you mix up the colors—especially on third-party adapters—you might get sound with no video, or a distorted picture.
Step 4.Plug in and power on both devices. On your Roku Home screen, select the AV tile to start watching. If the AV tile isn't showing on your Roku home screen, go to Settings > TV Inputs > AV > Set up input to enable it.
Pro Tip from Our Lab:
When testing this setup on a TCL Roku TV, we ran into an annoying issue with cheap, third-party 3.5mm-to-RCA adapters: the internal wiring was swapped! If you’ve plugged everything in correctly by color (Yellow to Yellow, White to White) but get a black screen with audio – or distorted video – try swapping the yellow (video) and white (left audio) connectors. You’d be surprised how often budget cables mislabel these colors.
The A/V cable connection is a little complex compared to the HDMI cables. If you are still using your old DVD players, this method is suitable for you. It is also budget-free for most people.
Part 4. Troubleshooting on Hooking Up DVD Player to Roku TV
How to Get the Best Picture Quality (Resolving 480i vs. 4K Issues)
Standard DVDs only output video at 480i or 480p resolution (or 576i/576p for PAL discs in Europe). When you play a low-resolution 480p DVD on a modern 55-inch or larger 4K Roku TV, the TV has to stretch those pixels dramatically, which often results in a blurry, pixelated, or squished image.
Here is how to tweak your settings for a much cleaner picture:
1. Enable HDMI Upscaling (If Supported): Check your DVD player’s setup menu using its original remote. If your player supports Upscaling / Upconverting via HDMI, set the video output resolution to 1080p or 4K. This forces the DVD player (rather than the TV) to handle the image smoothing, which usually yields a sharper result.
2. Adjust Roku Aspect Ratio: If the movie looks stretched horizontally or everyone looks 'fat,' press the Star (*) button on your Roku TV remote while the DVD is playing. Go to Picture settings > Aspect ratio and change it from Stretch to Direct or 4:3. This will preserve the classic original theatrical format (adding vertical black bars on the sides) instead of distorting the frame.
3. Fixing HDCP Error Messages: If you connect via HDMI and get a purple screen with an 'HDCP Error' or 'Unauthorized Content' message, your TV and DVD player failed their digital handshake. To fix this, simply unplug both ends of the HDMI cable, power cycle both devices, and plug the cable back into a different HDMI port on your Roku TV (such as HDMI 1 instead of an eARC port).
Common Tips for Hooking DVD Player to Roku TV
1. Check Your Connection Type
HDMI: Secure the cable, try other ports, and test with another device to rule out faults.AV: Match colors correctly, use a converter if needed, and ensure it’s powered.
2. Select the Correct Input Source
Choose the right input on your Roku TV and label it for quick access.
3. Power Cycle Devices
Restarting both devices can often fix temporary connection glitches.
4. Check for Compatibility Issues
Not all DVD players work with Roku TVs - test on another TV or verify converter support.
5. Update Roku TV Software
Keeping your Roku TV updated ensures better device recognition and performance.
6. Try an Alternative Method
Rip DVDs to digital files and play them via USB if physical connections fail.
7. Community Help
Forums and support threads offer proven fixes—don’t hesitate to reach out or ask for help.
Part 5. How to Play DVDs on Roku TV Via USB Drive
What if your DVD player stops working, or your wall-mounted Roku TV lacks accessible ports? You don't have to give up on your physical movie collection. If your Roku model (such as Roku Ultra or Streambar) includes a USB port, you can digitize your discs and play them locally. By using a desktop tool like HandBrake, Blu-ray Master Free DVD Ripper, etc., you can easily convert physical DVDs into Roku-compatible digital formats (like MP4 or MKV) on your computer without quality loss.
Blu-ray Master Free DVD Ripper is a powerful DVD ripping software that can rip any DVD to MP4, MOV, MKV, AVI, and 500+ formats in 5 minutes. You can choose different output profiles with different resolutions and even customize the output parameters like encoder, bitrate, etc., to fit specific needs. With GPU acceleration, it can rip DVDs 50× faster compared to other tools, making it the fastest DVD ripper. Moreover, this extensive tool has various editing tools for you to optimize the video effects. It is available for Windows and Mac computers, and you can download it.
Step 1. First, download and install the comprehensive DVD Ripper on your computer. Before launching the program, make sure that you put the DVD on the optical drive first.
Free Download
For Windows
Secure Download
Free Download
for macOS
Secure Download
Step 2. Once done, launch the program. On the Ripper tab, press the Load DVD dropdown button to load the titles you want to back up in digital format. After that, wait until the program analyzes the disc. Next, select the Full Title List and then click OK.
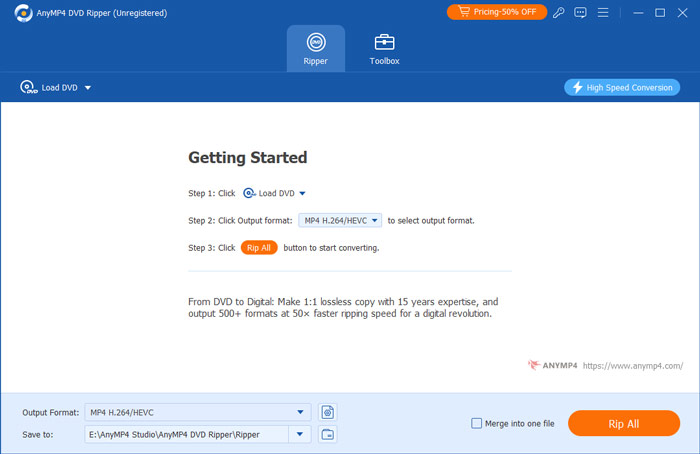
Step 3. To validate all the titles, tick the Full Movie List. Select all the titles you want to back up by clicking the box of each title. After you select all the titles, tick the Rip All button and select your desired output that is compatible with your Roku TV.
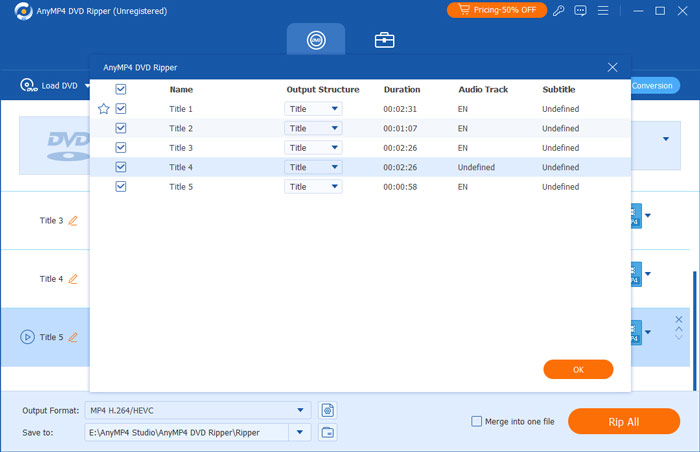
Step 4. Once done, select a destination for your output by ticking the Save to option. You may create a new folder that you will transfer to your USB drive. After that, click the Rip All button to begin the ripping process and wait for it to finish.
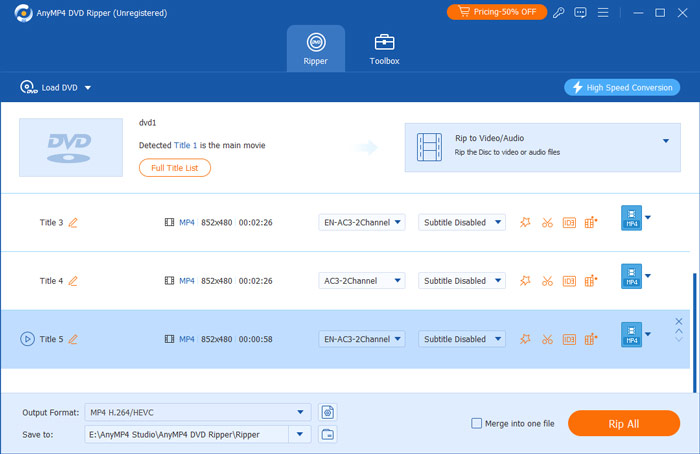
Important: Before transferring files, check your USB drive's file system. Roku Media Player natively supports FAT16, FAT32, NTFS, and EXT2/3. Ensure your USB flash drive is properly formatted on your PC or Mac before loading your movies. Once your files are converted and saved to a compatible drive, simply plug it into your Roku TV and launch the Roku Media Player app to start watching.
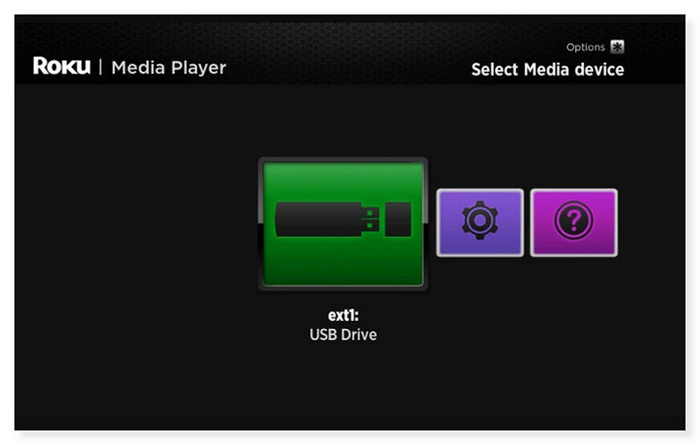
Step 5. Once done, eject the USB drive from your desktop and insert it into the USB port of your Roku device. On the Home screen, if you are in Roku Media Player, when the USB device is inserted, a USB Drive icon should show up in the media device selection screen. Select it and open the video you want to watch on your Roku TV.
This way is convenient for people who want to enjoy high-quality DVDs on the big screen of Roku TV. With this software, you can back up your DVDs to digital in a safe way. By clicking several steps, you can convert DVDs to various video and audio formats without losing quality. However, it is a paid software that you need to buy it to enjoy the full features.
Part 6. FAQs on How to Connect DVD Player to Roku TV
-
Can you run Roku through a DVD player?
No, you cannot run Roku through a DVD player. A Roku is a streaming device that you can connect to your TV’s HDMI port to stream media from different online services. Furthermore, a DVD player is designed to play DVDs and cannot run a Roku or act as a streaming device. If you want to use a Roku, you must connect it straight to your TV.
-
Can Roku remote control a DVD player?
Unfortunately, no. Only the TV is controlled via the Roku TV remote. You can only adjust the volume when a DVD is playing using the remote. However, you may use a universal remote that is compatible with both Roku TV and DVD player or you can use the remote that came with your DVD player.
-
Why won't my Roku TV play USB movies?
It might be because the Roku TV does not support the USB drive filesystem format. USB drives can be formatted with various file systems. FAT16, FAT32, NTFS, EXT2, EXT3, and HFS+ file systems are supported by Roku players on USB sticks. ExFAT is a pre-formatted file system that is not supported on many modern USB sticks. Place the USB drive into a USB port on your computer that is available if you are unsure of the file system being utilized.
-
I’m trying to hook up an old DVD player to my new TCL Roku TV, but there are no red, yellow, and white ports. What adapter do I need?
You need a 3.5mm-to-3-RCA AV adapter cable. Plug one end into the 'TV IN' jack on the TCL Roku TV, and insert the three colored cables from the other end into the corresponding color ports.
-
Why does my Roku TV say 'No Signal' after I connected my DVD player with an HDMI cable?
First, make sure the DVD player is powered on. Next, verify your TV input setting: on your Roku home screen, select the exact HDMI port tile (e.g., HDMI 1) where your cable is plugged in. If it still fails, try swapping the HDMI cable or plugging it into a different HDMI port to reset the connection.
-
How do I switch the input source on a Roku TV using the remote control to play a DVD?
Press the Home button on your Roku remote. Navigate to the tile corresponding to your connected input (e.g., AV or HDMI 1/2) and press OK. If the tile isn't visible, go to Settings > TV Inputs, select your connected port, and choose Set up input to add it to your home screen.
-
My DVD on Roku TV has sound but a black screen with yellow, white, and red cables. How can I fix this?
This usually happens when the yellow (video) cable is loose or plugged into the wrong jack. If you are using a 3.5mm adapter, third-party cables often have swapped internal wiring—try swapping the yellow and white plugs on the adapter. Also, ensure all connectors are pushed in firmly.
Conclusion
Now you know how to connect DVD player to Roku TV using the above methods. If unfortunately, they still don’t work or you don’t want to go to the hassle of connecting your DVD player to Roku, you may opt to rip your DVD into digital format. Blu-ray Master Free DVD Ripper is the best DVD ripper you can use. Any DVD, regardless of region codes, disc types (DVD±R or DVD±RW), or system standards (UDF, ISO 9660, NTSC, or PAL), can be easily ripped using this DVD-to-digital converter. So you don’t have to worry anymore if you can still watch your favorite movies even without a DVD player.
More from Blu-ray Master
Play DVD Movies
Fast and free ripping software to decrypt all DVDs to digital easily on your computer.
100% Secure. No virus