Sep 03, 2025Posted by Kevin Miller to Create DVD
The M4V format was developed by Apple Inc. and was originally used primarily to package video content on the iTunes platform, including movies, TV series, music videos, etc. With support for efficient encoding such as H.264, M4V can compress file sizes while maintaining image quality. As a result, it has gradually become a common choice for storing high-quality videos outside of the Apple ecosystem.
Although M4V is easy to play on digital devices, many users still need to burn it to DVD, especially those who are accustomed to using traditional DVD players. However, it is not easy to burn M4V to DVD, as it requires solving DRM copyright protection and format compatibility issues. In this article, we will introduce 3 top MP4 to DVD burners to solve the problem effectively. Let’s start!

- Part 1. Preparing M4V Files for DVD Burning
- Part 2. Choosing the Right DVD Burning Software
- Part 3. 3 Tools to Burn M4V to DVD
- Part 4. Troubleshooting and Tips
- Part5. FAQs
Part 1. Preparing M4V Files for DVD Burning
Before converting M4V files to DVDs, thorough preparations are essential to ensure the process runs smoothly. Below are the detailed hardware and software requirements that need to be met.
Hardware Preparations
To complete the M4V to DVD burning process, the following hardware is necessary.
• Computer with a DVD drive: Ensure your computer has a built-in DVD drive. If not, you should buy an external DVD drive and connect it to the computer.
• Blank DVD discs: Prepare appropriate blank DVD media based on your storage needs and drive compatibility. Common options include DVD-R and DVD+R, which are compatible with most DVD players. And ensure the disc capacity matches the total size of the M4V files you intend to burn.
Software Preparations
To convert and burn M4V files, you’ll need reliable software that supports M4V input and DVD output. Some tools also offer editing and menu customization features.
Part 2. Choosing the Right DVD Burning Software
Different M4V to DVD authoring software has different characteristics. Some excel at simplicity, while others offer more advanced features. Here’s a comparison of the best DVD burners based on key parameters:
| Software | Compatibility | Ease of Use | Video Editing Tools | Price | Output Quality & Speed | DVD Menu Creation |
| DVDStyler | Windows and Mac | Easy | Basic | Free | Good, slower on large files | Basic templates |
| DVD Creator | Windows and Mac | Easy | Advanced | Free/Paid | Fast & high quality | Rich customization |
| Nero Burning ROM | Windows only | Moderate | Advanced | Paid | Excellent, hardware optimized | Rich customization |
Part 3. 3 Tools to Burn M4V to DVD
Below is a detailed introduction to three reliable M4V to DVD burning tools, including step-by-step operation guides, unique features, advantages, and disadvantages.
DVD Creator
Blu-ray Master picked DVD Creator is designed specifically to simplify the process of converting M4V to DVD. It can not only burn M4V to DVDs on Mac and Windows, but also perform video editing, menu design, subtitle addition, etc., making it a complete tool that combines creation and output.
Free Download
For Windows
Secure Download
Free Download
for macOS
Secure Download
Core Features:
• Supports H.264-encoded M4V files without the need for pre-conversion.
• Provides multiple menu templates with customizable backgrounds, buttons, and chapter structures.
• Built-in video editor: trim, crop, add watermarks, and adjust brightness/contrast.
• Flexible output formats: DVD discs, DVD folders, and ISO images.
• Supports multiple audio tracks and subtitles, ideal for multilingual content distribution.
Usage Steps:
Step 1. Download and Installation
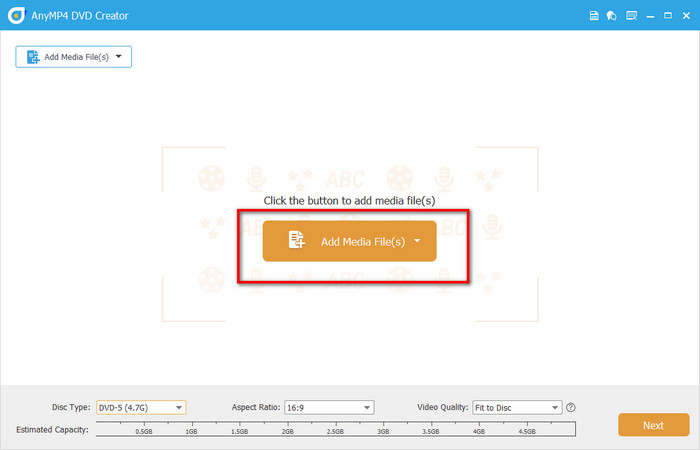
Download and install the software on your computer. After launching it, click the DVD Disc button, and then click the Add Media File(s) button to upload your M4V video files.
Note: Ensure that you have inserted a blank DVD disc into the computer before uploading your video files.
Step 2. Edit M4V Videos (Optionally)
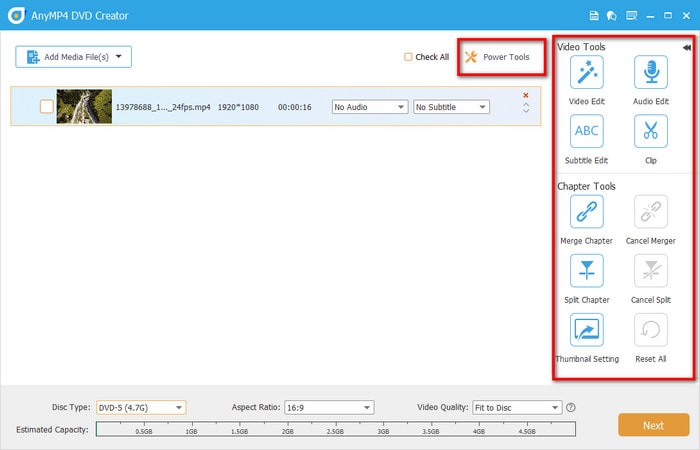
Click the Power Tools button to edit your videos by clipping, cropping, rotating, adding subtitles & watermarks, and adjusting effects. Also, it allows you to merge chapters, split chapters, and adjust thumbnail settings. After that, click the Next button to continue.
Note: The bottom bar allows you to change disc type, aspect ratio, and video quality.
Step 3. DVD Menu Creation
Navigate to the Menu Template tab, and choose a suitable menu for your DVD, such as wedding, holiday, family, travel, etc. Also, you can add background music, change the background, and add an opening film in the bottom bar.

Step 4. Start Burning
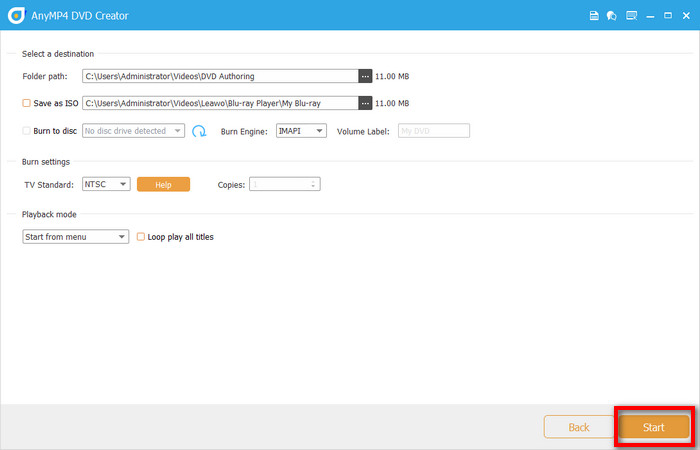
Then, click the Burn button to select the destination, burn engine, TV standard, and playback mode. Finally, click the Start button to start burning M4V to DVDs.
In general, DVD Creator is an all-in-one tool that combines editing, design, and burning, suitable for users who want to improve the quality of their DVD products and save time. If you are looking for efficiency and professionalism, it is definitely worth a try.
DVDStyler
DVDStyler is one of the best free DVD burning software that supports various video and audio formats, including M4V, for creating DVDs. It can meet simple DVD burning needs, but lacks exclusive optimization for M4V. Therefore, it is suitable for users with limited budgets who only need basic M4V burning functions.
Core Features:
• Supports MPEG-2 encoded videos (but M4V needs to be converted beforehand).
• High degree of freedom in menu design: customize backgrounds, buttons, and text links.
• Supports jumping between multiple pages of menus and chapters.
• Multiple audio tracks and subtitles can be added.
• Cross-platform support: Windows, macOS, and Linux.
Usage Steps:
Step 1. New Project Settings
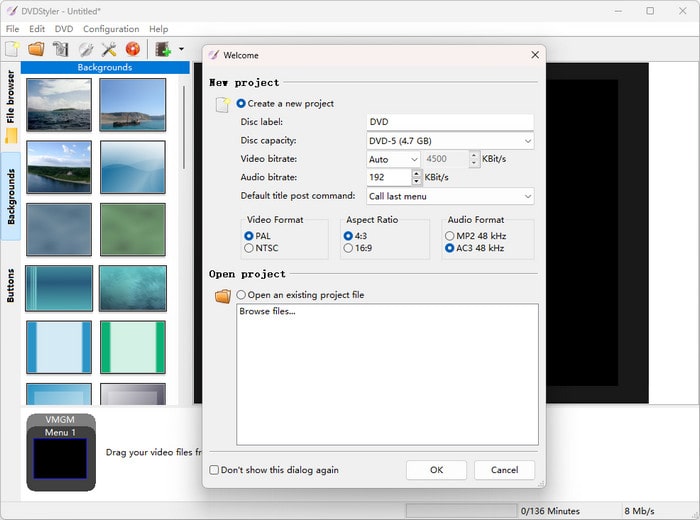
Download and install DVDStyler first, and run it on your computer. Then, set the relevant information for the new project in the pop-up window, including disc label, disc capacity, video bitrate, audio bitrate, video format, aspect ratio, and audio format.
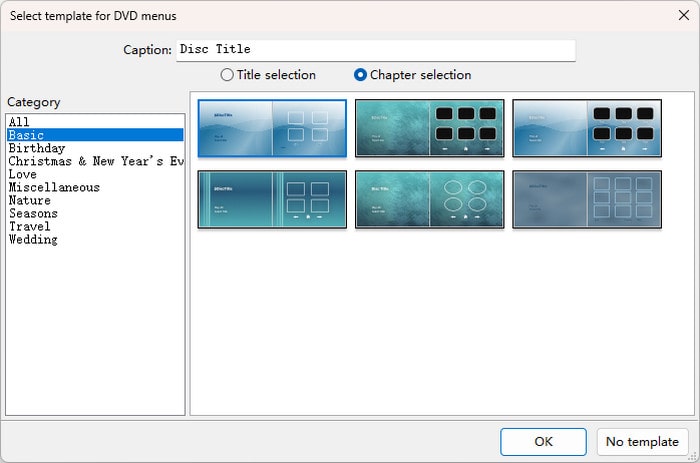
Step 2. Select DVD Menu
Then, select a suitable menu for your DVD in the pop-up window, including basic, birthday, love, nature, etc., and click the OK button to continue.
Note: If you don’t want to add a DVD menu, just click the No template button.
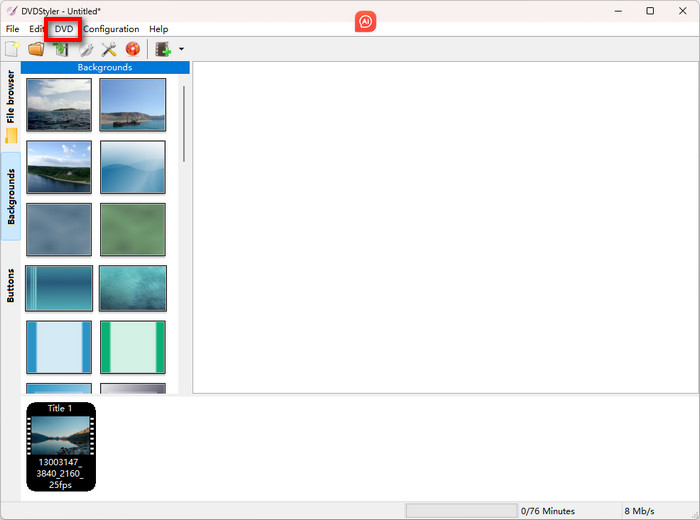
Step 3. Add M4V File
You can click the DVD button to upload your M4V video that needs to be converted. Also, you can drag and drop it directly to the DVDStyler timeline.
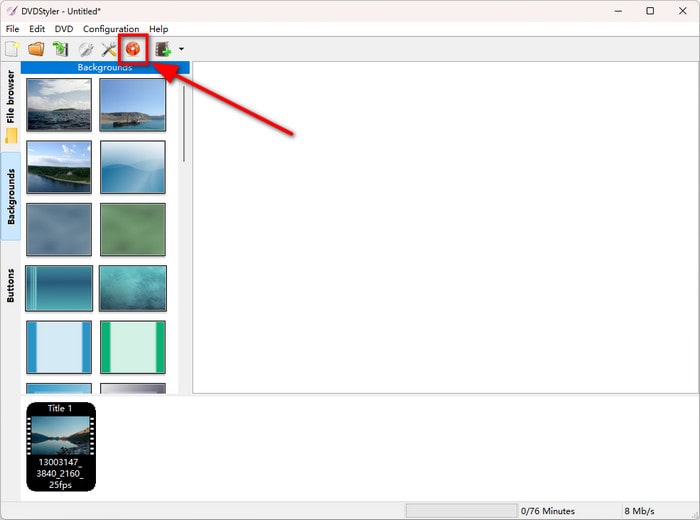
Step 4. Start Burning
Click the orange icon in the top left corner to start the DVD burning. Then, click the Start button in the burn menu screen that pops up below. And you will see the progress of the burning process.
Note: Before starting the burn process, remember to insert a blank DVD disc into a built-in or an external DVD drive.
Overall, DVDStyler is a tool suitable for users with limited budgets who have certain requirements for menu design. It lacks video editing functions and cannot edit or adjust effects, making it suitable for users who have already processed M4V videos and want to burn them directly.
Nero Burning ROM
Nero Burning ROM is a long-established disc burning software renowned for its stability and versatility. Although it does not focus on M4A to DVD authoring, it excels in data burning, ISO management, and disc copying, making it ideal for users who need quick backups or bulk burning.
Core Features:
• It supports multiple disc types: CD, DVD, and Blu-ray.
• It has a high-speed burning engine with multi-threading support.
• It has the ability to create ISO images and erase rewritable discs.
• This software can be used with Nero Video for video editing.
Usage Steps:
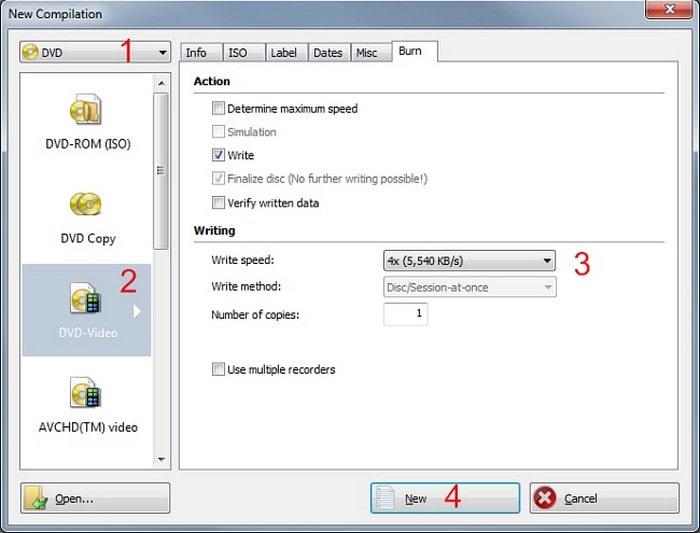
Step 1. Adjust DVD Settings
Open Nero Burning ROM and insert the DVD disc into the computer. Select DVD from the drop-down menu in the New Compilation window and click the DVD-Video button to adjust write speed and write method. After that, click the New button.
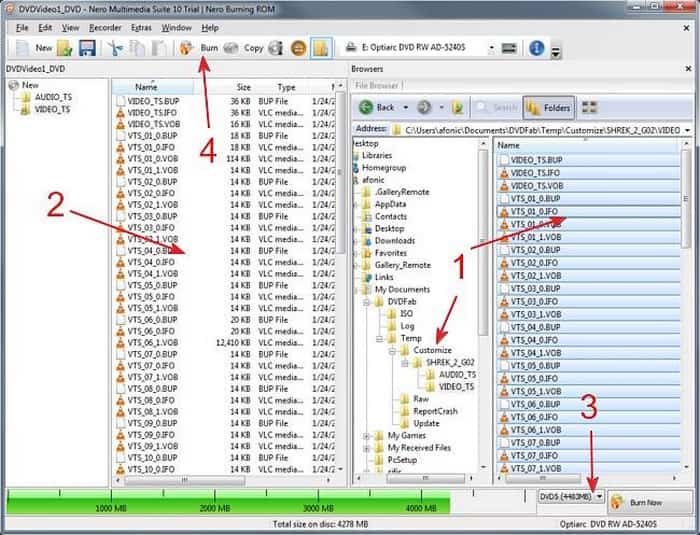
Step 2. Add M4V Files
In the following interface, choose the M4V video from the right side that needs to be converted and drag it to the Video_TS folder on the left panel.
Step 3. Output Settings
Then, select the DVD type as the output format at the bottom. After that, click the Burn button on the top toolbar.
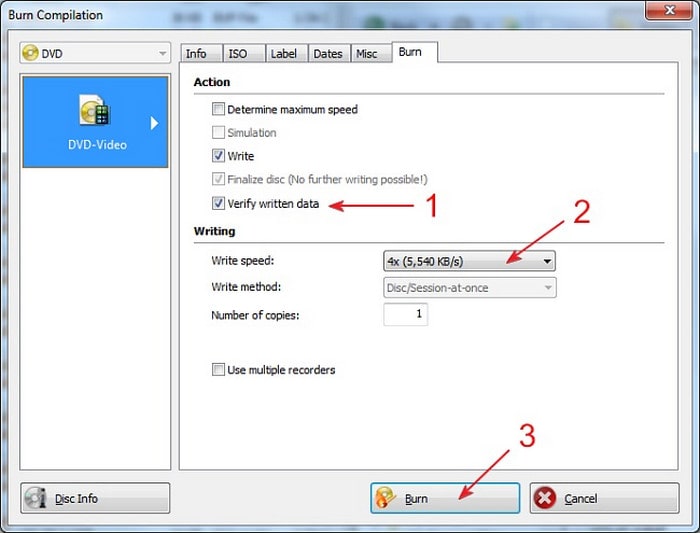
Step 4. Start DVD Burning
You can verify the written data and set the write speed and write method again. Finally, click the Burn button to complete the DVD burning process.
When using Nero Burning ROM to burn M4V files, my overall impression is that it is stable but not very intuitive. Its burning engine is very mature and supports multi-threaded processing, performing particularly well when burning large amounts of data or batches of files. However, the lack of built-in video editing or menu design functions is also frustrating.
Part 4. Troubleshooting and Tips
Even with the right software and workflow, DVD burning can sometimes run into unexpected issues. Below are common problems and expert tips to help ensure your M4V to DVD project goes smoothly.
• DVD won’t play: The most frequent cause is an unfinalized disc or using media incompatible with the playback device. Use reliable branded blank discs and ensure the software performs a ‘finalize’ step after burning. Also, slower burn speeds (like 4x or 8x) tend to produce more stable results, especially for older players.
• Audio/video sync issues: It is recommended to avoid multitasking during burning, use software with stable encoding (like DVD Creator), and ensure frame rates match.
• Burning speed vs. quality: High-speed burning (e.g., 16x or above) saves time but increases the risk of write errors or edge distortion. For important or archival projects, prioritize slower speeds to ensure data integrity and consistent video quality.
• DVD format compatibility (PAL vs. NTSC): PAL is used in Europe, China, and other regions; NTSC is standard in North America and Japan. Choose the correct format based on your playback region to avoid issues like flickering, color distortion, or playback failure. Some software offers automatic conversion, but manual confirmation is recommended for compatibility.
Part 5. FAQs
-
Can I burn iTunes movies to DVD?
No, you generally cannot burn iTunes movies directly to a DVD. Most movies purchased from the iTunes Store are protected by Digital Rights Management (DRM). This protection prevents copying or burning the movies to a DVD using standard iTunes functionality.
-
Is it legal to remove DRM?
It depends on your country’s laws. In the U.S., bypassing DRM, even for personal use, may violate the DMCA. In some regions (like parts of the EU), limited DRM removal for personal backup may be allowed.
-
How long does DVD burning take?
Burning a DVD can take anywhere from a few minutes to over an hour, depending on factors such as the DVD burner's speed, the amount of data to be burned, the type of disc (single or dual-layer), and whether the data needs to be encoded into a DVD-Video format. For a single-layer DVD, a 16x speed burner might take around 4-6 minutes for a full disc, while a dual-layer disc can take 15-20 minutes at 8x speed.
Conclusion
From selecting the right software and preparing compatible video formats to troubleshooting and optimization techniques during the burning process, this guide provides you with a clear and practical process to burn M4V to DVD. And we have learned three popular DVD burners, among which Blu-ray Master picked DVD Creator performs well in terms of burning speed, video editing, and DVD menu creation. Download it and take action now!