Jun 06, 2025Posted by Kevin Miller to Create DVD
Windows Media Video, known by many as WMV, is a video compression format developed by Microsoft. This video format has a small file size with reasonable video quality. That’s why many use it for streaming videos over the internet and playback on Windows-based devices. Although it is highly compatible with Windows Media Player, it doesn’t play on DVD players. This post will demonstrate two solutions to burn WMV to DVD using top reliable tools. By doing so, you will be able to transform your digital media into a format that’s readable by standard DVD players. This way, you can watch your digital videos on a big screen for better viewing.

- Preparation Before Burning WMV to DVD
- Way 1. Burn WMV to DVD with Blu-ray Master DVD Creator
- Way 2. Burn WMV to DVD with DVDFab DVD Creator
Preparation Before Burning WMV to DVD
WMV to DVD burning isn’t something you can just jump into without preparation and planning. You need the right tools and materials before you can begin. Below is a breakdown of what you’ll need before starting the burning process.
DVD Burner
A DVD burner is a piece of hardware used to write data onto a blank disc. It can be either an internal DVD drive or an external DVD burner. Most desktops and some older laptops come with built-in optical disc drives. If your system doesn’t have a pre-installed disc drive, you can use an external drive that connects through USB. Without this, you won’t be able to create a disc.
Video to DVD Burner Software
Aside from the hardware, you’ll still need video-to-DVD burner software . This specialized software helps you turn your video files into playable DVDs. A tool like DVD Creator, chosen by Blu-ray Master, is built to convert video formats such as WMV into a DVD-compatible structure with a menu interface. Unlike default OS burners, this software ensures your DVD can be played in standard DVD players with proper formatting.
A Blank DVD Disc
The most important material you need is a blank disc to store the converted video content. DVDs have two types: DVD-R and DVD-RW. The DVD-R is a write-once format ideal for final copies you won’t change. DVD-RW, on the other hand, is a re-recordable format that you can reuse. Also, don’t forget to check the disc capacity: DVD-5 (4.7 GB) for standard videos or DVD-9 (8.5 GB) for longer content.
Way 1. Burn WMV to DVD with Blu-ray Master DVD Creator
DVD Creator , picked by Blu-ray Master , is a powerful DVD-burning and authoring software. It’s compatible with Windows 8/10/11 and Mac OS X 10.9 and later. It is built to convert WMV to DVD with the option to save it as an ISO file. With it, you can load multiple WMV files and burn them at once. You can customize your DVD projects by adding audio tracks and subtitles.
In addition to burning functionalities, DVD Creator comes with built-in editors like Video and Chapter Tools. You can also freely adjust the disc type, aspect ratio, and final video quality. DVD Creator has a rich library of menu templates. Plus, it supports both NTSC and PAL TV standards to ensure compatibility with DVD players worldwide.
Here’s how to write WMV to DVD:
Step 1.Start by downloading the DVD Creator, preferred by Blu-ray Master, for free. Install the WMV-to-DVD creator software and allow the installation process to complete. Once finished, put the blank DVD into the disc drive and launch the software.
Free Download
For Windows
Secure Download
Free Download
for macOS
Secure Download
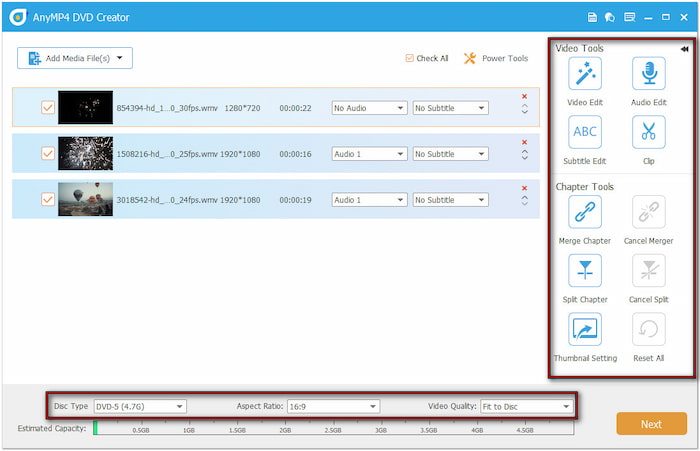
Step 2.Upon opening the software, choose the DVD Disc option as your disc type. Click the Add Media File(s) button to add individual WMV files. Otherwise, use Add Media Folder to import WMV in batch from a single path directory.

Set the disc type (DVD-5 or DVD9), aspect ratio, and video quality before you proceed. Use the Power Tools, like video tools and chapter tools, to make edits. In Video Tools, select Video Edit to access tools like rotate, clip, crop, apply effects, adjust effects, and insert watermarks.
Step 3.In the DVD Menu window, choose a pre-designed menu template on the right navigation pane. You can also customize your menu by adding background music, uploading an image, and inserting an opening film. But if you prefer to burn DVDs with no menu, check No Menu.
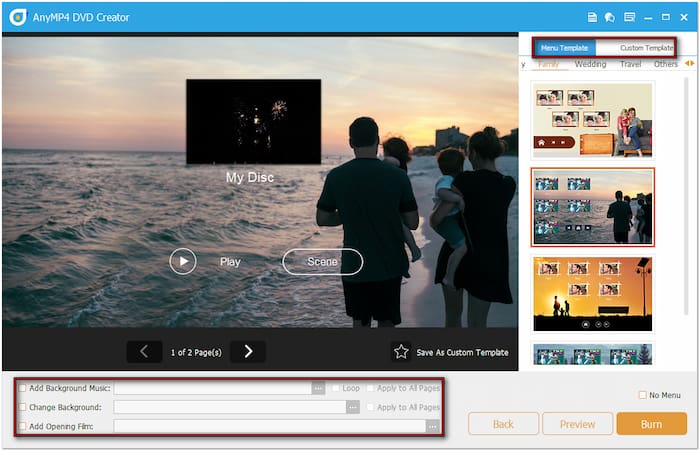
Professional Tip: Click the Preview button to see how the DVD menu will appear before burning. Once satisfied with your DVD menu customization, click Burn for the next step.
Step 4.Click the Folder Path field in the Burning Settings window to specify your output directory. Then, check Burn to Disc and select your disc drive from the pulldown menu. Configure other settings to ensure an error-free playback and click Start to initiate the burning.

Important Note: Select a TV Standard that aligns with your region to ensure the disc will play correctly. If unsure about your region’s standard, click Help for assistance in selecting the appropriate standard. You can also check Save as ISO to create a backup ISO file.
Way 2. Burn WMV to DVD with DVDFab DVD Creator
DVDFab DVD Creator is a premium DVD-authoring software made to convert WMV files to DVD. This software lets you burn any video files, including WMV, to a physical disc, ISO file, or even a VIDEO_TS folder. It provides an advanced settings option for configuring the final DVD output. However, DVDFab DVD Creator doesn’t provide chapter creation.
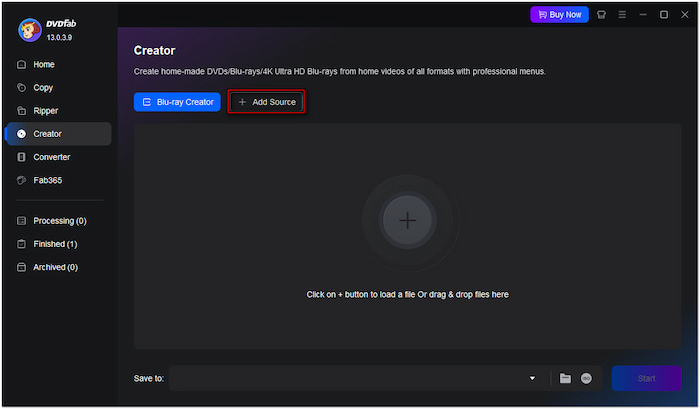
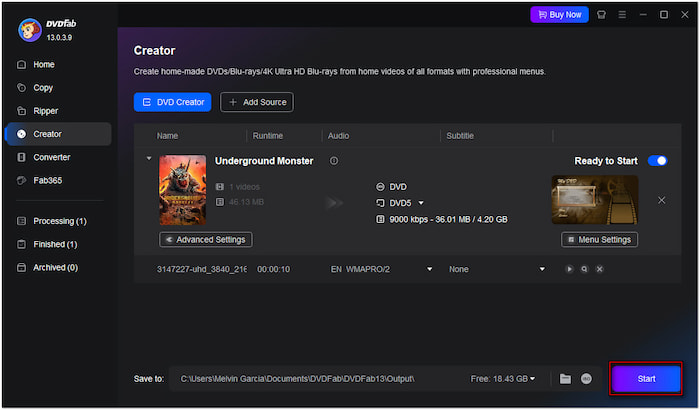
Step 1.Insert the blank disc in the external DVD drive’s tray and run DVDFab DVD Creator. By default, it will take you to the Home tab; move to the Creator section. Click the +Add Source button to import the WMV from your local files.
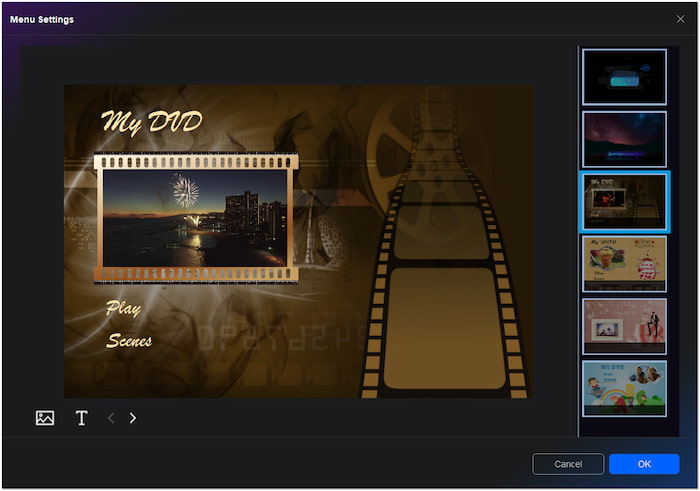
Step 2.Proceed to the Advanced Settings to specify the disc type, TV standard, aspect ratio, and playback mode. If needed, you can add external subtitles to your DVD movies. Optionally, navigate to the Menu Settings to create a menu for your DVD.
Step 3.After all the settings are set, click the Save To field and select your external DVD drive. Alternatively, click Folder to save the output as a VIDEO_TS folder or ISO to create an ISO file backup. Once everything is set, click Start to convert the WMV file to DVD format.
Important Note: The software slows down the conversion process with larger files. This means it takes more than an hour to complete the burning process with high-quality videos. Please note that since it is premium software, you won’t be able to burn WMV to DVD for free.
Wrapping up
This post showed four effective ways to burn MOV to DVD on Windows and Mac. Among the tools presented, DVD Creator, picked by Blu-ray Master, stood out for its powerful features and broad compatibility with MOV and DVD. If you want a complete tool to customize menus and enhanced video quality, DVD Creator offers an all-in-one solution.
More from Blu-ray Master
Digital to DVD