
May 22, 2020 12:01Posted by Kevin Miller to Screenshot
Screenshots benefit you in many ways, when you want to capture the funny moments on a video call, or capture the important photos of an online conference.
From most Windows computer, you can easily find the PrtSc key to take the screenshot. However, when it comes to Microsoft Surface, you may ask why they miss the key.
That’s what we will talk 5 free capable ways to take screenshots on Surface, whether you are using the Surface tablet or personal computer.

Though Print-Screen key has been removed since Surface Pro 3 on either Type or Touch accessories, Microsoft leaves another a straight way to take screenshots on Surface.
This method works when you are using the Surface in the tablet mode without connecting to the Type Cover.
Surface Pro 3 and earlier models: Just press and hold the Windows button located on the tablet’s screen, and press and release the Volume down button on the side.
Surface Pro 4 and newer models: Press and hold the Power button and press and release the volume up button on the side.
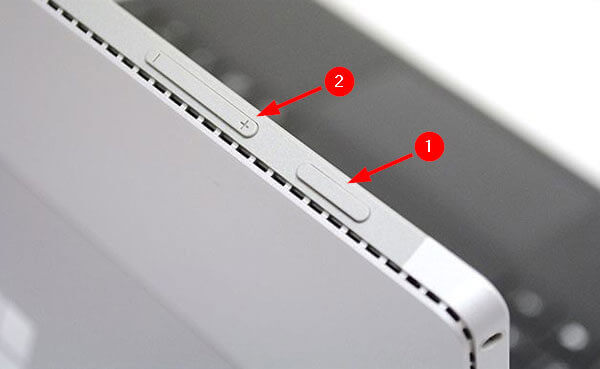
After that, you will find the screen dims and back to bright again, which indicates the screenshot is done.
All screenshots in this way will be saved in a folder named Screenshots under Pictures library on your Surface.
If your Surface device is equipped with Type Cover, then you can easily take the screenshots by using the keyboard combinations.
Press the PrtScn and release it to make the full screenshot on Surface.
Press Alt + PrtScn key to take a screenshot of the active window on Surface.
After that, you can paste the screenshot to Paint, Word or other programs you prefer to.
For saving the screenshot on Pictures library, you need to hold down the Windows key and then press the PrtScn key at the same time.
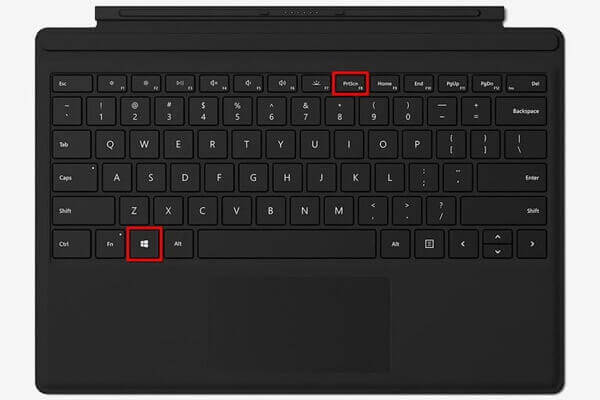
Note: Cannot find PrtScn on Surface Pro 4? Just press Fn + Windows + Spacebar to take the full screenshot successfully.
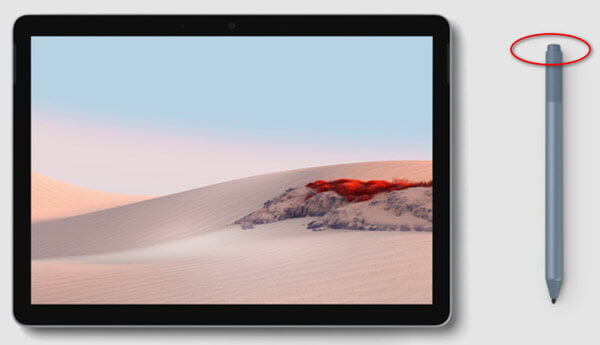
Surface Pen ($78.99) has been created to service with better functions on Windows. One of the new features is Screen Sketch, which can print screen and offers the editing features like drawing, cropping, etc.
Just double-click the eraser button on the top of your Surface Pen. Then click Save as to export the screenshot on Surface.
Before exporting the screenshot, it lets you edit the screenshot like edit, crop, etc.
Apart from the above solutions to take screenshots on Surface, another built-in tool in Windows you should not miss is Snipping Tool.
Snipping Tool is the simple screenshot tool, which can let you capture the Surface screen in 4 modes.
Go to search on Surface and type Snipping Tool for searching.
Open Snipping Tool, and select the screenshot mode from the drop-down options of Mode (Free-form Snip, Rectangular Snip, Window Snip and Full-screen Snip).
Then it will take a screenshot immediately. You can use the editing features like pen, highlighter, eraser, etc.
After that, click File and select Save Snip to save the screenshot as PNG, GIF, JPG or HTML.

Every screenshot you made; you need to launch this software again.
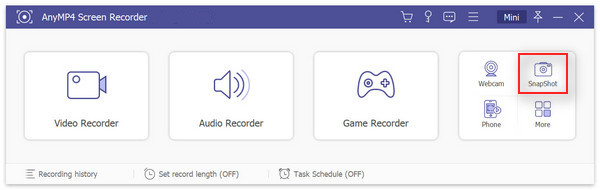
Another free screen capture software for Surface is Free Screen Capture. It is the free screenshot taken software on Windows and Mac computer. It is the screen recorder program to capture the video, audio, webcam and take screenshot images on computer.
Now, let’s use this free screenshot capture software on your Surface computer.
Select Screen Capture
Free download this software from the above download link, and run it. Initiate the window, select Screen Capture.
Take a screenshot on Surface
While you select Screen Capture, a cross pointer will appear, you can hover your mouse to the window, or left-click and move the mouse to select the screenshot area, while leasing the mouse, you will get the screenshot.

Save screenshot on Surface
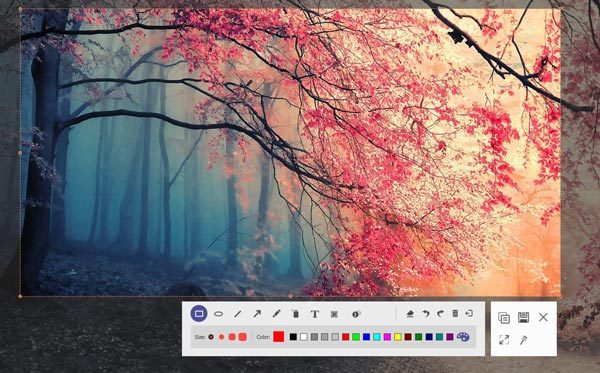
Then you will enter the editing window, where you can draw the screenshot with pen, add callout, add caption, pin to screen, and more. After all the settings are made well, just click Save to export the screenshot on your Surface computer.
Conclusion
Taking screenshots of a movie, video call, game, conference, etc., will be the easiest way to access what you want. When you use the Surface computer, the screenshot process comes to be a slightly different from that on Mac or other Windows computers. This page collects 5 easy free ways to take the screenshots for Surface.
Which one is your preferred one?
Leave your comments below.
More Reading
How to Burn a Photo/Video Slideshow to DVD on Mac without iDVD
Here you can get the detailed steps to burn slideshow to DVD on Mac. Just read and learn how to make a DVD slideshow with your photos, videos and music files.
How to Record Audio on iPhone without Losing Quality
Looking for the method to record audio on your iPhone? You are at the right place since we share three ways to complete the job without losing information.
[DVD to MPEG Converter] How to Copy DVD to MPEG-2
How do I convert DVD to MPEG-2? Is there any free DVD ripper or MPEG converter can easily rip DVD disc to MPEG format? This post shares 3 simple ways to help you convert DVD to MPEG-2 with high quality.
How to Convert MTS and M2TS Video Files to DVD on Windows and Mac
This guide introduces the detailed steps to convert MTS and M2TS files to DVD. You can get free and professional MTS to DVD converters to create DVD discs with ease.