
March 07, 2024 09:40Updated by Brittany Garcia to Screenshot
Taking a screenshot is a part of daily desktop tasks and is already a built-in function on any device. But for some users, one screenshot feature is not enough, especially if virtual activities require flexibility or accessibility. But in the case of Windows, a screenshot can be part of the screen, including specific areas, windows, or fullscreen. To fully recognize all of the screenshot options and hotkeys, read the following demonstration.
Part 1. How to Screenshot a Specific Area on Windows
Throughout the years, Windows has provided built-in features to make a dependable desktop. And each version had different ways of capturing virtual activities. Take a look at the various options, together with the snipping tools and alternatives.
Built-in Screenshot Hotkeys
Considering your hardware, the most common hotkey is the Windows Logo Key + PrtScn buttons. It is the standard shortcut key, but other hardware can use the PrtScn button only. Additionally, Fn + Space Bar + Windows Logo Key is an alternative way to screenshot on Windows. When pushing the right buttons, your screen will briefly flash, indicating a screenshot was taken.

To locate the image, launch File Explorer and locate the Picture folder from the navigation pane. Inside the Screenshots folder, you will find the screenshots.
Keep in mind that the shortcut keys are only for fullscreen mode. If you need flexible modes, like half screen or a window, use the built-in snipping tool.
Snipping Tool
Snipping Tool was released in 2007, along with the first introduction of Windows Vista. It is included as a built-in function on Windows 7, Windows 8, and Windows 10. By the release of Windows 10, Snipping Tool became Snip & Sketch, the updated version with more offered features and is also included on Windows 11.
All Supported Modes:
- Free-form Mode- allows the user to draw any shape to screenshot specific screens on Windows.
- Rectangular Mode- enables a rectangular shape that can be on any screenshot size.
- Window Mode- captures any open window or tab on the screen in full size.
- Full-screen Mode- captures the whole screen, including the taskbar.
How to take a screenshot of a specific area on your PC using Snipping Tool or Snip & Sketch:
Step 1.Press the Windows Logo Key + Shift + S buttons simultaneously.
Step 2.When the screen darkens, choose a mode from the top part of the screen. The app will open automatically for further editing.
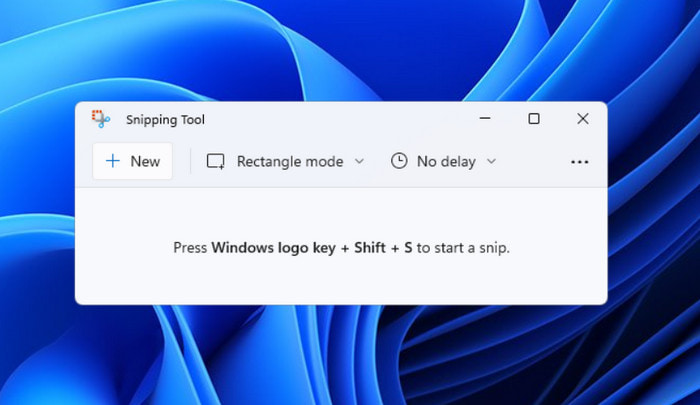
Step 3.Click the Save button and choose a designated location. Alternatively, click the Copy button to paste the image to other platforms.
Having the Snipping Tool as a default screenshot tool on a computer is a huge advantage. Provided it has more screenshot options, you can capture any area of the screen with hotkeys.
Game Bar
In addition to built-in screenshot tools, Game Bar was introduced on Windows 10, especially for gamers. It is a dynamic function that elevates the gaming experience. Along with multiple solutions, Game Bar offers its impressive Screenshot Mode, allowing you to capture photos of epic battles. While it is a built-in function, you need to start setting it up. Then, you can learn how to screenshot on a Dell laptop in a specific area. Just follow these steps:
Step 1.Open settings on your desktop and search for Game Bar settings. Simply toggle on the button, then press the Windows Log key + G.
Step 2.From the Widget menu, choose the Capture option. Then, click the Screenshot button. To simply access this mode, press the Windows Logo key + Alt + PrtScn simultaneously.
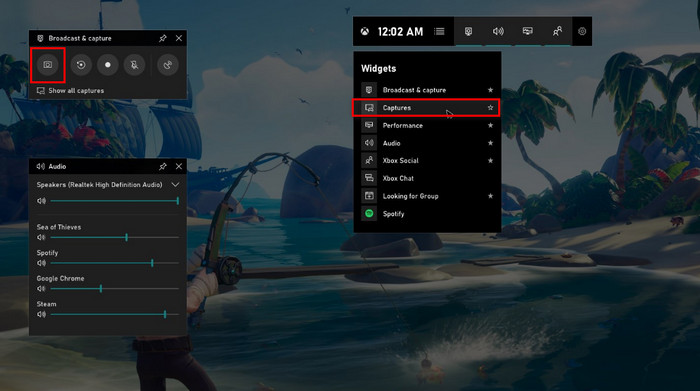
Step 3.When a notification appears on the screen, click on it to view the screenshot. You need to reassess the Game Bar, then proceed to the See My Captures menu to view recent screenshots.
With the Xbox Game Bar, you can easily record gameplay on Windows. Also, it reveals analytics on your PC, including CPU, resources, and the overall performance.
Screen Recorder
How to screenshot something specific on Windows with high-quality? While all built-in screenshot modes on your PC are accessible, some screenshots may appear blurry. That’s why Screen Recorder by Blu-ray Master is recommended to download for high-quality pictures. Its screenshot tool provides customizable screen size, allowing you to capture at any length without lowering the quality. On the other hand, you can customize the shortcut keys to easily access the different screenshot modes on your keyboard. Moreover, Screen Recorder not only saves images in one format but also supports JPEG, PNG, TIFF, BMP, GIF, and more. Check out the supported screenshot modes by Blu-ray Master Screen Recorder on Windows and Mac:
- Fullscreen snapshot.
- Pop-up menu capture.
- Scrolling window.
- Browsing window or tab.
- Free-hand capture.
Step 1.Get Screen Recorder from the official website and install it on your computer.
Free Download
For Windows
Secure Download
Free Download
for macOS
Secure Download
After the installation is done, run the program and select the Snapshot option from the More menu. Your cursor will change into a crosshair grid for capturing.
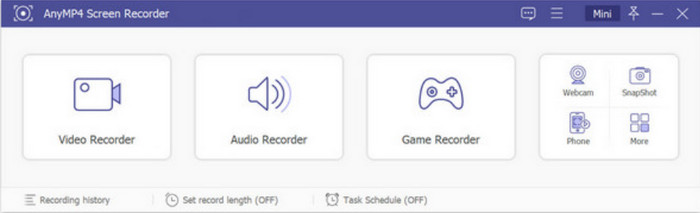
Step 2.How to take a screenshot of part of the screen? Hover the center of the crosshair to select part of the screen to screenshot. You may long-press while moving your mouse. Let go, and the screen recorder will take a screenshot. The built-in image editor will appear on your screen, allowing you to apply text, shapes, numbers, and other elements.

Step 3.Other options included on the widget are Copy to Clipboard, Pin to Screen, Scrolling Windows, and Fullscreen. Once done with editing, click the Save button. The screenshot will be stored on the Local Disk within the AnyMP4 Screen Recorder folder.

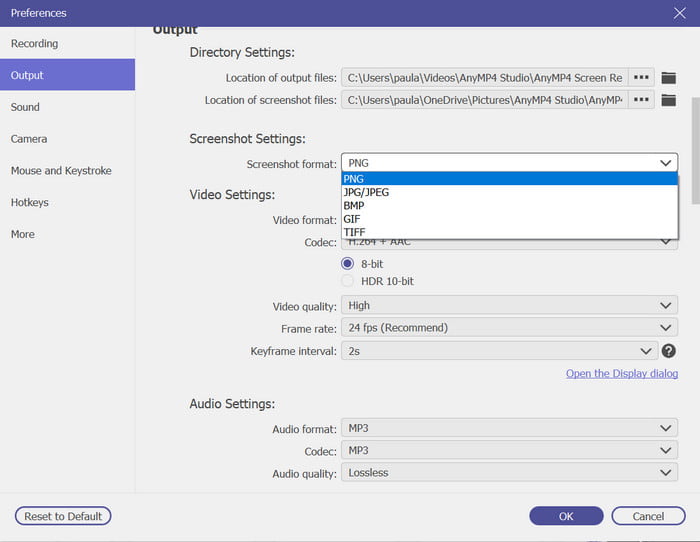
Step 4.If you wish to change the designated location or the image format, select the Menu list and choose the Preferences option. Go to the Output menu and change the Location of Screenshot Files and Screenshot Formats. After editing the output settings, save the changes by clicking the OK button.
Blu-ray Screen Recorder is the best way to screenshot the full screen, selected areas, and others. Other than this, it also offers professional screen recording tools for supported platforms.
Part 2. How to Screenshot Part of the Screen on a Mac
Several screenshot features are embedded on Mac, whether it is an older or newer version. Like Windows, the user can access the screenshot function with combinations of buttons on the keyboard. Here, you can explore various screenshot shortcut keys and where you can find all the images taken.
List of all Screenshot Shortcut Keys:
- Screenshot the Entire Screen- Press Command + Shift + 3
- Capture a Windows 10 screenshot selected part of the screen- Press Command + Shift + 4. Drag the cursor to the desired area to capture.
- Capture an Opened Window- Press Command + Shift + 4 + Space bar. Click the window to capture.
- Screenshot Touch bar from MacBook Pro models- Press Command + Shift + 6.
- Screenshot and Copy to Clipboard. Press Command + Control + Shift + 3 to capture the entire screen. Press Command + Control + Shift + 4 for the selected area. Note that this function will not save the photo automatically. It is temporarily saved on your clipboard, which you can paste on any platform.
All screenshot photos are automatically saved on your desktop. But if you have macOS Mojave or later, the screenshots will be directly saved in the Screenshot folder.
There is another way to capture onscreen content on your Mac. The Screenshot app is a default tool that has all the screenshot modes. On Mac, how to screenshot part of the screen? You only need to press three buttons: Shift + Command + 5. This will allow you to open the app and use its modes. The only drawback with the app is other programs like Apple TV do not allow taking screenshots. But it is still a helpful alternative to take a screenshot on Mac.
List of Supported Screenshot Modes:
- Fullscreen
- Selected Area
- Selected Window
- Video recordings
- Toolbar (MacBook with the toolbar feature)
All taken screenshots are located in the Screenshot folder on your desktop. By default, the images are named Screen Shot [date] at [time].png. You can change the location folder on the Screenshot app from its Options menu.
Part 3. FAQs about Windows Screenshot Part of the Screen
-
Where do Snipping Tool Screenshots go?
All screenshots on Windows are located mainly in the Picture menu within the Screenshot folder. Similar to Mac Mojave and later, a dedicated screenshot folder will be the default location.
-
Why is the Snipping Tool not working?
The Snipping Tool might be disabled on your computer’s settings. To check on it, go to the Control Panel and the Programs menu. Then, select the Turn Windows features on or off. Also, check the Tablet PC Optional Components to enable the Snipping Tool.
-
Is there a snipping tool for Mac?
Yes. Any Mac version has a default snipping tool included. The best part is that the upgraded version of the Screenshot app allows you to instantly capture images and video recordings.
-
What is the shortcut to crop a picture on a Mac?
You can crop the picture on the Photos app. Just double-click the picture and click the Edit button from the menu bar. Then, choose the Crop option and select the desired area to crop an image on Mac. Save the cropped image once done.
Wrapping up
And there you have it. You quickly learn how to screenshot parts on the screen on Windows and Mac, along with shortcut combinations to easily access different screenshot modes. Additionally, the Blu-ray Screen Recorder is the suggested alternative for any desktop screenshot with its extensive screenshot modes like scrolling windows. Try it today and share this article with a friend.
More from Blu-ray Master
- How to Capture Still Image from Videos in Windows Media Player
- How to Take a Scrolling Screenshot on Windows and Mac [Solved]
- How to Take a Full-Screen or Scrolling Screenshot on Samsung
- Crop a Screenshot on Windows 11/10/8/7 (Full/Scrolling/Window Screen)
- How to Screenshot on Firefox of Webpages and Videos
- How to Take a Full or Partial Screenshot in Minecraft [2024]