

Sep 18, 2026Posted by Kevin Miller to Create DVD
Quick Summary:
When selecting a program to burn ISO to DVD on Mac, the three most reliable options are Blu-ray Master DVD Creator, Finder & Disk Utility, and the macOS Terminal. All you need to do is find the best uses of each software, which are the following:
For Professional DVD Writing: Blu-ray Master DVD Creator
Modern Built-in Solution on Mac: Finder & Disk Utility
For Advanced and Developer-level Users: macOS Terminal
During the rapid rise in the popularity of digital media, the use of cloud storage and online streaming has grown so much that it has become the standard for media consumption. Unfortunately, their digital background made these copies feel ephemeral; the feeling of ownership is simply absent. This exact sensation made the comeback for physical backups and copies a must-have for home entertainment collections. In this article, we will provide a solution for this problem by providing a detailed tutorial on how to burn ISO to DVD on Mac. The program we will tackle in this article will also solve the absence of native optical drives on Apple computers alongside our tutorials on writing digital ISO backups to shelf-ready and playable DVDs.
- Part 1. Radical Transparency: How We Tested
- Method 1: The Professional & Creative Solution — Blu-ray Master DVD Creator
- Method 2: The Modern Native Route — Finder & Disk Utility (With a Twist)
- Method 3: The Developer/Geek Route — macOS Terminal
- Part 5. DVD Burning Information You Should Know
- Part 6. FAQs About Burning ISO to DVD on Mac
Part 1. Radical Transparency: How We Tested
To provide an objective and comprehensive review of the programs we will feature, we tested how each software works on a modern macOS computer. As such, the device we used for testing runs on the latest macOS Sequoia, has 16 GB of RAM, and uses an M5 Apple Silicon chip. To maximize compatibility, we used the official Apple SuperDrive as the external DVD driver.
Afterward, we used specific tracking metrics such as burning speed, disc compatibility on DVD±R/RW, menu customization features, and the success rates of each tested method to ensure that any DVD coaster side effects will be prevented.
Now that the device we used for testing, as well as the methods used for it, are discussed, let us move forward to the tutorials and quick reviews of the best authoring tools to write ISO digital copies on DVD using macOS computers.
Method 1. The Professional & Creative Solution — Blu-ray Master DVD Creator
We will begin our recommended methods by presenting the most professional option to write ISO images to DVDs with Blu-ray Master DVD Creator for Mac. This program works best for users who prefer quality and the look and feel of commercial-grade store-bought DVDs.
It has customizable DVD menu templates, background music, and frames. Designing your DVD menu exactly like commercial DVDs is easy when using Blu-ray Master DVD Creator.
However, despite its superb customization options, the program’s user interface is surprisingly intuitive and very easy to use. Most of its workflow options are highly simplified and use a drag-and-drop system to bypass the technical barriers of macOS.
For users who want to apply basic adjustments to their videos, you will also have access to built-in trimmer, cropper, and watermark tools before burning. Moving on to the burning process, the program’s GPU acceleration will ensure fast burning without data corruption.
To learn how to use the program, make sure to read our three-step guide below. Do not forget to download it as well for an easier time following our tutorial.
Free Download
For Windows
Secure Download
Free Download
for macOS
Secure Download
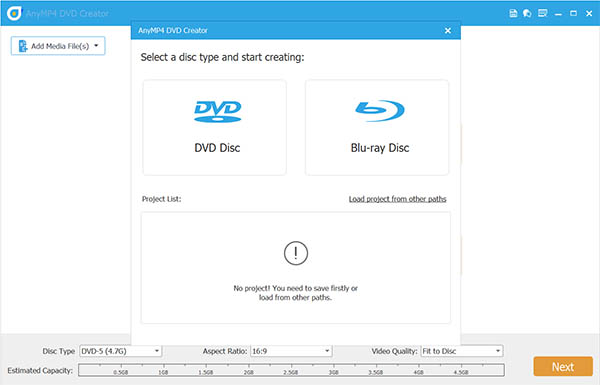
Step 1.Connect the Apple SuperDrive or the external DVD driver you will use. Then, open Blu-ray Master DVD Creator and select the DVD Disc option.
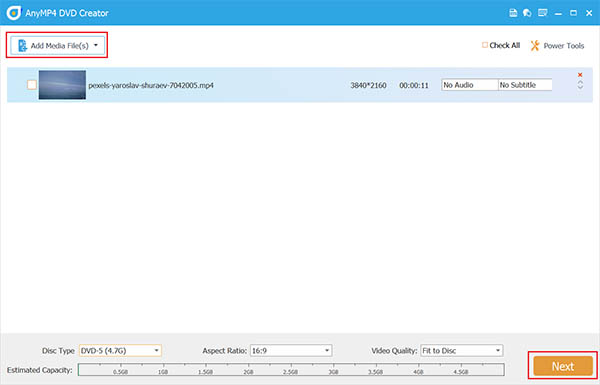
Step 2.Once the blank DVD has been loaded, select Add Media Files and browse through your files to find the ISO image you want to write to the DVD.
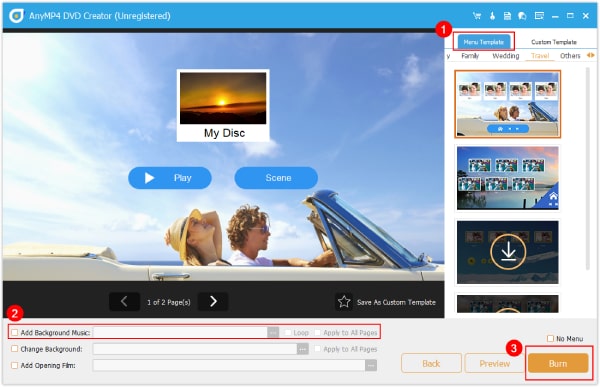
Step 3.With the ISO image now loaded, you can now add a menu to the DVD using templates, or add background music to the menu. Once you are done setting up the menu, select Burn to start writing the ISO content to your DVD.
Although Blu-ray Master Free DVD Creator is the only method in this article that isn’t a built-in option, it offers the most reliability, even compared to other tools native to macOS.
Method 2. The Modern Native Route — Finder & Disk Utility (With a Twist)
Next, we will present the no-installation, quick-fix option for fast DVD burning on Mac using Finder and Disk Utility. Before using this option, make sure that the ISO file you will write is clean and does not need any editing, as the Disk Utility tool lacks any editing options.
Despite the lack of customization, this program still gets the job done if you are only looking to burn the ISO image simply and you are not concerned about the menus and other customization options.
Before using this option, keep in mind that it does not write a playable ISO file. Instead, it writes the data stored on your ISO archive. Think of it more like copying than writing playable data to your DVD.
Step 1.Load the DVD you want to burn on your Mac computer.
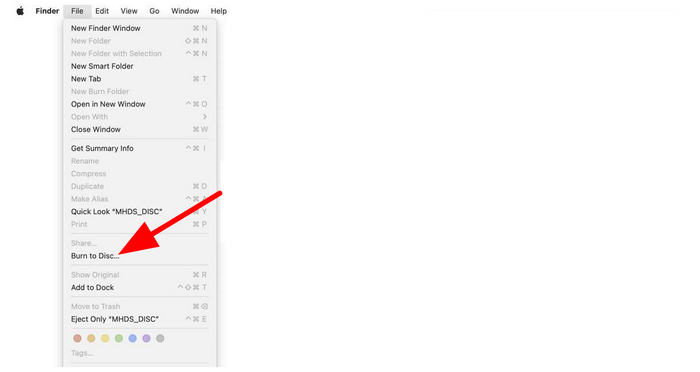
Step 2.Next, find the ISO file you want to burn and click on it. Then, select File and click on Burn to Disc or Burn Disc Image.
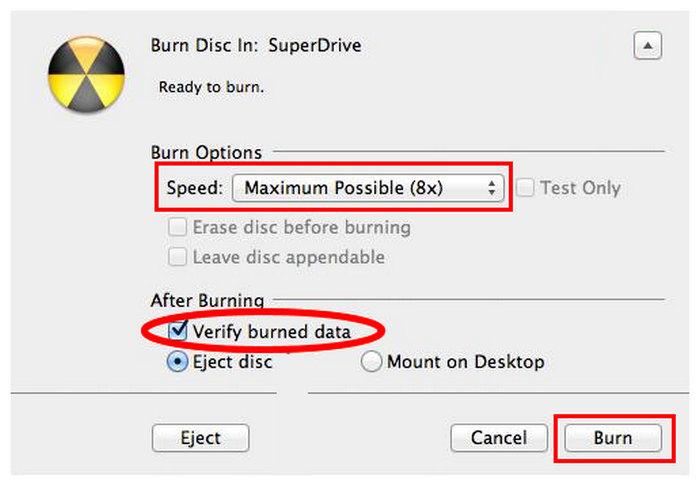
Step 3.In the Burn Settings, enable Verify Burned Data, set the Speed to your preferred option, and select Burn.
If your concern is creating physical data backups, the combination of Finder and Disk Utility to burn an ISO is a reliable enough solution. Just remember that this program does not work if you want to create playable DVDs similar to commercial releases.
Method 3. The Developer/Geek Route — macOS Terminal
Finally, the third option we will present is the most advanced option for burning an ISO to DVD on Mac in exchange for code-level precision when writing data. This is none other than using the Mac Terminal to burn ISO via writing specific codes and scripts.
Among the options on this list, using Terminal codes is the fastest way to burn ISO content. However, its lack of a proper GUI makes using it very intimidating for beginners. Fortunately, the command for burning is simple to apply, making it one of the best free DVD burning software options if you are already familiar with scripts and basic codes.
When using it, make sure to avoid errors when writing file paths where your ISO images are saved in your file manager.
Step 1.Load the blank DVD into your external DVD driver. Then, open the Terminal software.
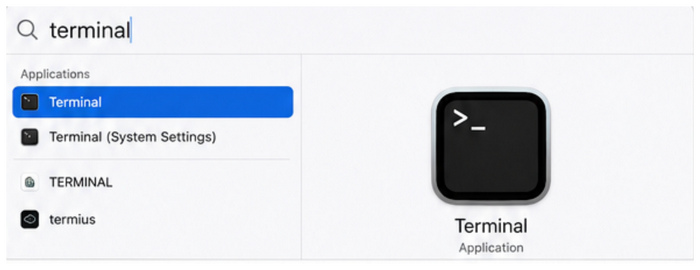
Step 2.Once Terminal is open, locate your ISO file, then drag and drop it into the Terminal.
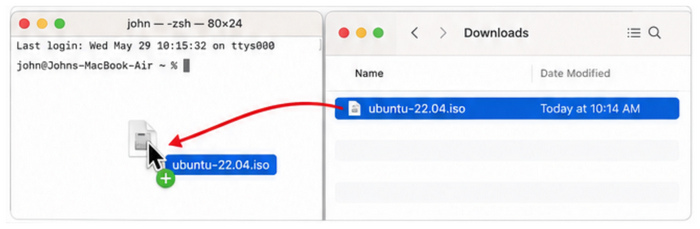
Step 3.When your loaded ISO file is written in the Terminal, write the following code beside the ISO path: hdiutil burn /Users/Your Name/Downloads/iso file name.iso. Make sure to change the name after the Users section to the name of your computer, then write the name of the ISO.
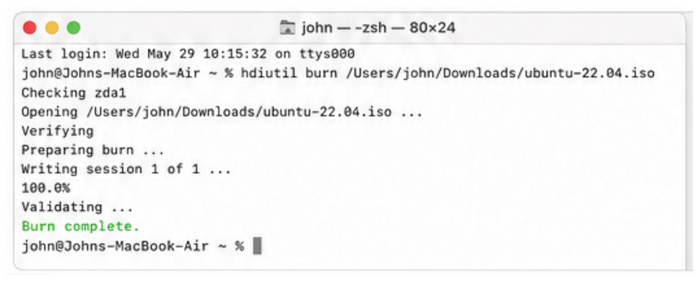
If you plan on using this option, you will be able to enjoy its complete lack of software footprint since you burn the ISO image to the DVD via commands and without using any authoring tool. However, it has a steep learning curve for beginners since it completely lacks any visual feedback or menu.
Part 5. DVD Burning Information You Should Know
Hardware Realities
Since one of the issues of MacBooks is the lack of a built-in DVD driver, you have to learn how to choose the right external DVD drive to access DVDs on your modern macOS computer. In this case, we highly recommend using the official Apple SuperDrive or a third-party USB-C DVD drive to maximize your Mac's performance.
Disc Formats Demystified
When choosing a DVD, you also need to learn how to pick the right DVD type. Some of the more popular options are DVD-5, DVD-9, DVD-R, and DVD+R. Among them, we recommend using DVD-R for bootable ISO, DVD+R for data backups, and DVD-5 or DVD-9 for playable videos.
The “Playability” Secret
When writing ISO files on DVDs, you have to understand the difference between data backups and playable DVDs. If you are having trouble playing DVDs on physical media but it runs well on your computer, your DVD might be written as a data backup disc. Make sure to learn first how you are going to use your DVD before burning data to it.
Part 6. FAQs About Burning ISO to DVD on Mac
-
Why does my Mac say “no burnable drive found” when I plug in my external DVD writer?
Your external drive is not being detected as plugged in. Double-check its physical connection to your computer. Also check your driver’s manual to see if it requires any setup to run properly.
-
Will a DVD burned from an ISO on a Mac play on a standard home Blu-ray or DVD player?
It depends on how it was burned. To play them on DVD players, make sure to write your ISO content as playable data. Also be sure to use a DVD-5 or DVD-9 disc.
-
How do I fix the “Disc burning failed” or communication error on macOS?
Re-run the DVD burning process. If it fails again, double-check the connection of your driver and the quality of your disc. These two are the most common reasons for communication errors when burning DVD data.
-
Can I burn a Windows 10/11 ISO to a bootable DVD using a Mac?
Yes, you can. You can write a bootable copy of a Windows operating system to a DVD on a Mac. Just make sure that you are using a DVD-R disc when writing a bootable OS.
-
Does M1/M2/M3 Apple Silicon support ISO burning via native tools?
Yes, they do. Apple Silicon chips support burning ISO to DVDs. You can use native tools such as Disk Utility and Terminal commands.
Conclusion
While hardware evolves and digital media grows, physical preservation remains king when it comes to privacy and reliability. As such, learning how to burn ISO files to DVD on Mac is a practical skill. With that in mind, we hope that the methods we have provided in this article will be helpful for our readers who want to learn how to create physical backups. In this case, we highly recommend using Blu-ray Master DVD Creator for Mac for users who want to start learning with the most accessible DVD creator program.
Free Download
For Windows
Secure Download
Free Download
for macOS
Secure Download