Popular Ways to Trim Videos with Their Full Guidelines to Pursue

March 03, 2023 10:00Posted by Selena Thomas to Edit Video
There are many reasons why we trim videos. In our case, we cut or trim our recorded videos when we want to remove unnecessary parts, like the waiting part of the convent. In some cases, when we need to cut the advertisement that our video has, we will need to trim it. Furthermore, video trimming is an essential thing for those who aspire to be professional video editors by profession or by just the call of a task. As simple as it may look, trimming plays a significant role in making the videos look clean and sequentially organized when merged. Yes, trimming is a prerequisite of bigger and more technical video editing in the industry of professionals, for it is the highest fundamental block of editing.
Therefore, if you are a rookie and have formulated a nice music video or short movie in your mind but still do not know how to cut video clips, then here are the popular ways you should grasp. As the saying goes, let the babies be fed with milk first, but in your case, milk and solid food are prepared as you read the entire article content below.

If you are wondering what would be the best tool to trim, cut, or split videos on Windows and Mac, based on the public’s choice, it is the Video Converter Ultimate. It is a software you can use to convert media files and enhance, edit, and split videos like professionals do. In the case of beginners like you, you may still enjoy it without worrying about the process since it has a straightforward interface that is perfect for rookies. Furthermore, with the tool of the hour, the trimmer in Video Converter Ultimate can be accessed in two ways, one in the converter and one in the Toolbox. If you want to trim and at the same time change their format, then you can access the tool in the converter. But if you want a dedicated trimmer that will allow you to add segments, fast split, and apply fade-in and fade-out effects, then go to the Toolbox of this best video trimmer. In addition, this dedicated trimmer also lets you customize the output’s format, resolution, quality, framerate, encoder, zoom mode, channel, bitrate, and sample rate!
Meanwhile, you will be delighted to know that this amazing software can work and produce more than 500 file formats. On top of that, it promotes device security and smoothness, for it comes with advanced technologies such as hardware and GPU acceleration, ultrafast conversion, and Artificial Intelligence. It is really something that a video editor shouldn’t miss since it gives a full-packed performance. Not to mention, it also comes with a movie, music video, 3D, collage, and GIF makers that you will surely enjoy! Thus, let’s not miss the complete steps we have on trimming videos on Windows 11 and earlier and on Mac.
Key Features:
Obtain the Best Software
First and foremost, you must prepare for the acquisition of the software on your computer device. Download and install the software using the Download buttons available above for a quicker transaction.
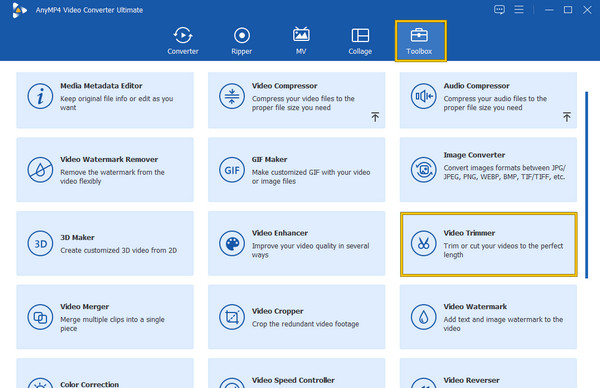
Open the Trimming Tool and File
Once you have obtained the software, begin to access the lossless video trimmer. Go to the Toolbox menu when you run the software, and look for the Video Trimmer option among the tools there. After that, click the Plus icon on the next window to load the video you want to trim.
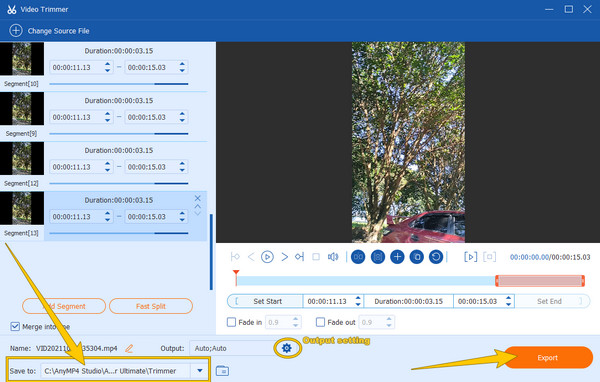
Begin to Trim
Now that you are on the trimming interface, you may begin to work. You can drag the red dragger to reduce the length of the video. Also, you can click the Fast Split tab and then the Add Segment buttons to apply their purposes. Please note that you can shift the sequence of the segments you split and click the Merge Into One tab to merge them. Please note that this is also the same procedure you can follow to trim a video using Mac.

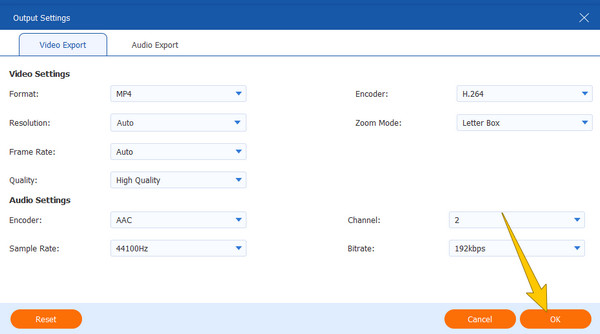
Customize the Output (Optional)
This time, you can optionally customize the output’s quality, framerate, encoder, zoom mode, resolution, format, etc. to do so, hit the Coggle icon at the bottom of the interface. Then, after the customization, hit the OK button.
Export the Trimmed Video
Finally, you can now hit the Export button at the bottom right corner of the interface. Wait for the exportation process to finish, and check your output in the file destination shown in the Save as dialogue box.
Moving forward are the three best tools to cut videos online. If you are one of those who are pleased with online tools, this part is the best for you to grasp. Below are the top three all-time favorite online tools used for video trimming.
InVideo is among the top online trimmers today. It is a free tool that can basically help you trim and cut the videos according to your desired length. Furthermore, it has an easy-to-understand interface and procedure thanks to the given instruction that will welcome you to its page. In addition, we were delighted to see its claim of supporting all types of video files, which means there is no way to experience importation errors due to incompatibility. Even though you can trim a video online for free, InVideo promised not to imprint a watermark on the output worked, which is also impressive for an online tool. However, it still holds cons you might not like, for it can only work on video files that are not more than 800 MB. On the other hand, if you are good with it, then here are the steps you can pursue.
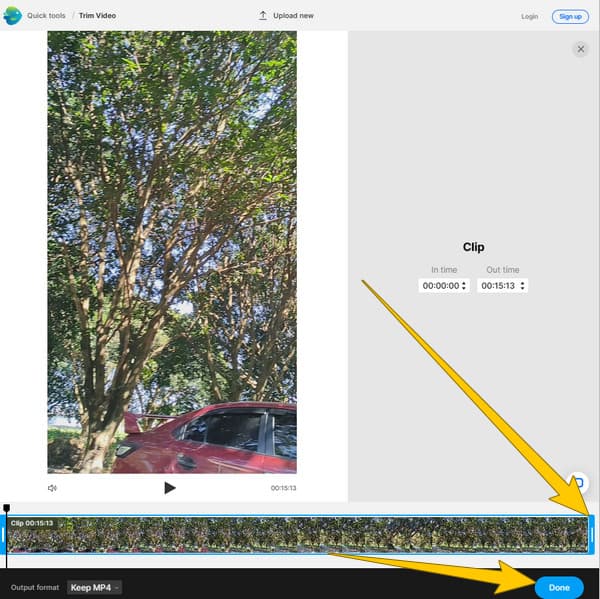
Upload the video you need to trim by clicking the Upload Your Video to Cut button. You will find this button when you arrive on its main webpage.
Then, on the trimming interface, adjust the blue dragger to trim your video. You will notice that even though you are done trimming the video online, you still need to wait for the uploading process to finish before saving the trimmed video.
When fully uploaded, the Done button will appear. By clicking this button, it will enable you to export the video.
Another online tool that hits the interest of the users is this EzGIf. It was initially a GIF maker that eventually added great tools for editing videos and, of course, GIFs. One of the added tools is its video cutter which is responsible for trimming files. Furthermore, it also offers a reverser, speed changer, cropper, rotator, and many more. Unlike the first video trimmer online, EXGIf can work with video files of a maximum of 100 MB for free. However, the only downside you can obviously notice is the pesky ads all around its page, which is a typical scenario for most of the free online tools. Hence, if ads don’t bother you at all, then you can follow the steps we provide below.
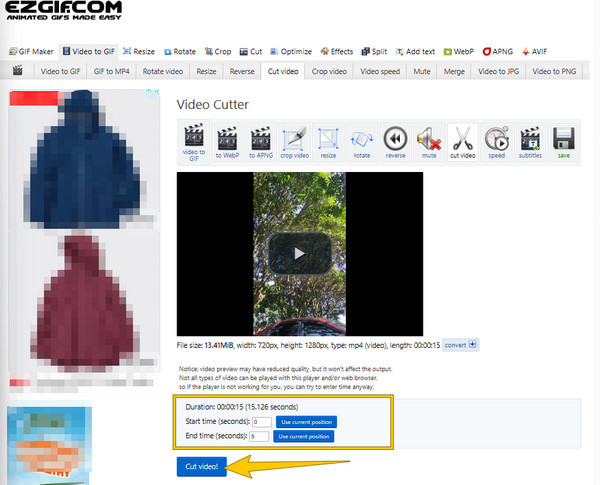
Launch your browser to visit the EZGIF video cutter’s main page and click the Choose File button to select your video file. Then, hit the Upload Video button to import the file to the cutter interface.
In the next window of the video trimmer of EZGIf, please set the start and end time duration to cut the video.
Once you obtain the perfect trim or cut for your file, click the Cut Video button and finish it by downloading the output.
Lastly, we have this Kapwing, the third of the most popular free trimmers online. Similar to the previous ones, Kapwing quickly cuts the videos according to its user’s desired duration. Furthermore, it also comes with a dragging trimming procedure, making the task easier. In addition, you are also free to cut, split and rearrange the clips to the perfect position as you wish in just a few clicks. However, this Kapwing video trimmer produces a watermarked output for its free service. But if you want to have an unwatermarked video, you can upgrade to its paid version anytime. Regardless, here are the quick guidelines for cutting a video using this third online tool.
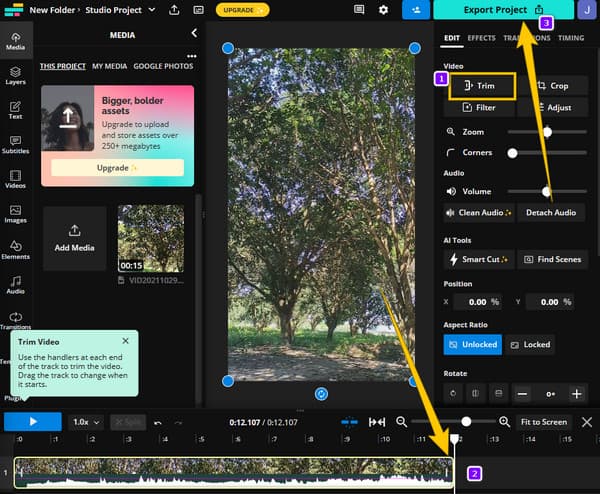
On the official page of the video trimmer of Kapwing, click the Choose a Video button. This will allow you to upload the video file.
When the video is loaded, hit the Trim option under the Video menu on the right side. Then, move our cursor to the timeline below, and adjust the video to trim.
After that, hit the Export Project button to save the trimmed video on your computer.
This time, allow us to show you how VLC trims a video. VLC is an open-source media player that everyone knows about. It lets you watch almost all types of video formats easily. Furthermore, you will be surprised that aside from being a media player, it also allows you to edit your video with editing functions. However, not everyone enjoys its editing functions due to the odd-looking videos when being cut. To help you with your video trimming using VLC, please be guided by the steps we provided below.
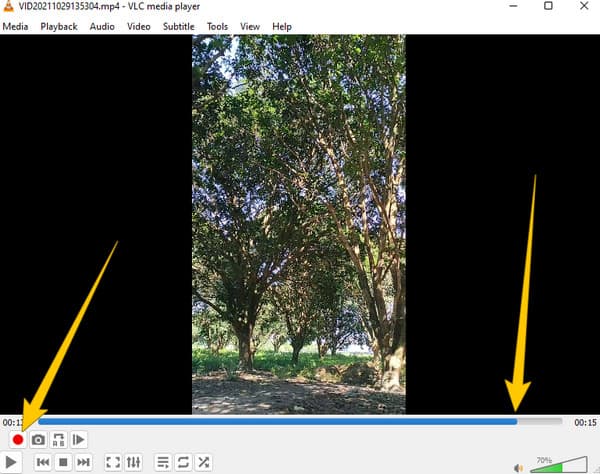
Suppose you already have VLC on your computer. In that case, run it and open the video you need to trim by clicking Media > Open File tabs.
When the video is ready in the VLC video trimmer, click the View menu and select the Advanced Controls tab from the given options. On the new playback window, determine the starting point where you want to begin your video.
Once determined, click the red Record button to start capturing the part of the video. Then, hit the Pause button on the part you want to eliminate and re-click the Record button to continue. After that, a newly trimmed video will be saved in the dedicated folder of your VLC.
Openshot is another open-source, free video editing software compatible with almost all operating systems. Like the freeware above, OpenShot is packed with all essential editing tools that are frequently updated. Before you trim video in OpenShot, you must also be aware of some tools in its toolkit, which are the speed changer, video rotator, text adder, and many more. However, to show leniency in this post, users of OpenShot experienced a cumbersome procedure for video editing. Hence, if you think this open-source tool is good for you, here are the simplified guidelines.
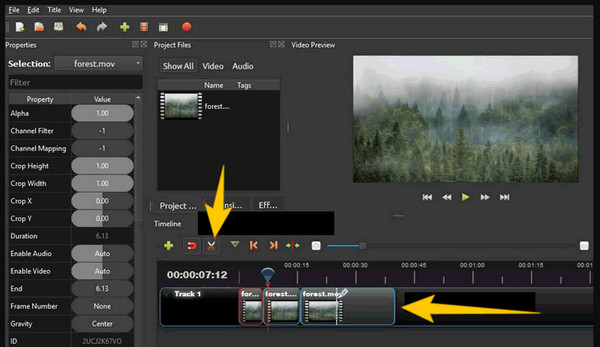
Launch the software after the installation process. Now, click the Plus icon placed at the upper ribbon menus when you reach its main interface. Clicking this will enable you to import the video you need to work on.
Once the video is in the timeline, start to drag the ends of the video to trim it. Then, if you want to split the video, click the Scissors icon.
When you’re done trimming the video, you now save the file. To do so, go to the File menu, and hit the Export Project option. Then, on the new window, click the Export Video button.
The answer is yes for those who ask if FFmpeg can trim videos. This professionally known command-based software can trim, convert, enhance, and do other editing functions to a video file. Again, FFmpeg is a well-known tool for professionals, especially those who are in the IT industry. For this reason, if you are a user who hates to see syntax commands in editing software, then FFmpeg might be too overwhelming for you. On the other hand, if you want to experience the thrill of this method, then feel free to follow what we prepared for you below.
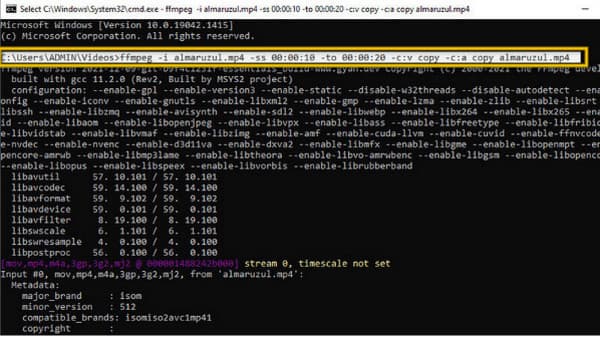
Download and install FFmpeg on your computer device, then open the CMD.
Now, go to the file folder where you placed the video you need to trim. To do so, please use the navigation command for this MP4 video trimmer. The syntax command is ffmpeg-ss-inputvideo.
After that, complete it by encoding the syntax to ffmpeg-ss00:00:10-iinput.mp4 -to-00:00:20-c: copy-c:acopyoutputvideo.mp4. Then, hit the ENTER key on your keyboard to apply. Once the command is completed, check the folder where the trimmed video is saved.
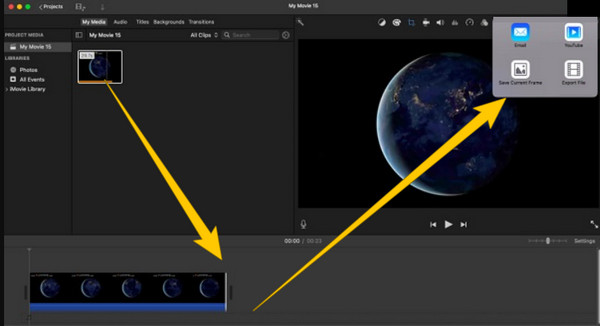
Let’s break from the desktop solutions and turn to a dedicated Mac tool, iMovie. It is pre-installed software that you can use for free if you are a Mac user. Furthermore, with its uncomplicated interface, beginners like you can use it to trim your videos on Mac easily. Regarding editing tools, iMovie has many options, including color correction, noise equalizer and reduction, clip filters, video trimmer, and many more. Meanwhile, to easily remove the unwanted parts of your video, you can freely adjust the play-in and play-out markers placed on the timeline. Moreover, this software supports regular video formats for Mac which are MKV and MOV. On top of that, with iMovie, you can freely customize your file’s resolution, format, and quality. Hence, we prepared simple guidelines for you to follow in case you want to know how to trim video iMovie.
On a Mac computer, launch the iMovie app. Then, hit the Import Media button and upload the video file you need to trim.
Once the video is uploaded, drag it to the timeline, where you can start trimming. Drag the ends of the video to achieve the trim you want.
After that, click the Export icon at the top right corner of the interface, and proceed to the exportation process.
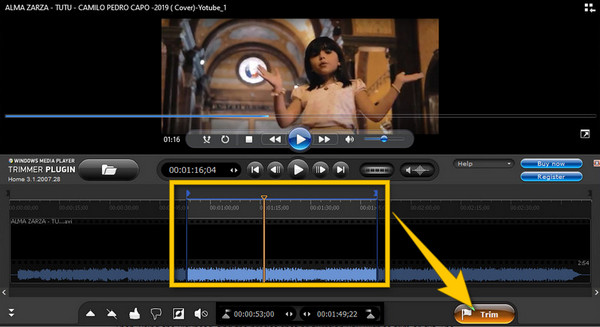
Going back to a Windows solution, let’s have its built-in media player, the Windows Media Player. As its name suggests, it is a media player exclusively for Windows desktops. Thus, if you want a direct video trimmer in a player, then trim your videos in Windows Media Player. Besides, you can crop videos in Windows Media Player. However, for the trimmer to take place, you must install a plug-in tool, namely SolveigMM WMP Trimmer integrated with the media player. Therefore, before proceeding to the steps below, please ensure you have installed the plug-in tool.
Launch the media player and infuse the plug-in by going to the Tools and clicking the Plug-ins option. Then, look for the SolveigMM WMP Trimmer and click it.
Now click the Folder icon at the bottom to upload the video file. After that, click the Edit File button to access the trimmer.
You can now work on the trimming process by indicating the video’s beginning and end. Then, hit the Trim button. A trimming process will prompt, and when it finishes, you can check the video in the preview.
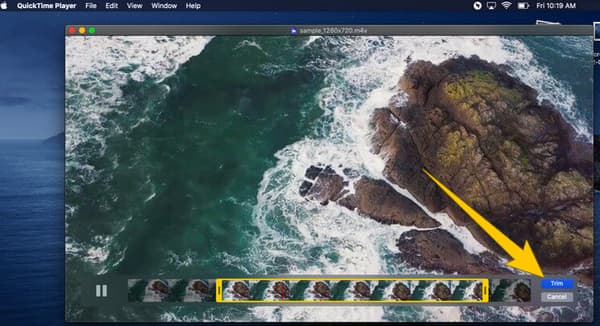
Another Mac solution that will strike you is QuickTime. And yes, you can use QuickTime to trim a video. In fact, its trimmer is just one of the editing tools that this software holds. Along with it are the rotator, flipper, splitter, and many more that you can use in addition to the trimmer. Although video editing is not the main purpose of QuickTime, it still passes the quality check of the output that is produced under it. Overall, QuickTime is enough to do some editing on the video you playback using it as a player. For this reason, the guidelines will lead you to use it on video trimming.
Start up your Mac and fire up the QuickTime player. Then, click the File tab followed by the Open File to browse and load the video you need to trim.
Once the video is playing, click the Edit menu and go to the Trim tab. Then, you can start dragging the yellow bars of the video and adjust the duration for cutting.
After achieving the desired cut, hit the Trim button. You can now proceed to the savings process by clicking the File menu and the Save button afterward.
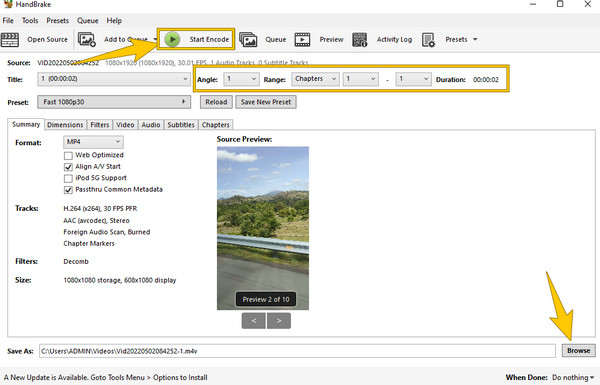
To finally end this content, we introduce the HandBrake to trim a video. HandBrake is free and open-source software you can download on all popular operating systems, such as Windows, Linux, and Mac. Furthermore, this free video editor has many features and tools you can freely use. The tools are for compressing, converting, and trimming. Moreover, you can also use HandBrake to edit the video dimensions, add subtitles, and add filters to the files. You also can use HandBrake to flip videos. Additionally, you can use this tool safely even though it is free while enjoying its easy-to-use interface. Thus, here are the steps to use Handbrake.
Install the tool on your device and click the File button to upload your video. Alternatively, you can just drag and drop the file on the interface.
Once the video is loaded, choose a file destination for your output by clicking the Browse button. Then, navigate the Angle and the Duration to trim your video.
After that, hit the Start Encode button to apply the changes, then save the file.
How to trim video in Final Cut Pro?
If you want to trim your videos in Final Cut Pro, upload the video to its timeline. Then, trim the video by dragging the bar of duration. Then, save it afterward.
Can I trim the video in PowerPoint?
Yes. to do so, open the video using PowerPoint, then go to the video tools. Then, click the playback option on the ribbon menu and look for the trim video option.
How to trim a video on Snapchat?
Open the video from your camera roll, and tap the edit video option. Then, tap the button to trim, followed by the trimming adjustment. Afterward, tap the save icon to have a copy of the trimmed video.
How to trim a video in After Effects?
Open the video when you run After Effects. Then, split the video into 2 layers by clicking the CTRL+SHIFT+D keys. Then you can trim the video now by dragging the trimmer bar accordingly.
Woah! That is quite an overwhelming article about the famous video trimmers. We know that you will not use all, but at least use whatever captures your interest. If, after reading, you are still wondering which one is perfect for you to trim videos, then rely on the flexibility and robustness which you can find in Video Converter Ultimate.
More Reading
Top 6 MP4 Cutter Applications for Windows and Mac
If a video file is very large due to the length, here is a top list of MP4 cutters on desktop and online available to cut and split your video into clips.
3 Best Ways to Trim GIF on Windows, Mac, Online, and Mobile
How to trim GIF on your device? Let us solve that issue! Assimilate on how to trim a GIF using the different GIF trimmers that work best online and offline.
Top 8 Video Reversers for All Platforms and Devices
Meet the best video reverser apps that will quench your video-reversing task on various platforms. See which one can satisfy your cravings for the best editor.
How to Sharpen Videos Quickly: Ultimate Guidelines to Perform
Do you find it tricky to sharpen a video? Worry no more, for we have prepared the ultimate guidelines to do it quickly and efficiently. Click here to start.