How to Improve Video Quality in Premiere Pro in Full Guidelines

December 08, 2022 14:00Posted by Selena Thomas to Edit Video
Do you want to edit your videos like a pro, so you would like to use Premiere Pro? Then, this article is made to support you. We outlined the comprehensive steps on how to improve video quality in Premiere Pro, so it would be easier for you to do the task. As we all know, Premiere is not a tool for everybody. It has challenging navigation that requires knowledge to pursue. However, as the saying goes, if there’s a will, there’s a way, so if you want to learn it, then we’ve got you covered.
We understand where you are coming from. We agree that watching a substandard video is one of the most annoying things one may encounter nowadays. One may cling to the most popular video editing tool, like Premiere, to solve the issue. Thus, may you realize the importance of having excellent and straightforward editing software after reading the entire content below, together with the steps on how to make video quality better in Premiere Pro.
Premiere Pro is one of the high-end video editing programs for professionals. This editing program allows you to alter your video files by applying different effects and turning them perfectly. So then, since you are looking for a powerful tool that will professionally enhance your video, then no wonder why Premiere Pro is your choice. However, you should also know by now how tricky the navigation of this software is. Therefore, here are the comprehensive steps on how to improve the quality of video in Premiere Pro.
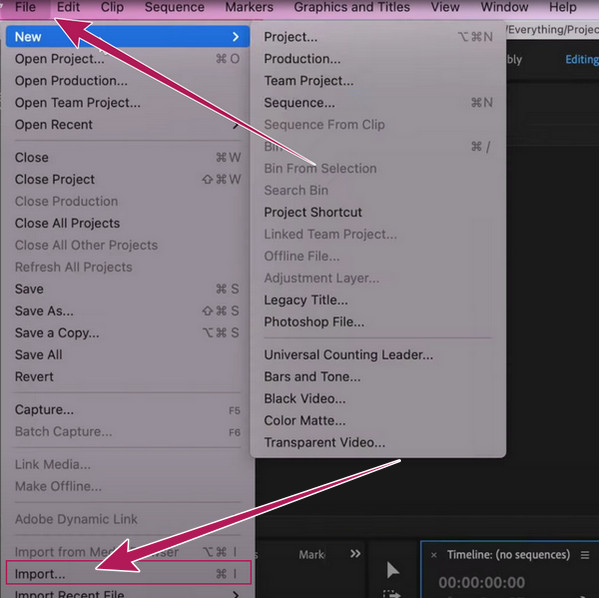
Launch the software on your computer. Then, Import your video file by going to the File menu and selecting the Import selection. After successfully uploading the file, you should drag it to the timeline.
Now once the video is in the timeline, go to the File icon from the right side of the UI to add effects to your video. Then, select the Adjustment Layer to make a new layer that you must drag to the timeline above your uploaded video.

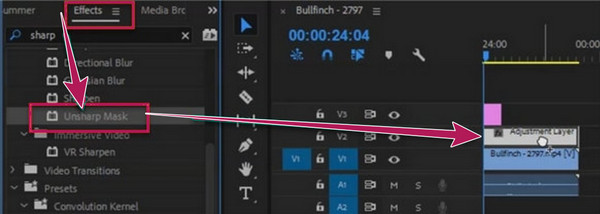
After that, you can start improving the entire video by sharpening it. Then, click the Adjustment Layer again, and go with the FX selection. Now, locate the Unsharp Mask option under Effects and drag it to the timeline.
You can now adjust the elements of the video to complete the enhancement. Use the parameter set to see various adjustments for the quality and choose a symbol to mask the part of your video. Consequently, you can already proceed with saving the file by following the steps on how to export video in Premiere Pro’s best quality below.

Exporting your file with Adobe Premiere Pro is crucial to maintaining quality. Although the process is overwhelming, you can still ensure the effectiveness you will see once the edited video is reviewed. So, how can you export without losing quality? Here are the steps.
Go to the File menu and locate the Export option. Now go to the Export Setting and make sure that the Preset is set to High bitrate.
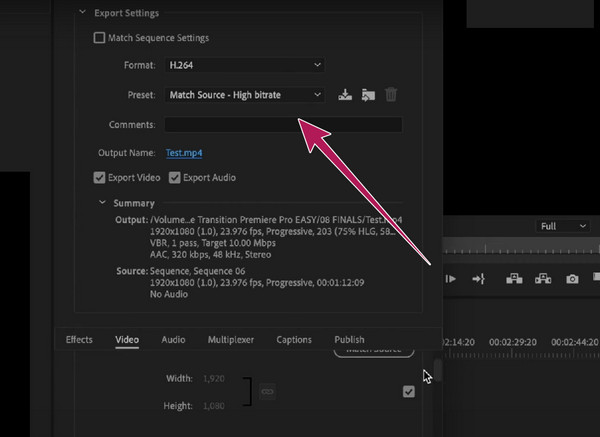
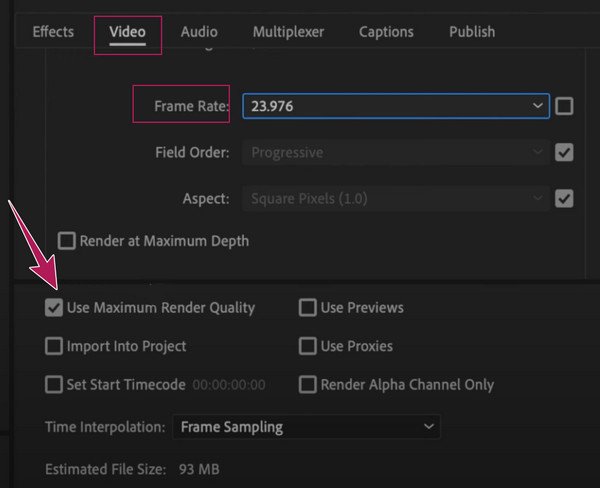
Now on the same window, move to the Video setting. Set the Framerate, and toggle the Use Maximum Render Quality option to have the best quality for your output.
Finally, you can now hit the Export tab on the window. Wait for the exporting process to finish, and check your newly exported file after.
Suppose you suddenly want another video editing tool with a much easier process but the same efficiency as Premiere. In that case, Video Converter Ultimate is the one. It is another video editing software with a premium set of tools and options at a much more affordable cost. Unlike how we change the video quality in Adobe Premiere Pro, Video Converter Ultimate lets you have a straightforward procedure. As a matter of fact, it will allow you to toggle the enhancement you wish to apply, such as the noise remover, shake reducer, resolution upgrader, and brightness and contrast optimizer. Then, you can already leave it to its AI-powered tool to do the job efficiently. This means It will only take three easy steps to fulfill your task. Also, you don’t need to worry about the exporting process, for it will definitely bring you excellent outputs with maintained quality!
You will surely appreciate its intuitive interface and its smooth process due to its acceleration technologies. Not just that, It lets you manually customize the resolution and the format of your video output according to your preference! Want to see more about it? Then rely on the information below.
Features
How to Enhance Video Quality in Premiere Pro’s Alternative
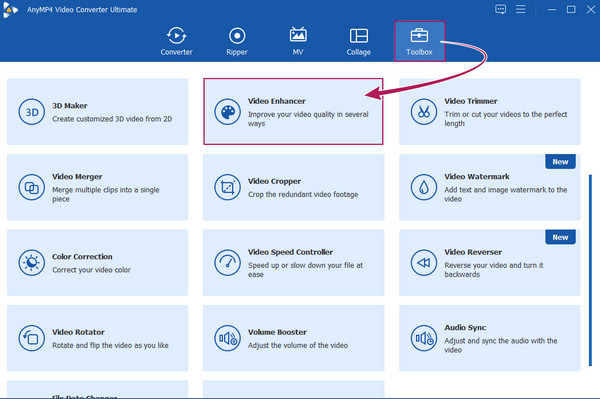
Upon installing Video Converter Ultimate on your computer, launch it. Then, go to its Toolbox, look for the Video Enhancer tool, and click it. Now, load your video format quickly after clicking the Plus icon from the next window.
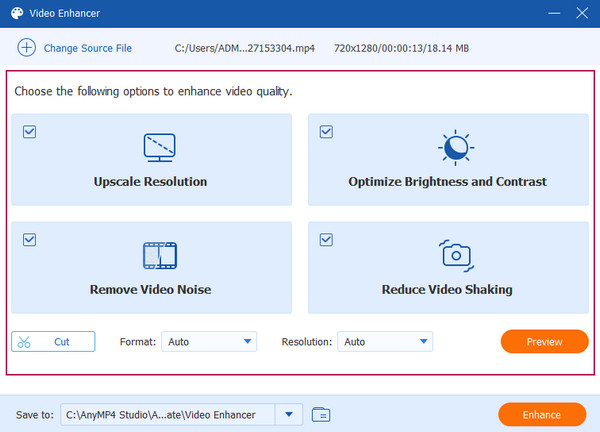
Once you select and upload your video, it will bring you to its AI editing window. Here, it would be best if you toggled the enhancements that you want to apply to your video, like stabilizing videos. Also, you can navigate the Resolution and Format if you wish.
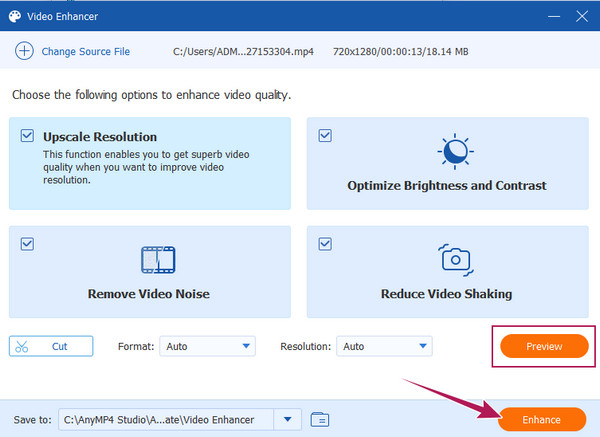
After that, you can click the Preview tab to see your video before saving it. Otherwise, directly click the Enhance button to proceed with your video file’s quick transformation and exportation.
Do I need to mask the video to enhance the quality in Premiere?
Yes. Masking the video will lead the video to add great effects and enhance your video more profoundly.
Is enhancing video using Premiere Pro free?
Yes, if you use the 7-day free trial. After the trial, you can no longer use it for free unless you want to subscribe to its premium account at $20.99 a month.
Can I edit my 8K video in Premiere?
Yes. Premiere Pro is an advanced tool that supports high-resolution videos such as 8K.
Why does my video reduce in resolution with Premiere Pro?
Usually, when you enhance the video using Premiere Pro and do not make the settings into the maximum quality render, the video reduces in resolution. It frequently happens to allow faster enhancement and playback.
Now that you know how to improve video quality in Premiere Pro, you can now act like a professional video editor. However, since you met Video Converter Ultimate, which gives you the same quality and efficiency, it is a different thing now. You may think again about which of the two is more practical and easier to use.
More Reading
How to Improve Video Quality in Windows Movie Maker
Learn the efficient solution on how to enhance video quality in Windows Movie Maker. Tap on this article and grasp the detailed step-by-step presented.
Full Guide on How to Create a Slideshow in Premiere Pro
Learn the tips and tricks in creating a slideshow in Premiere Pro. This guidepost will help you understand Adobe Premiere Pro better for your next slideshows.
A Walkthrough Guide on How to Speed Up Videos in Premiere
Have you desired to use Premiere for video editing? Do you want to know how to fast-forward a video on Premiere? Then, click this post to learn the procedure!
2 Highly Commendable Ways on How to Crop Video in Premiere
How to crop video in Premiere? This post will assist you in learning how to crop video in Premiere effectively by providing a full instructional approach.
Enhance Video