How to Go Frame By Frame in VLC: Complete Steps to Follow

May 06, 2023 10:20Posted by Selena Thomas to Play Video
When it comes to media playing, VLC is, without a doubt, one of the finest, which is why it is the most popular one. This freeware media player supports media files, webcams, discs, and even streams for playback. In connection with this, VLC also has the ability to play even the downloaded encrypted files is, by the way, an illicit act. Furthermore, this freeware runs on almost all platforms, including Windows, Mac, Linux, Android, and iOS, making it more multifunctional. One of the unique features of VLC is the frame by frame that enables you to have a perfect snapshot of every frame your video has. Therefore, since we already confirmed that this media player has the feature you want, let us learn how to find and use it. Refer to the complete steps we provide you below.

As mentioned above, the VLC player’s frame by frame is only one of the software’s advanced features or playback functions. However, you will hardly find it since it is hidden unless set to be part of the playback controls. And now, as we tackle how to get through this playback control, please see the steps below.
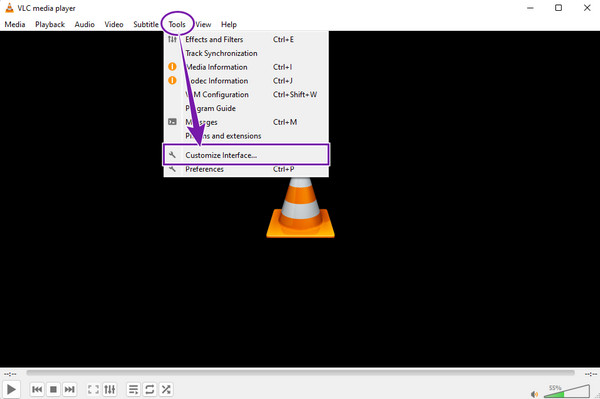
Run the media player and begin to add the advanced control to your playback control. To do so, click the Tools tab along the ribbons on the top of the interface. Then, select the Customize Interface selection.
Once selected, hover over the playback control options shown in the new window. Find the Frame By Frame option and drag it somewhere in the Line 2 section.
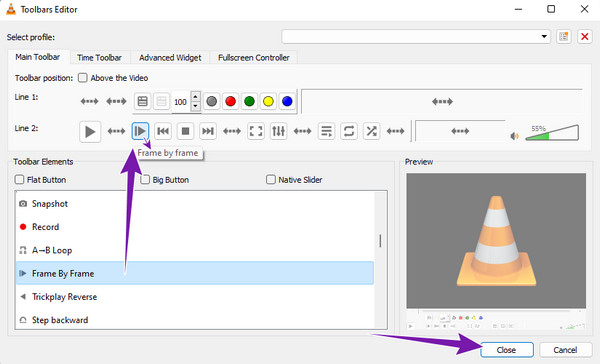
After that, click the Close button to exit the window. Then, play a video file, and you will see the added function to the playback controls.
This time, let us learn how to use VLC to screenshot every frame of the video.
Begin by adding the snapshot tool to the playback control. Going to the Tools media tab, then clicking the Customize Interface tab. Then, drag the snapshot tool with the Camera icon to the Line 1 section on the new window.
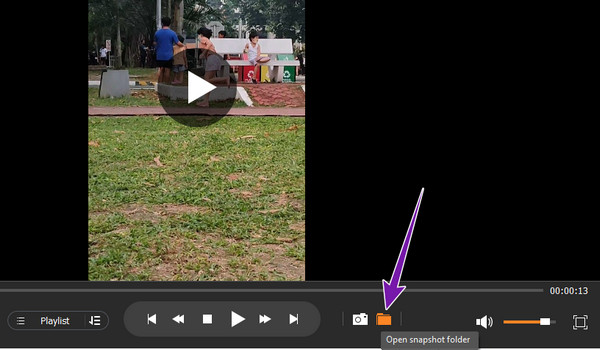
Once done, open the video file to play on VLC. Then, click the Frame-By-Frame button, followed by the Camera button, to take a screenshot of each video frame.

Continue to click the buttons until you finish taking screenshots of every frame your video has. Please note that the screenshots are saved in the folder shown on top of the playback screen with the file name.
You can also extract video frames using VLC. To do so, please follow the steps provided below.
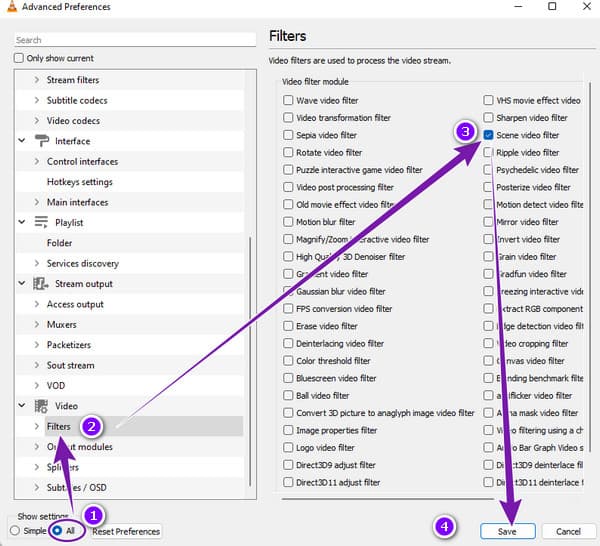
Click the Tools tab menu, and select the Preferences tab among the menu options there.
Then, when you reach the new window, tick the All tab at the bottom, and click the Filters tab among the preferences.
Once done, go to the interface’s right side, toggle the Scene Video Filter tab, and click the Save button. You can now play the video, and VLC will automatically extract its frames. Click here to learn how to trim videos in VLC.
There is no argument for the advanced frame by frame function of VLC. It is great but lacks the guarantee of a lossless frame shot. Do you want a much better way to screenshot the frame of your video without losing the high quality? Better to use this Blu-ray Player, the ultimate player of Blu-ray discs, ISO files, folders, IFOs, DVDs, and regular videos on your device. This magnificent media player is available on all popular OS platforms, including Windows and Mac. Furthermore, it supports all the popular video formats such as AVI, MP4, WAV, MOV, WMV, MKV, MPEG, and many more without limitations. Unlike VLC, this Blu-ray Player has a much easier operation and smoother process when playing and taking video screenshots. As a matter of fact, you won’t need to do additional settings just to include the snapshot tool on the playback control.
What’s more? This Blu-ray Player even provides you with extra features like crop, deinterlace, aspect ratio adjustment, video effects, audio effects, subtitle control, etc. But the main reason why it is better than VLC? Is its smooth yet cinematic playback experience, making its screenshots also cinematic. Hence, let us have the steps on using this amazing media player below.
The first thing to do is to acquire this best Blu-ray Player by clicking the applicable Download button on your computer below.
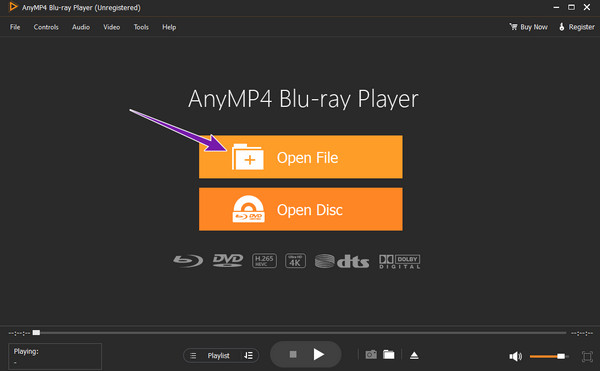
Next is to launch the software after installing it. Then, launch the video you need to screenshot when you click the Open File button at the center of the interface.
Once the video is loaded, the tool will automatically play it. Then, hover over the playback control at the bottom to reach the Camera button for the screenshot. Feel free to click the button to take a shot of the video frame you need to capture.

After taking screenshots, you can easily access the folder where the shots are saved. How? Just click the icon next to the Camera button, and it will direct you to the file destination.
Does VLC have a previous frame shortcut?
Unfortunately, VLC has no shortcut to return to the previous frame. But you can acquire a plugin or extension like the VLsub.
Can I take a screenshot of the frame of the Blu-ray video on VLC?
Yes. However, you need to have the latest version of VLC and download the needed library and codec to play Blu-ray on VLC. If you want a smooth screenshot process for Blu-ray better to use Blu-ray Player.
Can I customize the hotkeys for the Frame by Frame of VLC?
Yes. Go to the Tools menu and click the Preference option to do so. Then, go to the Hotkeys tab, then set the combination.
The VLC Frame by Frame feature is something that seems to be unique, but it is not. After all, you must set it first to make it visible on the interface. For this reason, VLC is not that handy for such video settings due to the additional setup needed. Hence, if you are looking for a much more handy media player with the same features as VLC, use Blu-ray Player.
More Reading
Concrete Guide to Convert VLC Files to MP4 Quickly
Cannot open playlist file with VLC extension? This guide tells you the easiest ways to convert VLC files to MP4, so that you can enjoy your videos anywhere.
Comprehensive Guide to Rotate a Video in VLC Media Player Properly
You can rotate your video in two different ways with VLC. This tutorial shows you with the comprehensive steps and explains the workflow in detail.
Detailed Tutorial on How VLC Crops Video and Its Alternative
Newbie in cropping video? Discover how VLC crops video and the problems encountered while using the tool and the best alternative tool to use on cropping video.
How to Solve VLC Audio Delay and The Best Way to Fix It
Be knowledgeable on how to repair VLC audio delay permanently on desktop and the unique solution to use when the fixes didn’t work by reading today’s post.