Aug 27, 2025Posted by Kevin Miller to Create DVD
H.264 has become the gold standard in video compression, ubiquitous in everything from smartphone recording to professional video editing. It significantly reduces file size while maintaining high image quality, making it ideal for video streaming, sharing, and storing digital content. But what if you want to watch these videos on a traditional DVD player, or share them with others in physical form?
However, most DVD players cannot natively read H.264 files and require MPEG-2 format, which means that you must burn H.264 to DVD. This guide will help you easily convert H.264 files to DVDs that can be played smoothly.

- Part 1. Choosing the Right DVD Authoring Software
- Part 2. Step-by-Step Guide to Convert H.264 to Playable DVD
- Part 3. Tips for Preserving Video Quality
- Part 4. FAQs
Part 1. Choosing the Right DVD Authoring Software
The first step in burning H.264 format to DVD is to select software that can handle both format conversion (converting H.264 to MPEG-2) and authoring functions, such as creating menus, chapters, and structures that comply with DVD standards. Not all DVD burning tools include authoring features, so it is important to be clear about your selection criteria.
Key Points for Choosing DVD Authoring Software
To ensure that the final DVD plays properly and meets your needs, you should prioritize software with the following key features:
Ability to Transcode H.264 to MPEG-2: This is an essential feature. DVD players rely on the MPEG-2 format to play videos, so the DVD burning software must be able to automatically convert H.264 files to this format without the need to manually download codecs.
DVD Menu Creation Capabilities: Making a DVD menu is optional but highly desired by users. Menus make DVDs more user-friendly because they allow you to select videos, jump to specific chapters, or adjust the audio.
Chapter Mark Support: The chapter function allows viewers to jump to specific parts of the video. The software should support manual tagging or automatic tag generation at set time intervals.
Support for Various Audio Tracks and Subtitles: Ensure that the software can convert the audio in H.264 files to compatible formats, such as AC3 and MP2. At the same time, the software should also support adding subtitle files to enhance accessibility.
Types of Software (General Categories)
DVD authoring tools are mainly divided into three categories, each suitable for users with different skill levels and budgets.
User-friendly Consumer Software: Designed specifically for beginners, with a focus on ease of use rather than complex controls. Typically includes pre-made templates, one-click coding, and wizard-style workflows. Most are paid software, but with free trial versions.
More Advanced/Professional Tools: Suitable for users who need comprehensive control over details (such as custom menu design, bitrate adjustment, or multi-track settings). These tools have a steep learning curve, but they can provide high-quality output for projects such as short films or commercial content.
Free/Open-source Options: These tools are cost-effective, but require some technical knowledge. Many of them lack built-in codecs or have limited menu functions.
For most users, especially those new to convert H.264 to DVDs, user-friendly consumer software is the best choice, which combines ease of use with powerful functionality, eliminating the need for manual codec settings and complex workflows.
Part 2. Step-by-Step Guide to Convert H.264 to Playable DVD
One of the best software to burn H.264 to DVD is Blu-ray Master picked DVD Creator, which is known for its ease of use, speed, and compatibility. It can automatically encode H.264 to MPEG-2 and burn it to DVD. And it supports most common DVD output formats, including DVD disc (DVD-5, DVD-9, DVD-R, DVD+R, DVD-RW, DVD+RW, etc.), DVD folder, and ISO image file.
In addition, it allows direct import of video files encoded with H.264, such as MP4, MOV, and MKV, without manual transcoding. You can also edit your H.264 videos by cutting, rotating, cropping, adding filters, effects, watermarks, subtitles, etc. Moreover, it provides a variety of DVD menus, such as wedding, travel, family, and more.
Here are the detailed steps on how to make DVDs from H.264 videos:
Step 1.Preparations
Before you begin, please ensure that you have the following items ready:
• Video Files: Place all H.264 files (commonly in MP4, MKV, or AVI containers) into a single folder and test the files using a player to ensure that they are not damaged.
• A Blank DVD Disc: DVD-R and DVD+R are the best choices, which are compatible with most DVD players. You can also use a rewritable disc, such as DVD-RW and DVD+RW.
Note: Some older DVD players may not recognize rewritable discs.
• Hardware: A computer with a built-in DVD drive. Most modern laptops do not have a built-in DVD drive, so you may need an external drive.
• Software: Download and install DVD Creator on your Windows or Mac system. Make sure it's the latest version to avoid compatibility issues.
Free Download
For Windows
Secure Download
Free Download
for macOS
Secure Download
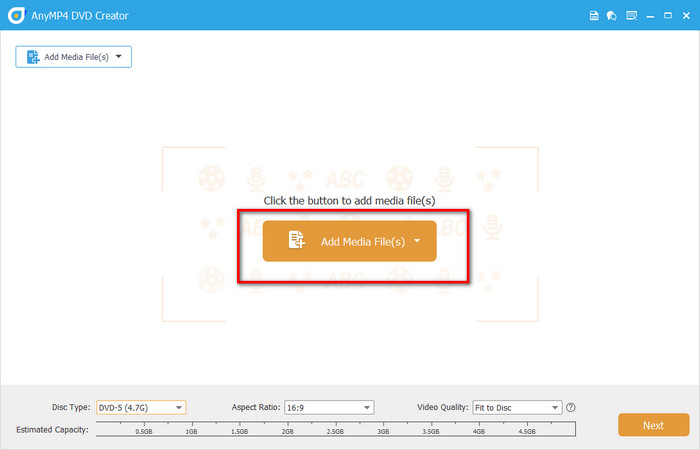
Step 2.Import H.264 Videos
Launch the software, and click the DVD Disc button as the output format. Then, click the Add Media File(s) button to upload your H.264 video files.
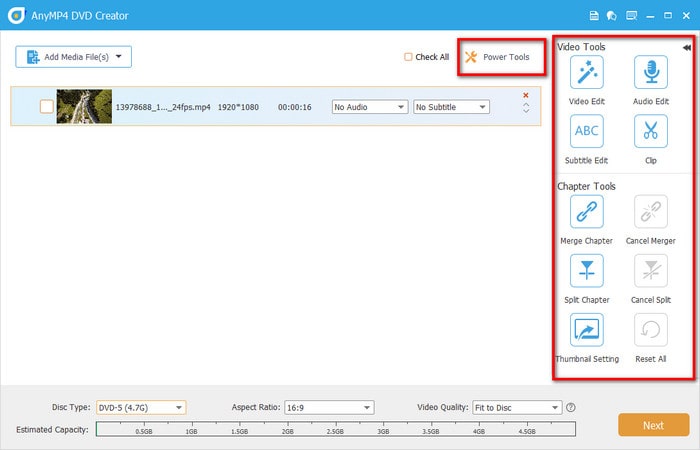
Step 3.Edit Video Files (Optionally)
Click the Power Tools button to open the right video & chapter tools panel, where you can clip, rotate, and crop your videos, as well as add effects, filters, watermarks, audio tracks, and subtitles.
Also, it allows you to merge chapters, split chapters, and adjust thumbnail settings. After that, click the Next button to continue.
Note: The bottom bar offers some options about disc type, aspect ratio, and video quality, which supports adjusting based on your needs.
Step 4.DVD Menu Settings
In the following interface, the right Menu Template tab allows you to choose a suitable menu for your DVD, such as wedding, holiday, family, travel, and more.
In addition, you can add background music, change the background, and add an opening film.

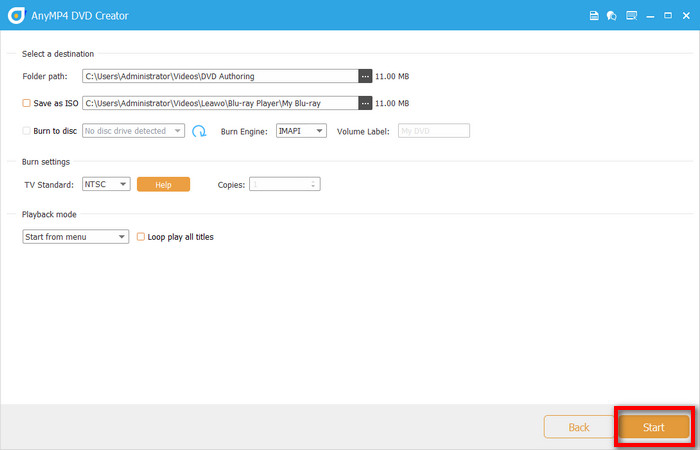
Step 5.Start Burning
Click the Preview button to view the effect of DVD menu and H.264 videos. Then, click the Burn button to select the destination, burn engine, TV standard, and playback mode. Finally, click the Start button to start burning H.264 to DVDs.
The above is the complete process for burning H.264 format to a playable DVD using Blu-ray Master picked DVD Creator. This software simplifies the operation to achieve efficient and high-quality burning. It automatically handles H.264 to MPEG-2 format conversion without manual codec configuration, while providing practical features such as menu design, chapter addition, and subtitle adaptation, which balance ease of use with personalized needs.
Part 3. Tips for Preserving Video Quality
Preserving video quality when burning DVDs is crucial, especially when working with high-efficiency codecs like H.264. Here’s how to ensure your final disc looks as sharp and smooth as possible:
• Use high-quality source files: We all know that the quality of a burned DVD cannot exceed that of the original H.264 file. Therefore, for best results, use 720p or 1080p H.264 files whenever possible, and avoid encoding the same file multiple times.
• Avoid excessive compression: Compression is a necessary step in storing videos on DVDs, but excessive compression can cause color distortion.
• Adjust bitrate settings carefully: Bitrate directly affects video quality and file size. 4–6 Mbps is ideal for standard quality, and 6–8 Mbps for high quality. Note: You should avoid variable bitrate settings that dip too low, which can cause quality fluctuations during playback.
Part 4. FAQs
-
Can I burn H.264 files directly to DVD without converting them?
No. Standard DVDs require MPEG-2 format for compatibility with standalone players. Most DVD authoring tools will automatically convert/encode H.264 to MPEG-2 during the burning process.
-
Will converting H.264 to DVD reduce video quality?
Some loss is inevitable due to format conversion and compression. However, using high-bitrate source files, DVD-9 discs, and optimized settings can significantly preserve visual fidelity.
-
Is Blu-ray better for preserving H.264 quality?
Absolutely. Blu-ray supports H.264 natively and offers much higher storage capacity (25GB+ per layer), making it ideal for HD content. If your audience has Blu-ray players, converting H.264 to Blu-ray is worth considering.
Conclusion
Based on the concrete guide above, you must master the best way to burn H.264 to DVD. When you need to burn a high-quality H.264 video to DVD, Blu-ray Master picked DVD Creator is absolutely a robust tool that performs well in terms of its ease of use and powerful features. Download it and put this workflow into practice!
More from Blu-ray Master
Digital to DVD