Jun 05, 2026Posted by Kevin Miller to Create DVD
| Workable Solutions | Step-by-step Troubleshooting |
| Best Way to Burn Any Video to DVD on Windows 11/10/8/7 and Mac | DVD Creator provides a comprehensive burning solution for both Windows and Mac… Full steps |
| How to Burn DVDs on Windows 10 | If you are a Windows 10 user and don’t want to download additional DVD burning software, you can follow these steps… Full steps |
| How to Burn DVDs on Mac | You can burn videos to DVD on a Mac without burning software… Full steps |
Although DVDs have decreased in popularity over recent years, physical media storage remains the premier option for users seeking an offline digital storage alternative, especially given concerns about online privacy. However, DVDs remain widely useful for their original purpose of storing digital video, and the sustained popularity of both Blu-ray and DVDs is one of their strongest indicators of continued popularity. In this article, we will help our readers learn how to burn videos to DVD on Windows 10 and Mac computers, enabling them to store high-quality videos on DVDs. We will explore the best software available for both Windows and Mac, along with the default options on each platform.

Table of Contents
- Part 1. Preparations for Burning a DVD on a Computer
- Part 2. Best Way to Burn Any Video to DVD on Windows 11/10/8/7 and Mac
- Part 3. How to Burn DVDs on Windows 10
- Part 4. How to Burn DVDs on Mac
- Part 5. Test Results During DVD Burning
- Part 6. Troubleshooting Common DVD Burning Issues
- Part 7. FAQs About How to Burn Videos to DVD on Windows and Mac
| Feature | Blu-ray Master DVD Creator | Windows Built-in Tools (Windows 10 File Explorer) | Mac Finder Burn Feature |
| Supported OS | Windows 10/11 and macOS | Windows 10 | macOS |
| Supported Formats | MP4, MKV, AVI, MOV, WMV, FLV, and more. | MP4, AVI, WMV | MOV, MP4 |
| Burning Speed | Fast (Hardware acceleration support) | Moderate (Based on hardware.) | Moderate (Based on hardware.) |
| DVD Menu Templates | Yes | No | No |
| Menu Customization | Yes | No customization features | No customization features |
Part 1. Preparations for Burning a DVD on a Computer
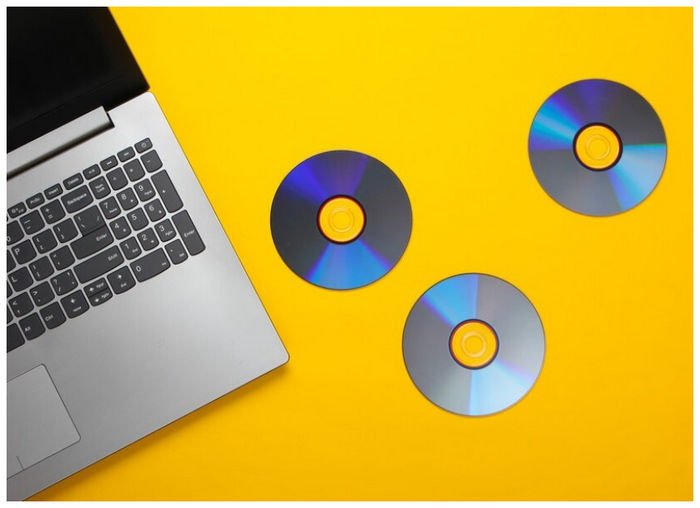
Blank DVD Discs
The most important piece of equipment for burning videos to DVDs is the blank DVD itself. This tool will be used as the new storage for the video that you will burn. However, not all computers have a DVD driver. With that in mind, please proceed to the next piece of equipment.
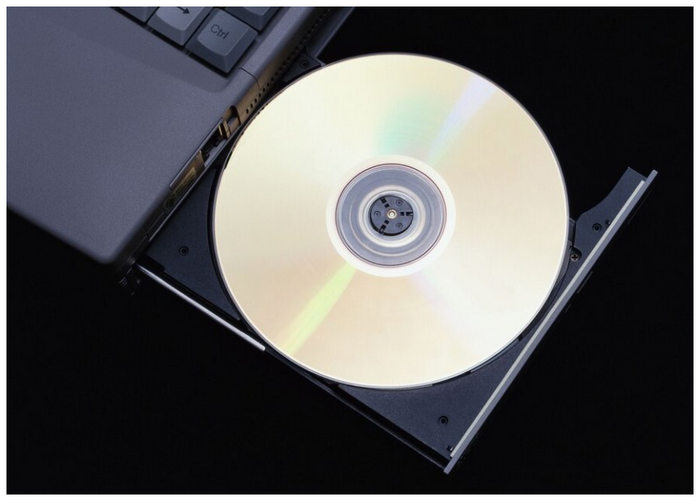
Internal or External DVD Burner Drive
Although some computers have built-in DVD drivers, most modern releases do not, since DVD use has lessened in popularity over the years. If your device lacks a built-in DVD driver, you will need an external DVD drive. Lastly, proceed to the last item in this section to learn the tool you will use for the burning process.
DVD Burning Program
Once you have a blank DVD and a DVD driver installed, you can use a DVD-burning program on your computer. If you are unsure if one is present in your device or if you are not knowledgeable enough to use it, please refer to our detailed guides below. Using the DVD-burning program itself is the last step in burning videos to your DVD, but it is also the most technically demanding.
Learn the Difference Between Data DVD and Video DVD
Data DVDs and video DVDs have self-explanatory functions based on their labels. Data DVDs are designed to store files and serve as offline storage for photos, documents, and video files. They are essentially offline storage. However, video DVDs are the more popular form of this hardware. These are designed to have Video_TS folders and MPEG-2 videos that all support playing their media directly on DVD players.
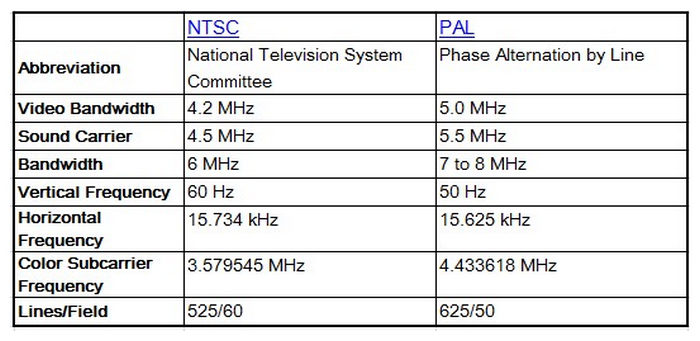
NTSC vs PAL Video Standards
Both the National Television Standards Committee (NTSC) and the Phase Alternating Line (PAL) are broadcast standards that set a unified resolution, frame rate, and visual quality for DVD regions. Simply put, if you plan to burn content for DVD players with set region codes, you have to follow the NTSC or PAL standards.
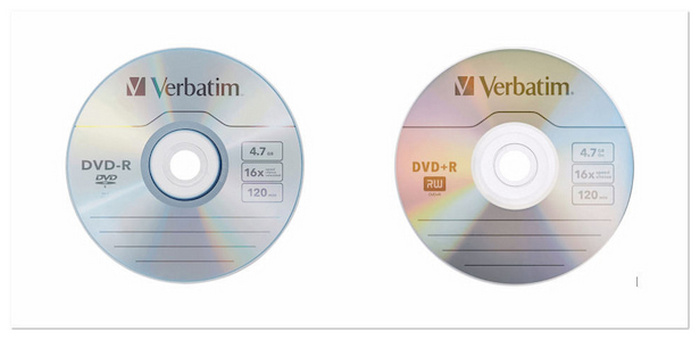
DVD-R vs DVD+R
Both DVD-R and DVR+R are DVD formats designed for permanent data storage, meaning they can only be burned with data once. However, they serve different purposes based on the DVD player you will use to access them. For older hardware, DVD-R is better. For modern drivers, DVD+R is more optimized. Regardless of what type of DVD you will use, both 4X and 8X burning speeds are good choices.
Check User Reviews and Verified Expert Tips
As a final preparation for choosing the burning tool for DVD writing, you can also check for authentic user reviews on online forums and for verified tips from multimedia experts who do software reviews. Hopefully, this article should serve this purpose.
Part 2. Best Way to Burn Any Video to DVD on Windows 11/10/8/7 and Mac
The best software to burn DVDs we will feature is Blu-ray Master DVD Creator, a third-party option available for both Windows and Mac. This tool is presented as the first option in this article since it is the most beginner-friendly. It is also available for both platforms, making this guide suitable for our readers.Developed exclusively for creating DVD and Blu-ray discs, this tool is among the most reliable on the market for efficiency and ease of use. In addition to its performance, it also supports most digital video formats, from the more popular MP4, MKV, and MOV to more advanced formats such as MTS or VOB. Moreover, it supports modern 4K HEVC videos at high bitrates, making it a suitable choice for burning videos captured with modern smartphones.For a quick overview of what makes Blu-ray Master DVD Creator a good option, we provided a comprehensive pros-and-cons comparison of the software to help users easily weigh its capabilities and limitations. This was followed by our quick guide to using the tool.
Pros
- It can burn videos to DVD and Blu-ray discs as a video, an ISO file, or a folder.
- There are multiple menu templates for a personalized menu.
- Videos processed on discs can be edited using essential tools.
- GPU-accelerated burning speed.
- Videos burned with the tool are preserved at lossless quality.
Cons
- The tool’s free version has slightly limited features.
- There is a slight difference between the Windows and Mac versions.
Download the software first, then proceed to the step-by-step guide.
Free Download
For Windows
Secure Download
Free Download
for macOS
Secure Download
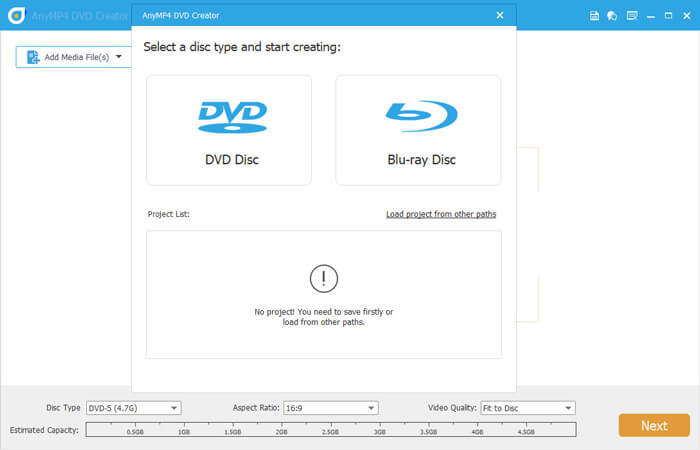
Step 1. Insert the blank DVD into your computer using the built-in or external driver. Then, open Blu-ray Master DVD Creator and select the DVD Disc option.
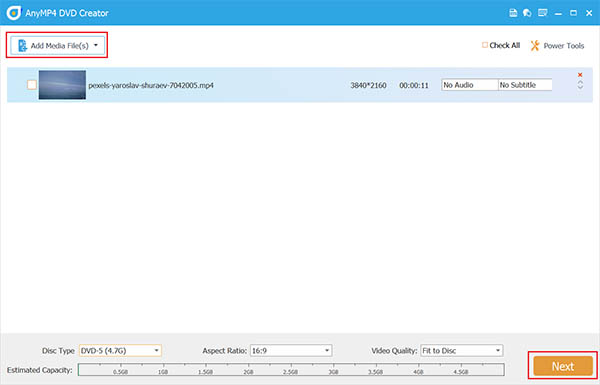
Step 2. Next, click on Add Media File to add the video that you want to burn.
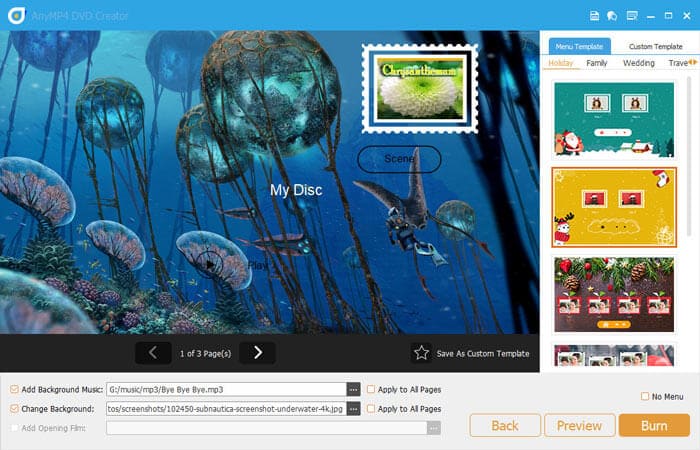
Step 3. Once the video has been added, you can edit the DVD menu using the software’s templates. After editing, or if you do not want to add a menu, click on Burn.
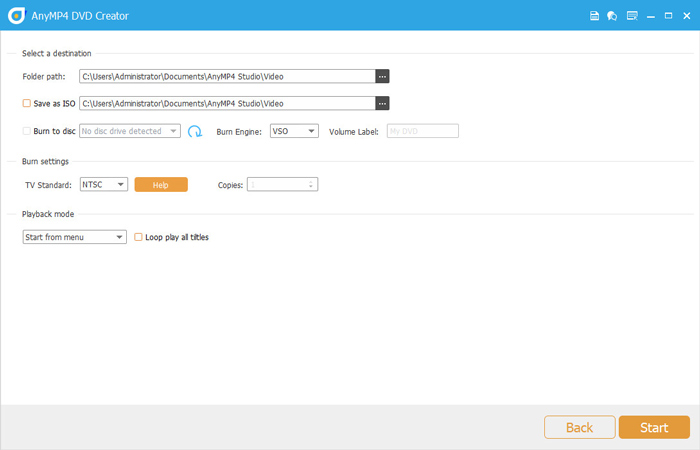
Step 4. In the next menu, set the Folder Path to the DVD you inserted into your computer. Then, check the Burn to Disc box before clicking on Start. Simply wait for the burning process to finish. Note: You are allowed to set TV Standard as NTSC or PAL.
Following these four simple steps makes burning digital videos into physical DVDs much simpler. Since this software supports adding DVD folders, you can also use it for offline storage. This added versatility is another convenient feature of Blu-ray Master DVD Creator.
Part 3. How to Burn DVDs on Windows 10
If you are using a Windows computer, you can also use the platform’s default DVD-burning process. However, this option does not have the customization available in the featured Blu-ray Master DVD Creator tool above. Despite that, it can still get the job done.
Step 1. Insert the DVD that you want to use on your computer. Wait for the notification to confirm that the DVD has been inserted.

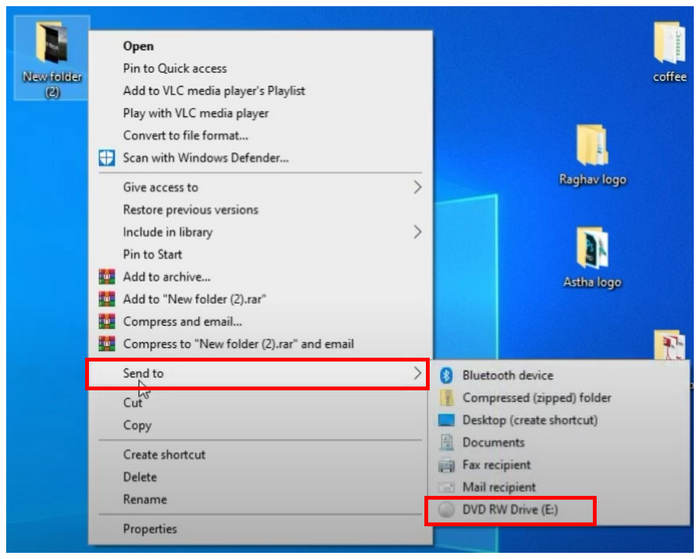
Step 2. Find the folder you want to burn to the DVD, then right-click it. Hover your cursor over Send to, then click the DVD drive. The folders will be copied onto the DVD.
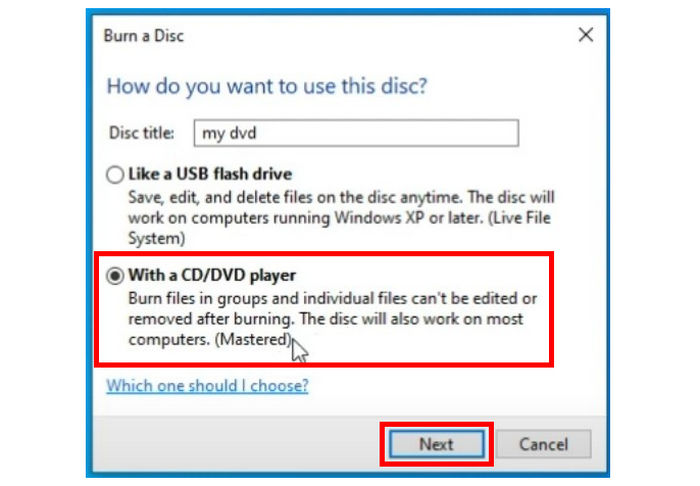
Step 3. In the burn menu that pops up, select the With a CD/DVD player option, then click Next.
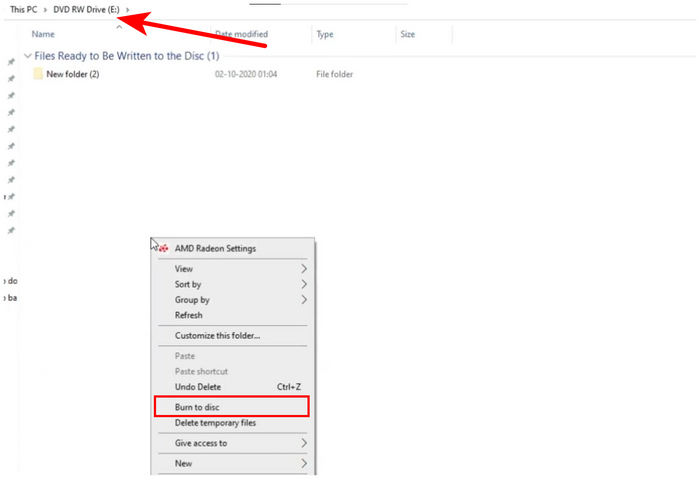
Step 4. Open the DVD drive in your computer, right-click on it, and select Burn to disc.
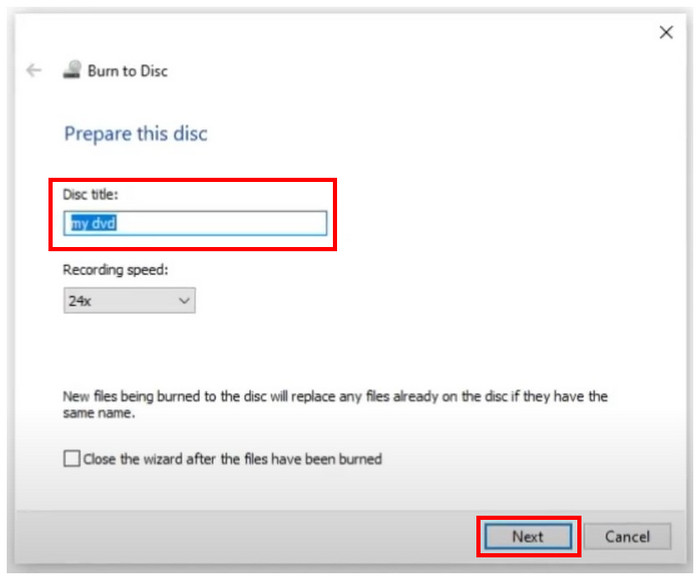
Step 5. In the Burn to Disc menu, you can rename the DVD if you wish. Otherwise, click on Next to start the burning process.
With these steps for burning DVDs on Windows 10 now discussed, we can now move on to the pros and cons of using this option.
Pros
- Does not need to be installed.
Cons
- No option for DVD menu customization.
- Tricky to use if you are not familiar with the process.
- Missing some DVD menu editing features.
Note: If you are using a Windows 11 computer, fear not, as the updated burning tool is still functionally the same as the Windows 10 built-in option.
Part 4. How to Burn DVDs on Mac
If you are using Mac hardware, you can also rely on the default option to burn videos onto DVDs on a Mac computer. However, unlike dedicated DVD creator software, it is much more limited. Despite that, this option is still reliable if you want to avoid installing new software on your device.
When you are using modern Mac devices equipped with M1/M2/M3 chips, you need to get an external DVD driver that is locally supported on these computers. Most modern Apple computers do not have a built-in DVD drive, making burning impossible without external solutions.
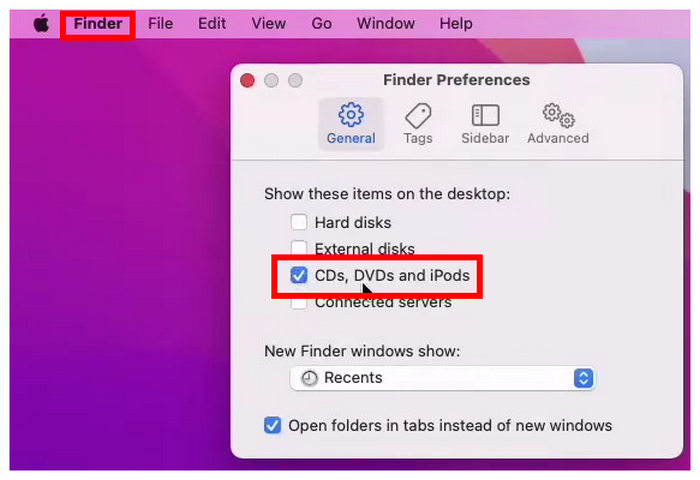
Step 1. Right-click on Finder and select Preferences to open the Finder Preferences settings. Check the CDs, DVDs, and iPods option.
Step 2. Insert the DVD that you want to use on your Mac computer.
Step 3. Open the DVD drive inserted into your computer.
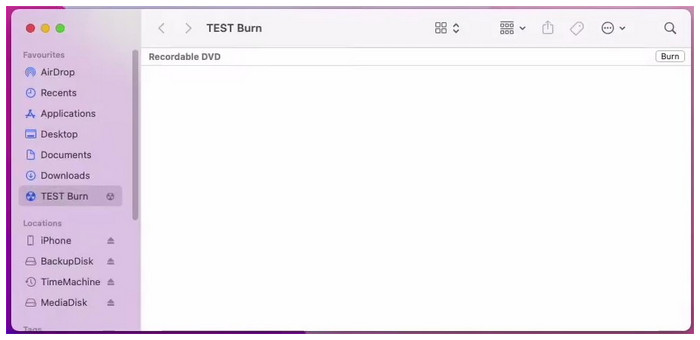
Step 4. Copy the files you want to burn to the DVD, then click the Burn option.
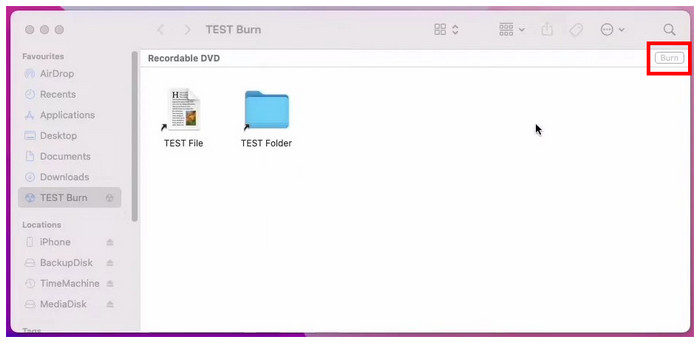
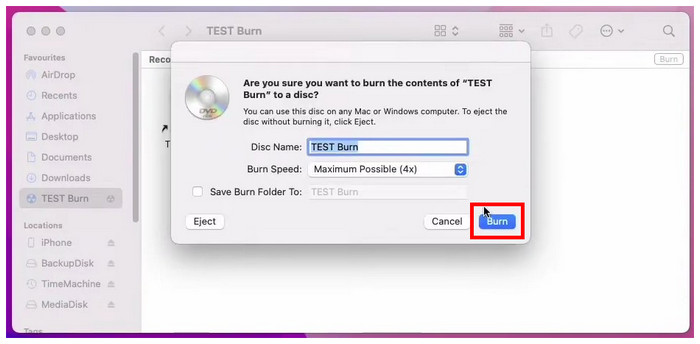
Step 5. In the Burn menu that will pop up, you can now rename the DVD’s disc name. To start the burning process, simply click on the Burn button.
Below is a quick list of the pros and cons of burning DVDs on a Mac. You can use this as a rough estimate of the option’s capabilities.
Pros
- Available for all Mac computers
Cons
- Modern Mac computers are difficult to use for DVD burning.
- DVDs burned on a Mac can sometimes be accessible only on other Mac computers.
If this guide helped you learn how to use Mac’s menu to burn DVDs, we are glad this article proved useful for your digital and hardware storage needs.
Part 5. Test Results During DVD Burning
For a quick result of the DVD burning test we made for the three DVD authoring tools, we have provided the data we collected, noting the time required to burn a standard high-quality 4GB video, the success rate of the burning process, and the compatibility when playing the DVDs with the burned videos.
| Tool | Time Required to Burn a 4GB Video | Success Rate | Playback Compatibility Results |
| Blu-ray Master DVD Creator | 8–15 Minutes (Based on DVD driver and encoding settings.) | High (Optimized for DVD burning) | Excellent (Produced DVD plays well on DVD players, TVs, and PCs) |
| Windows Built-in Tools | 10–20 Minutes | Moderate (Reliable for DVD data writing. Suboptimal when used for DVD-Videos) | Limited (Works mainly for creating data DVDs) |
| Mac Finder Burn Feature | 10–20 Minutes (Based on external driver and Mac hardware.) | Moderate (Stable for data burning. Inconsistent for DVD video writing.) | Limited to Moderate (Plays well on DVD players, but reliability is inconsistent when using Finder alone) |
Part 6. Troubleshooting Common DVD Burning Issues
DVD Not Recognized
A DVD that is not recognized is usually due to scratches on the disc or incompatibility. We recommend checking that the disc is clean and undamaged and that you are using a compatible format, such as DVD±R/RW. If the problem persists, try restarting your computer or reconnecting the external drive to a different USB port. You can also try a new disc to see if it is recognized.
Burning Process Failed
Another common problem is failed burning, often due to system resources being occupied. You can first close unnecessary background programs. Then reduce the burning speed, as high-speed burning is more prone to errors. In addition, it is also important to use high-quality blank discs, as poor-quality discs are more likely to cause burning failures.
Disc Not Playable
Sometimes, recorded discs cannot be played on certain players. This may be due to incompatible disc formats. Many older players only support DVD-R formats and do not support DVD+R or rewritable discs. We recommend testing playback compatibility on multiple devices and replacing the playback device.
Poor Video Quality after Burning
Poor video quality after burning is usually due to the source file’s quality or the encoding settings. If the original video resolution is low, the image quality will be even worse after burning to DVD. It is recommended to use high-quality video source files and to select an appropriate bit rate (8-10 Mbps) in the burning software.Note: It is best to convert the video to DVD standard MPEG-2 format first to avoid quality loss caused by secondary compression during the burning process.
No DVD Burner Detected
When the system cannot detect the DVD burner, first check whether the external optical drive is connected properly, and then try replacing the USB port. For Windows, you can check the driver status through Device Manager. Mac users can confirm whether the device is recognized in the USB options in System Report. If the optical drive is still not detected, consider replacing it.
Burning Speed
Avoid using the maximum burning speed (e.g., 16x). For better data integrity and to prevent buffer underrun errors, burn at 4x or 8x. It takes slightly longer but greatly reduces playback issues.
Disc Selection
For maximum compatibility with older DVD players, choose DVD-R instead of DVD+R. Modern players support both, but older devices are more sensitive and favor DVD-R.
Video Quality
Match your source video’s aspect ratio to your TV. Use 16:9 for modern widescreen TVs. For older camcorder footage, 4:3 prevents stretching.
Part 7. FAQs About How to Burn Videos to DVD on Windows and Mac
-
How do I use a DVD drive from another computer on my Mac?
First, you have to find a way to insert the DVD drive into your Mac. Simply insert the DVD into your computer using either a built-in driver or an external one. Your Mac can now read the DVD.
-
How do I burn a Windows ISO to a DVD on a Mac?
Since ISO files already contain data ripped from DVDs, they can be easily burned to other discs. To do so, simply use Blu-ray Master DVD Creator. You can also use the basic Windows and Mac burning tools.
-
Does Apple SuperDrive burn DVDs?
Yes, it can. SuperDrive works the same as other external DVD drives. This option will only work better since it is exclusively developed for Apple.
-
Are DVDs still used today?
Yes, they are. DVDs are still popular today. They are also popular as offline storage media.
-
Can I burn a DVD on my computer?
Yes, you can. You can burn DVDs using third-party tools such as Blu-ray Master DVD Creator. Another option is to use the default burning option for Mac and Windows platforms.
-
What is the best free DVD burning software for Windows 10 in 2026?
Blu-ray Master DVD Creator should still be your best bet in 2026. It is still openly updated and supported. It will also be a good choice even if you are using their macOS version.
-
Why won’t my Mac recognize my external DVD burner?
Your DVD burner may not get enough power from the USB port. Try using a powered USB hub or use an alternative cable/adapter. Also, double-check whether your DVD driver is compatible with your current macOS version.
-
Can I burn 4K videos from my iPhone to a standard DVD?
Yes, but the 4K video will be compressed down to standard DVD resolution. DVDs are limited to the standard 720p quality. If you want the higher 4K quality, use Blu-ray or digital storage instead.
-
Is DVD-R or DVD+R better for burning home movies?
It depends on what DVD player you will use. Use DVD-R for older DVD players, or DVD+R for additional formatting features. However, both work well on most modern devices.
Wrapping up
Now that we have featured three solutions for burning videos onto DVDs on Windows 10/11 and Mac, we hope that this article has helped you learn how to burn DVDs with videos on your own. If you are looking for the easiest option, using Blu-ray Master DVD Creator should be your best bet.Please share this article online to help other users looking for a reliable DVD Creator tool.
More from Blu-ray Master
Videos to DVD