May 29, 2026Posted by Kevin Miller to Copy DVD
Quick Answer:
Blu-ray Master Free DVD Ripper is a safe choice if you are looking for a reliable tool to copy DVD media to a hard drive, whether on a PC or a Mac desktop. It is easy to use, packed with useful features, and its free version is reliable for digital conversion needs.
If you are curious to learn if it is possible to rip DVDs to your computer’s hard drive, this article is made for you, since we will discuss multiple options to help you learn how to copy DVDs to hard drives, whether you are using a Windows PC or a Mac computer. The tutorials discussed in this article will be helpful if you want to create digital backups of DVDs used as storage, make a copy of movies or shows on DVD releases, bypass region-locking codes, or for the general convenience of digitising DVD media. To learn more about DVD ripping and transferring files to computers, please continue reading the guides below.

Table of Contents
| DVD Tool | Speed | Video Quality | Decryption Support | Use Cases |
| Built-in DVD Copy (OS tools) | Slow | Lossy Quality | None | Basic file backup of unprotected DVDs. |
| Blu-ray Master Free DVD Ripper | Fast | High-Quality HD, Lossless Quality. | Advanced (CSS, region codes, Sony ARccOS, and more) | Full DVD backup, copying, and high-quality conversion. |
| AnyMP4 DVD Copy | Fast | Lossless quality, 4K upscaling. | Standard decryption(CSS, region-codes) | Advanced file backup of encrypted DVDs. |
What You Need Before Copying DVDs to a Hard Drive
External DVD Driver
To access the DVD driver you want to copy, you have to open it on your computer first. This will only be possible if you use a compatible external DVD driver on your computer. This has become essential since modern laptop computers no longer come with built-in drivers.
Sufficient Hard Drive Space
Since the tools we will feature are designed to recover raw DVD data, you need to anticipate the large file sizes of these raw video files. In this case, it is smart to free up space on your computer first if you plan on copying raw DVD data digitally.
Backup Format (ISO, VIDEO_TS Folder, or MP4)
Make sure to select how you want to save your DVD media once it is converted. Among common formats, ISO, VIDEO_TS, MKV, and MP4 are common options. However, we recommend using the MP4 format if your chosen DVD app can support it. This format is the best for full digital compatibility.
Way 1. Copy Unprotected DVDs to Hard Drive Directly
Digitising the content of unprotected DVDs and creating a digital backup.
Free
We will start this guide by providing the most basic option: copying DVDs to the hard drive, which works on both Windows and Mac operating systems. This is none other than the direct copying of unprotected DVDs to a computer hard drive.
This process works by using the copy-and-paste function on your computer after the DVD you want to copy has been loaded into your device. This one is the most straightforward and simple to do among the options provided in this article.
Unfortunately, this option is only available for DVDs that are not protected by any encryption or data security system. This means that, where this option is viable, DVDs are limited to those burned manually and serve only as storage. Protected DVDs, such as movie home releases, cannot be bypassed by this option.
When used on encrypted DVDs, direct file copying will not work properly since this built-in solution cannot bypass encryption systems, even basic ones like CSS. When using this option, we recommend external DVD drives such as the LG GP60NB50 or the ASUS SDRW-08D2S-U Lite, both of which are available for both PC and Mac.
Moreover, we recommend using MKV as your format of choice, since using it as the export format made the program run 20% faster than using MP4 when backing up upscaled 4K DVDs. Just beware when using this option as your main DVD copying of choice, since handling advanced DVDs has a 50% error rate.
Please read the guide below to learn how to use the copy-and-paste method to transfer unprotected DVD data to your hard drive.
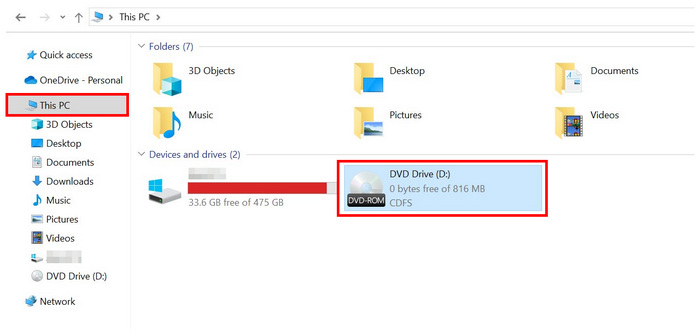
Step 1. Load the DVD you want to open on your computer. You can use an external DVD driver or a built-in one if your device has one. Look at the This PC section of your file manager to check if your computer has scanned the DVD, and then open it.
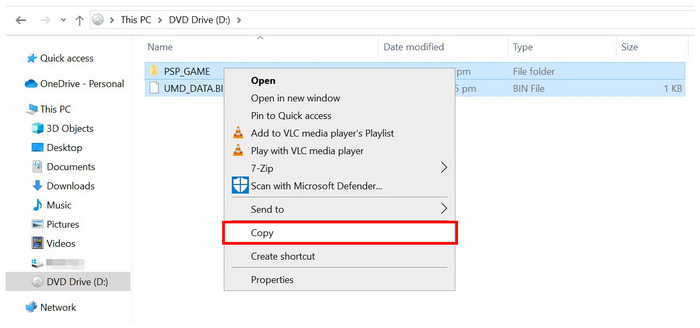
Step 2. Once inside the DVD you want to open, choose the content you wish to copy onto your computer. After selecting the files, right-click them and select Copy. The DVD data has now been copied to your clipboard.
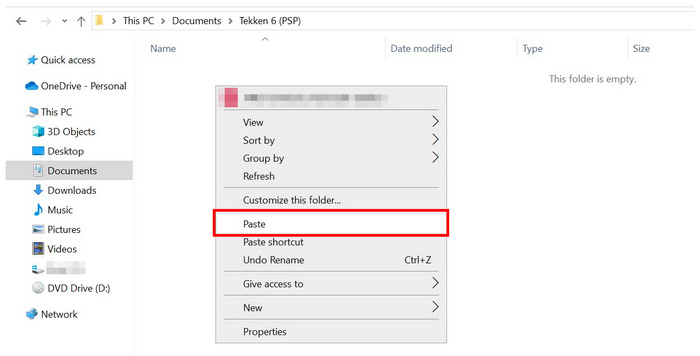
Step 3. Move to the folder in your hard drive where you want to paste the data from the loaded DVD you copied. Once you are in the location, right-click again and select Paste. Wait for the file transfer process to load.
This option is the most straightforward if you want to learn how to transfer DVDs to a hard drive, since it is as simple as copying and pasting text from one document file to another.
Unfortunately, the simplicity of this option is paid for by its capabilities. You cannot use data copy-and-pasting on DVDs with any form of security.
Way 2. Rip and Copy Protected DVDs to a Windows Hard Drive
Bypassing copy-protected DVDs on Windows PC.
Free
If you want to copy DVD content to a Windows PC, Blu-ray Master Free DVD Ripper is the best option. Compatibility-wise, this option works great for Windows 11/10/8, making it an optimised tool for modern computers. The program is also available for Macs running macOS 10.12 or later.
Blu-ray Master Free DVD Ripper can bypass security and copy DVD data to your hard drive by first digitising its content. With that in mind, the software can convert DVD media to 200+ digital video and audio formats it supports, including MP4, MKV, MOV, AVI, MP3, WAV, FLAC, and more. This makes the tool a good option if you want to learn how to rip a DVD to a hard drive.
On top of its DVD-to-digital conversion feature, the tool also offers file customisation options and video editing features to ensure your converted files are optimised for digital use. Some examples of these options are output formats, video encoder, resolution, bitrate, video trimmer, video cropper, 3D video editor, and other valuable features.
Moreover, if you want to copy homemade or personally burned DVDs or Blu-ray discs, Blu-ray Master Free DVD Ripper is the fastest option thanks to its superior hardware acceleration. This made it way more reliable than the built-in option.
Before our tutorial, let us discuss the best format for ripping DVDs to a hard drive. Regarding file formats, MKV and MP4 are the best options to convert DVD videos digitally. You must choose whether to prioritise video quality or file compression.
The MKV format is best for preserving video quality, as it minimises quality loss during conversion and preserves subtitle and multi-audio data. On the other hand, users looking for a storage-friendly option are advised to use the MP4 format, as it reduces the file size of converted videos at the expense of quality.
To learn how to use Blu-ray Master Free DVD Ripper to digitise DVD media and transfer them to your hard drive, please read the guide below. First, download the software to make following our tutorial easier.
Free Download
For Windows
Secure Download
Free Download
for macOS
Secure Download
Step 1. Insert the DVD you want to copy into your hard drive using an external or built-in DVD driver. Then, wait for your PC to scan the DVD’s content. Afterwards, open Blu-ray Master Free DVD Ripper and select the Load Disc Option. Click OK in the pop-up menu to confirm your selection.
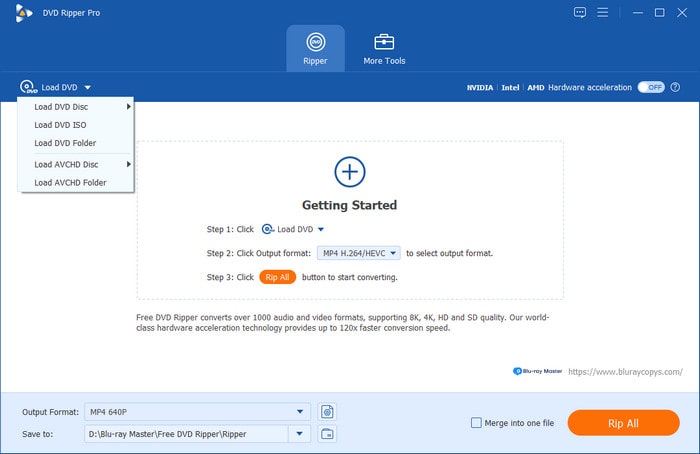
Step 2. Wait for the program to read the content of the loaded DVD. Once done, you will have the option to either open the DVD’s Main Title or Full Title List. Select OK once you have chosen how you want to open the DVD.
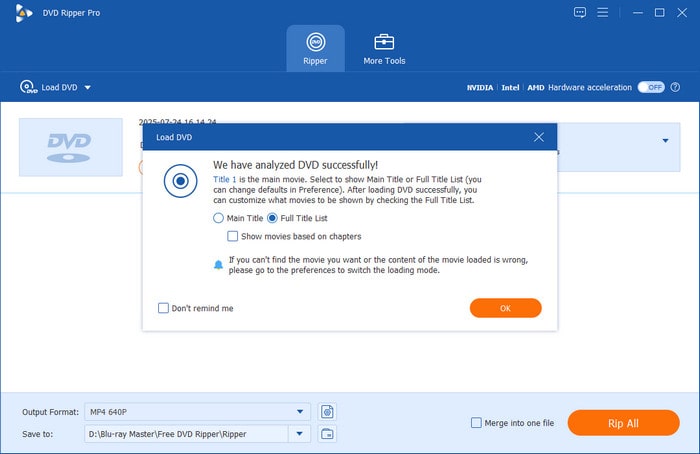
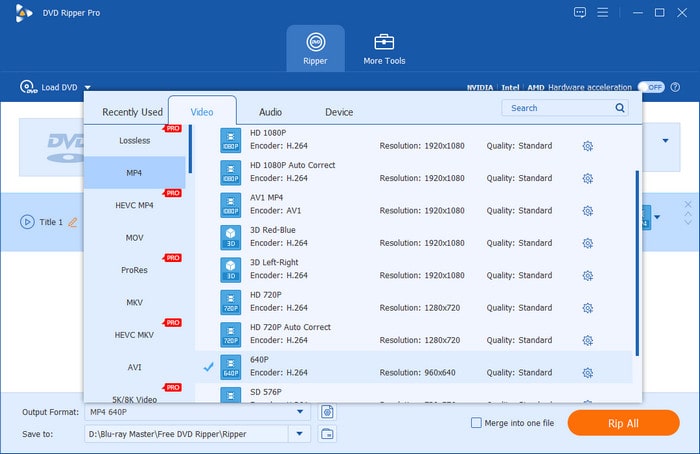
After choosing between the Main Title and Full Title List, select Output Format to specify how you want to save your DVD media on your hard drive. Among these formats, we recommend using MP4.
Step 3. Finally, once you have selected the output format for the DVD content you want to copy, click Rip All to start processing the DVD media into digital format while saving it to your hard drive simultaneously. Wait for the conversion process to finish.
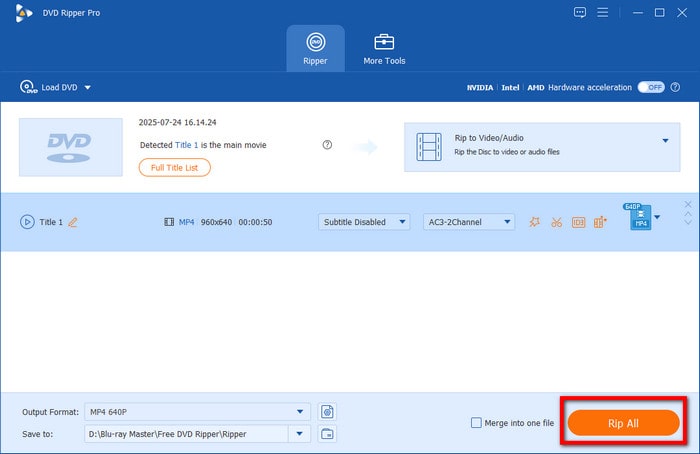
After the DVD conversion process, the converted DVD content you have loaded on Blu-ray Master Free DVD Ripper will be automatically saved to your computer. This makes the software a two-in-one tool that converts DVD media to digital format and copies them to your PC’s hard drive in one go. We recommend checking out our guide about the best Blu-ray ripper tools if you want to rip Blu-rays.
Way 3. Rip and Copy Protected DVDs to Mac Hard Drive
Bypassing copy-protected DVDs on Mac.
Free – $69.96
When it comes to transferring DVD files on Mac, AnyMP4 DVD Copy is the best option for ripping a DVD to your hard drive, saving it digitally for Mac storage. Similar to the option discussed in our software for Windows computers, this program, specifically designed for Mac hardware, also includes tools to bypass copy-protection mechanisms. This feature makes it a viable option to copy, back up, or compress DVD files for all DVD content, even modern home releases of movies and TV shows.
The program is a great backup option because it can rip DVD content at lossless quality. This means that files ripped with this tool and then transferred to a Mac will retain their original video quality as a 1:1 copy of the original resolution. Moreover, it is a practical tool for users who want to stockpile digital copies of DVD media, as it can reduce the file size once converted.
It is also equipped with a very fast GPU acceleration system calibrated for AMD, NVIDIA, and Intel releases. This made the program one of the most efficient options for handling large media files, such as raw DVD data.
Please read our guide below to learn how to use AnyMP4 DVD Copy to convert DVDs to hard drives on your Mac device.
Step 1. Insert the DVD you want to copy onto your Mac. Wait for your computer to scan the DVD's contents. Then, open AnyMP4 DVD Copy.
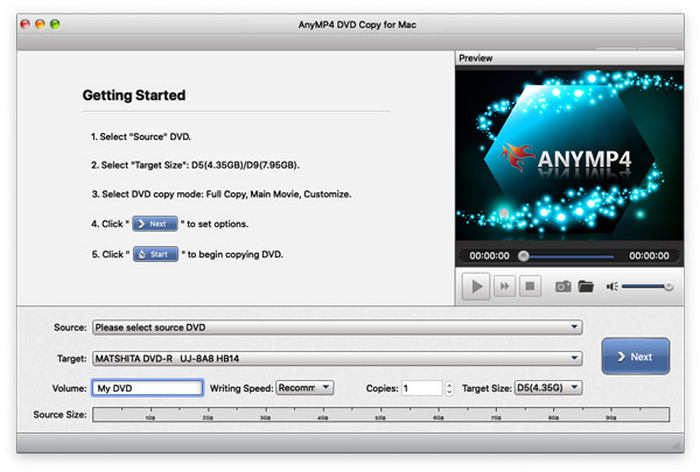
Step 2. While you are in AnyMP4 DVD Copy’s main menu, click on File on your computer menu and then click Select Source, and then click the DVD that you have loaded.

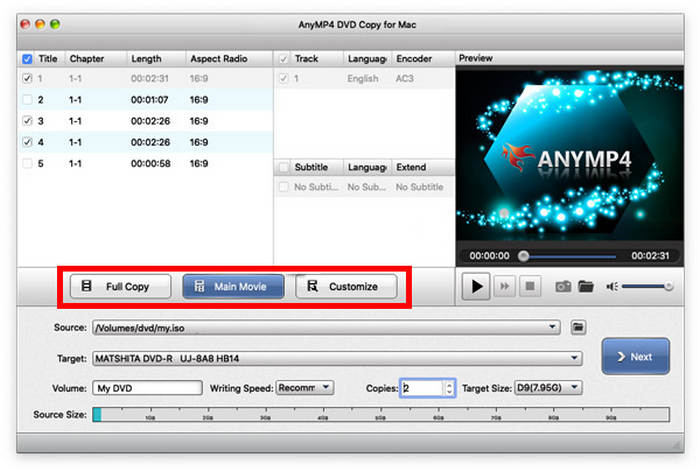
Step 3. Once the software has read the DVD's contents, choose the copying mode you want to use. You can select Full Copy, Main Movie, or the Customise option to modify the parts you will copy yourself.
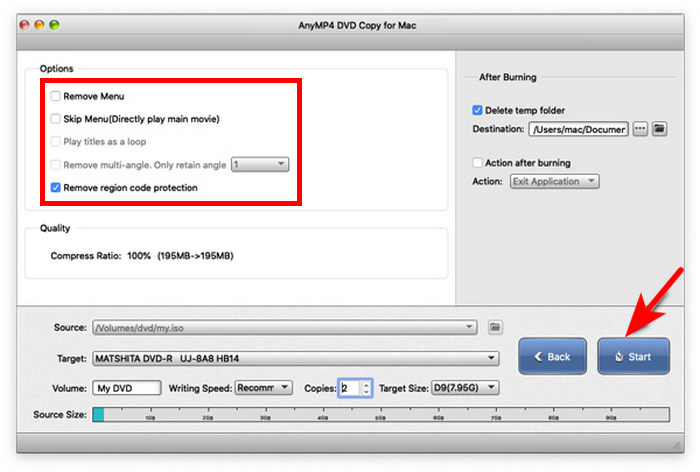
Step 4. After selecting the copy mode, you can now customise the playback menu. These include Remove Menu, Skip Menu, and Remove Region Code, as well as several options to customise the movie's quality to be converted. After editing these options, click Start to begin the DVD ripping process.
Once the DVD content you have loaded on your Mac computer has been successfully converted, the ripped file will be saved on your computer’s hard drive.
FAQs FAQs About How to Copy a DVD to a Hard Drive
-
Is it legal to rip DVDs for personal use in 2025?
Yes, it is. However, avoid making multiple copies. It is also illegal to sell ripped copies, as it constitutes piracy.
-
How long does it take to rip a DVD to a hard drive?
The speed of DVD ripping depends on multiple factors. Some of these factors include the length of the DVD content, the computer’s processing hardware, and the ripping software used. The usual conversion speed ranges from 10 minutes to 2 hours.
-
How much space does a ripped DVD take?
It depends heavily on the DVD's content. The output format where it will be saved also matters. To save space, save the DVD content to MP4.
-
How do I copy DVDs to a hard drive directly?
Simply use the copy-and-paste function on your computer. Select the DVD content, copy it, and paste it into another location. However, this only works for unprotected DVDs.
-
How to convert a DVD to a hard drive?
You need DVD-ripping tools to convert protected DVDs for storage on hard drives. The most innovative option to use is the Blu-ray Master Free DVD Ripper. This is because the program supports countless digital formats for saving any form of DVD content.
-
What is the best free software to copy a DVD to a hard drive without losing quality in 2026?
We recommend using Blu-ray Master Free DVD Ripper in this case. Among the options in this article, this software offers the best balance between features and quality preservation. It is also a big bonus that it can access encrypted DVD content.
-
Why won’t my computer let me copy a movie DVD to my hard drive directly?
Your DVD software may not be able to handle encrypted media. This is the most common reason why DVD copying fails. To solve this issue, we recommend third-party DVD tools such as Blu-ray Master Free DVD Ripper.
-
How do I bypass DVD region codes when ripping to a computer?
You have to use a DVD ripper that supports bypassing it naturally. Blu-ray Master Free DVD Ripper is a good example. For open-source solutions, MakeMKV and HandBrake are also good choices.
-
Which file format is better for DVD backup: MKV or MP4?
Both digital formats are good options. However, they have distinct strengths that may help you decide. Choose MKV for better quality, and select MP4 for a smaller file size.
Conclusion
We hope this article has helped you learn how to copy DVD data to your computer’s hard drive, whether you're using a Windows PC or a Mac. If you are unsure which options will work best for you, we highly recommend the Blu-ray Master Free DVD Ripper, a top DVD ripper for Windows and Mac, as your main choice for copying DVDs to your hard drive. You can download it for free using the link below.
Free Download
For Windows
Secure Download
Free Download
for macOS
Secure Download
More from Blu-ray Master
Copy DVDs