How to Remove Background Noise Using Audacity and Its Best Alternative

July 28, 2023 08:40Posted by Selena Thomas to Tips
We all agree that background noises from video and audio files hugely affect the quality of the recordings, making it challenging and sometimes even annoying to hear and understand. This may also lead to a misunderstanding or misinterpreting of the content and, worse, to a loss of interest from the audience. On the other hand, Audacity is a popular software that dedicatedly caters to audio editing. Therefore, it is unsurprising that many run to Audacity to remove background noise, even though they do not know how to properly perform the editing using the tool. Fortunately, this post will provide you with the step-by-step procedure on how to clean your audio properly to prevent potential damage to your audio file when using the said software.

Before removing background noise in Audacity, let us briefly describe the tool. Audacity is an open-source and free editing software that caters to music producers, including podcasters. With this program, you can edit, customize, blend, and merge audio tracks or several effects that will help you improve your sound. Furthermore, if you have many audio tracks and want to enhance them, this program can be your lifesaver. Meanwhile, this software comes with an editor of multi-track audio files, which you can also use to decrease the background noise of your audio. Like other programs, it is acquirable on multi-platforms such as Windows and Mac. However, when you start using it, you might find it challenging to access its features, for they are hidden. Also, its GHz and RAM processors have requirements. Nevertheless, here’s how to get rid of background noise in Audacity.
Upload the noisy audio file in Audacity. Or, if you are trying to remove the noise from your newly recorded audio using the software, then you will need to start by selecting the seconds that contain the noise.
Click the Effect button, then choose the Noise Removal and Repair option tab. After that, click the Noise Reduction tab from the popped-up box. Then, click the Get Noise Profile button.
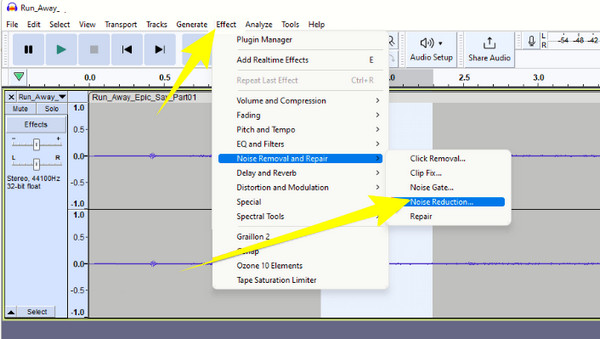
After that, select the audio track, and return to the effects. Then, click the Residue Radio button and the Preview button after. Thus, you have just eliminated background noise in Audacity, but if there is still more, then you need to adjust the settings.
Manually adjust the parameters such as the Noise Reduction (dB), Sensitivity, and Frequency Smoothing (bands), then click the Reduce button. After that, hit the OK tab.

Tip: If you want Audacity’s best noise reduction settings, then you may consider the following parameters: Noise Reduction (dB) – 20-40dB; Sensitivity – 5-10; Frequency Smoothing (bands) – 0-6.
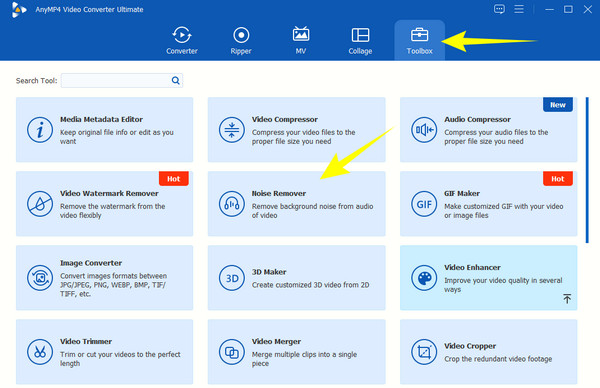
What if your computer cannot handle the huge system requirement of Audacity? If that’s the case, then you must know about the Blu-ray Master’s personal editor, which is the Video Converter Ultimate. Yes, it is a video converter by its name, but it also performs perfectly in editing audio files. This amazing software offers you various editing tools inside its Toolbox, including Audio Sync, Volume Booster, Audio Compressor, and Noise Remover. And, of course, many of the unmentioned video editing tools are included in this Toolbox, which you cannot find in Audacity. Hence, clean up the background noise not only on your audio but also on your video extensively.
Meanwhile, focusing on our main agenda, the Noise Remover of this software lets you easily eliminate unnecessary noise without any hassle. As a matter of fact, even a kid can easily master how it is done, for it gives you as easy as 1,2,3 procedures. Aside from the noise, you can also improve your audio’s volume and delay, as they are freely adjustable from the same page.
Key Features
First, download and install the program by clicking the Download button above. Then, launch the software, click the Toolbox, and select Noise Remover among the tools.
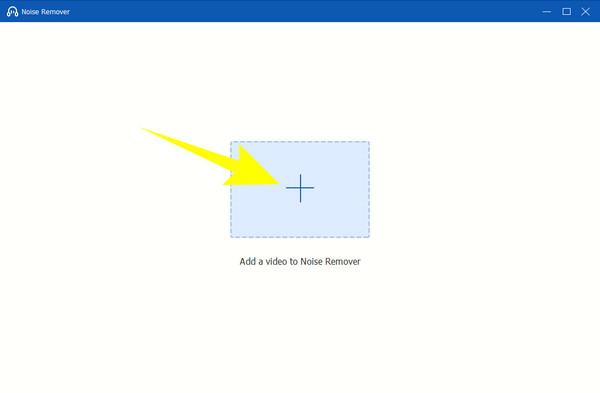
After selecting the tool, you will be prompted to the next page, wherein you need to click the Plus button. By doing this, you can upload the audio file you supposedly need to reduce background noise from Audacity.
Once the audio is loaded, tick the box that says Enable audio noise reduction. Then, you can also adjust the Volume and Delay options accordingly. After that, you may play the audio in the preview to listen to your output.
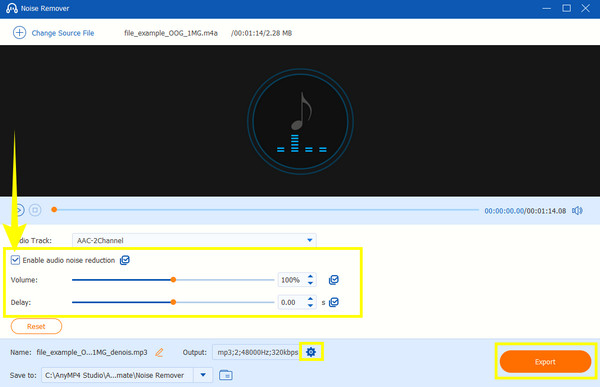
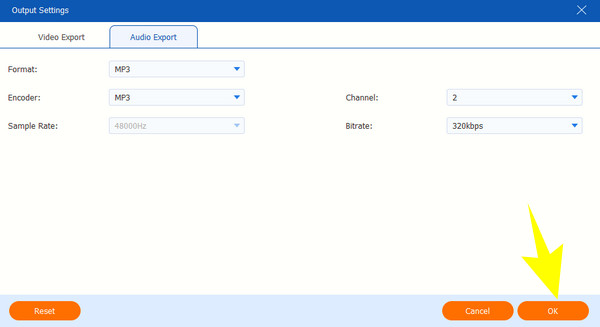
As simple as that. You can already press the Export button to save the cleansed audio. Otherwise, click the Coggle button to edit your audio’s format, encoder, channel, and bitrate before exporting it. Then, adjust according to your preferences on the prompted window and hit OK.
Tip:This Video Converter Ultimate program can also remove background noise from your video. If your video has high-pitch sound or you simply dislike the original soundtrack, you can use the program to replace it and add audio to the video to fix the issue.
What is a good noise reduction rating in Audacity?
The good reduction rating in Audacity to use is 44,100 Hz. It is the default setting of the software, so it is highly recommended to use it for audio files.
What is sensitivity in Audacity noise reduction?
The sensitivity parameter in Audacity is the setting that distinguishes the noise reduction algorithm. In addition, it controls the applied noise reduction settings in the file.
Where is the noise removal button on Audacity?
Audacity doesn’t have a specific button for noise removal since it takes multiple steps to do the process. However, you can find the function when you click the Effect button at the menu ribbon.
Why is there so much noise Audacity mic?
Various factors cause you to encounter noise in Audacity’s mic, and some are the following: Microphone quality, background noises, electronic devices near you, and sometimes, issues with your computer drive.
Why isn’t noise removal showing up on Audacity?
When the noise removal is not showing up, even after you click the Effect button, then you may want to check the software version you are using. If your Audacity is not up to date, then the tendency is that the noise removal function is not won’t be available.
If you just do it on your own, without following the instruction given above, you might find it overwhelming to use Audacity to remove background noise. The steps are super easy to follow, as we made them easier to understand. Audacity is indeed a good software to use, and it helps you big time with your audio editing tasks. However, if you want lighter and more friendly software, then use the best alternative, the Video Converter Ultimate.
More Reading
How to Denoise Videos in Four Ways [Step-by-Step Guide]
Are your videos grainy? This article has the perfect solutions with complete instructions on how to denoise videos remarkably. Thus, hit this post now to see!
How to Extract the Audio File from Blu-ray Disc for FREE
When you want to rip Blu-ray audio to FLAC, you can check this post and learn how to extract audio from Blu-ray.
Audacity Recording -How to Use Audacity Record Computer Audio
How to record computer audio? How to make the Audacity audio recording? This post gives you a detailed guide to record your computer audio with Audacity.
Various Ways to Fix Audio and Video Out of Sync on Windows
It’s troublesome to watch a movie if the audio and video are out of sync. Know how to fix audio and video out of sync using these various programs below.