Create Your DVD Using Adobe Encore in 4 Easy-to-Follow Steps

March 29, 2022 10:10Posted by Selena Thomas to Create DVD
We cannot deny that the demand for DVDs has dwindled over the past years. One reason for this is the availability of modern-day storage, which is way more convenient and compatible with laptops, TV screens, and even phones. But here is the thing, DVDs are much more reliable if you want to prevent data corruption. Of course, when your camera-recorded memories are at stake, you do not want the unwanted situation to happen. Right?
Stay tuned, and we will guide you on how to make a DVD with Adobe Encore.
If you purchased the Adobe Premiere Pro, you would also get the Adobe Encore as part of the bundle. Many treat this offline program as a rival with the other top-of-the-line tools for DVD authoring. On the other hand, it contains a drag and drop feature, which allows you to maneuver your project more efficiently.
Next, if you want to create a DVD menu, you may do it with Encore and Photoshop. But for this article, consider the steps below in burning your files into DVD.
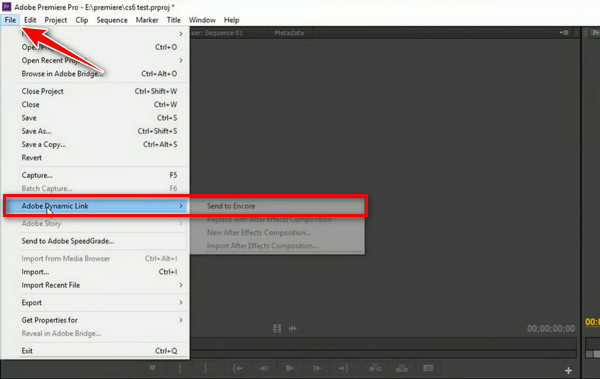
If your videos are in the Premiere Pro, you should first export them. Go to the File > Adobe Dynamic Link > Send to Encore to do this.
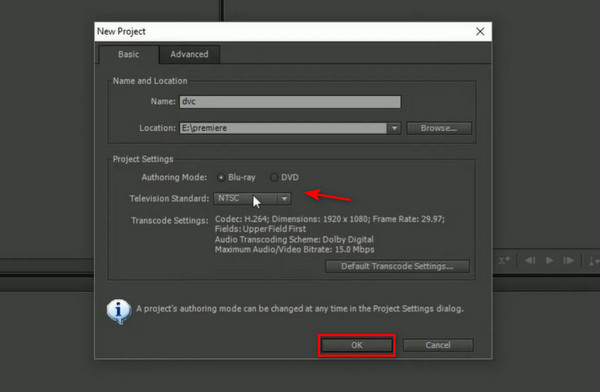
Next, when the Adobe Encore launches, set where you want to locate your output and put a title. On the other hand, tick DVD as your Authoring Mode. Then, change the Television Standard depending on your country, and when all is set, hit OK.
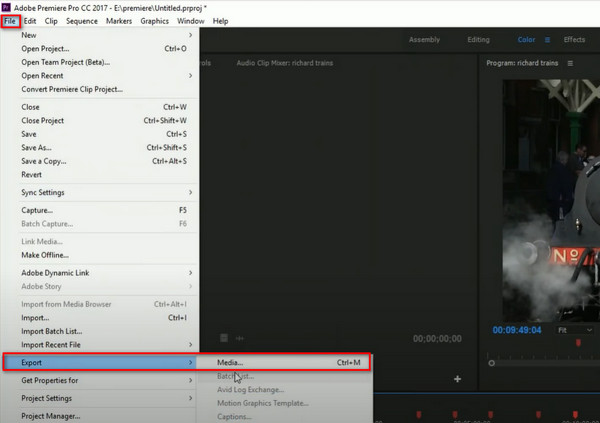
This time, you should already see your content from Premiere loaded on the timeline of Adobe Encore. To start the transcoding process, go to File > Export > Media.
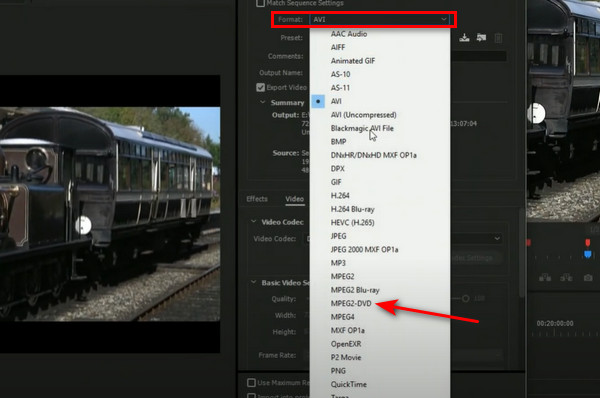
After that, on the Export Setting, drop down the Format and choose MPEG2-DVD. Do the same on the Preset and choose your preference in the options. If you are particular with the bitrate, you may also change it. When done, hit the Export button along the bottom of the interface.
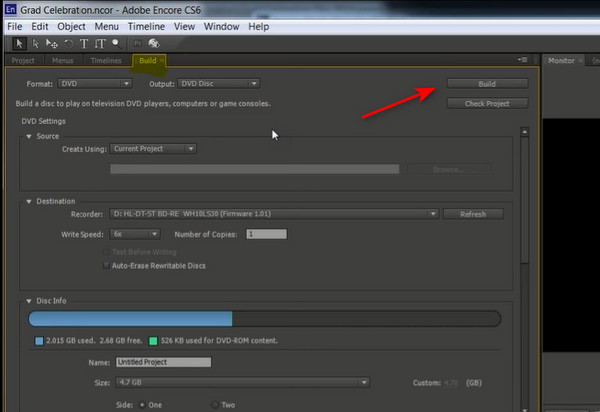
After your file has been transcoded, relaunch the Encore and start a New Project. This time, what you will be importing is the converted files earlier. After loading them on the timeline, go to the Build section and mount the disc on your tray. Then, hit the Build button, and the process will start.
Undoubtedly, any program released by the Adobe Team is great for professional services. As you explore beyond, you will discover many great features that Adobe Encore has. However, since this tool is no longer a bundle of the Adobe Premiere Pro CC, you do not want to have an impulsive upgrade and spend much money.
On the contrary, you may try a tool that simultaneously does the authoring and video editing. For that matter, DVD Creator is a reliable tool you can have. It is known for its user-friendly interface, and most beginners like their experience of it. On the other side, it supports hundreds of video formats, including MOV, MP4, MPEG, AVI FLV, and more, and burns them either into DVD/ISO or Blu-ray.
One more thing, this offline program is also able to customize a DVD menu to make your DVD more interactive and unique. DVD Creator provides you with various templates suited for any occasion. Below, our team has provided simple ways to burn DVDs using the best alternative tool for Adobe Encore.
Install the Best Alternative Tool
First and foremost, click the Free Download buttons below to have the DVD Creator. After that, follow the setup wizard to install the program on your device
Import the Files to Burn
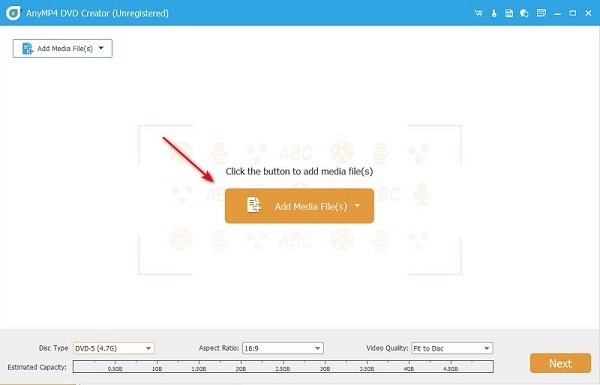
When the program launches, hit the DVD Disc as the one you will be working on. After that, hit the Add Media File at the center of the interface. When the popup windows show, select the files you want to burn from your computer folder and import them on the program.
Setup the DVD
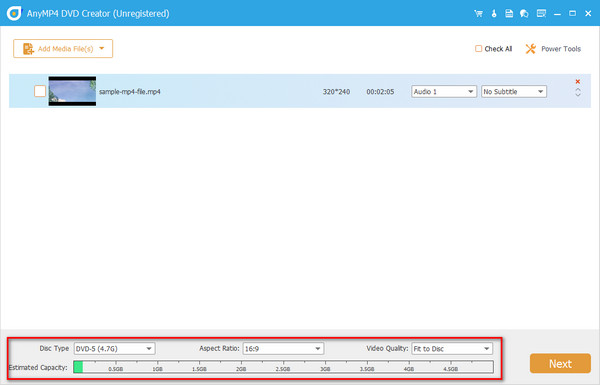
Ensure that you will not miss this part. Along the bottom of the interface, there is an indicator of file size that your video will need for DVD burning. Therefore, select the Disc Type that matches your disc’s capacity (either DVD 5 or DVD 9). On the other hand, you can stick to the default in the Aspect Ratio and Video Quality. After that, hit Next.
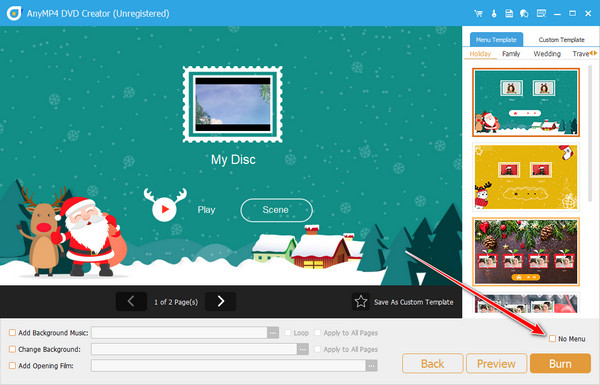
Customize DVD Menu (Optional)
Now, you will be in the section where you can create a DVD menu. If you want one for yourself, explore this interface and choose the template you want. If you do not need one, just tick the No menu tab. After that, hit the Burn button.
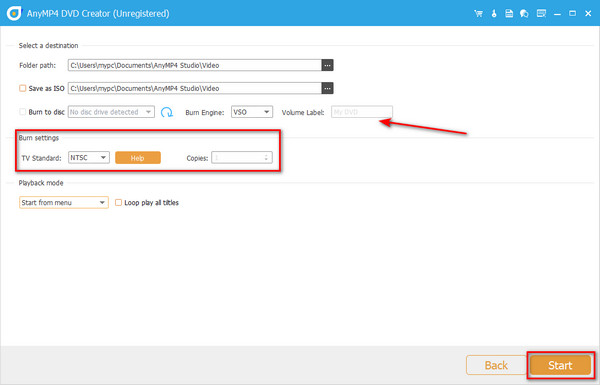
Start the Burning Process
Lastly, configure the settings for the authoring process. On the TV Standard, select whether you are using PAL or NTSC. Also, choose if you want to start from the menu or title. On the other hand, mount your disc on the DVD tray and check if the program detects it. When done, hit Start.
Further Reading:
Detailed Steps to Burn iMovie to DVD for Any DVD Player without iDVD
How to Create DVD from Adobe Premiere Pro (Beginner Friendly)
Can I burn DVD without Encore?
Sadly, Adobe encore is no longer bundled with Adobe Premiere CC. However, you can author videos by trying alternative applications out there.
Can I export my videos from Premiere to Encore?
Definitely, yes! You can export your content on Premiere to author them on Adobe Encore. In fact, you will also need an Adobe Encoder to convert your files to DVD-compatible format such as MPEG-2.
What is the difference between NTSC and PAL?
erhaps, you are constantly seeing these two options in the Television Standard. Choosing which one to select depends on the country you are living in. Usually, NTSC is used in America, while PAL is used in Asia and Europe.
Voila! By this time, you have learned how to create a DVD with Adobe Encore and with DVD Creator. While both have distinct features, you can decide which one to use. If you are a beginner and find Encore quite complicated, you can pick out DVD Creator. This offline program is very straightforward and does not require much technical mastery. On the other hand, if you get the bundle for the Adobe programs, as stated a while ago, enhancing your video editing skills on the Premiere may be a good start.
More Reading
[Full Guide] Crop/Scale to Split Screen in Adobe Premiere Pro
A split-screen video can tell multiple stories at the same time. You can learn how to split screen with cropping and scaling step by step in this article.
Step-by-step Guide to Import and Edit MP4 in Adobe Premiere Pro
Encounter error or alert message when importing MP4 in Adobe Premiere Pro? This article tells you the right way to do it and solutions to get rid of the error.
2 Highly Commendable Ways on How to Crop Video in Premiere
How to crop video in Premiere? This post will assist you in learning how to crop video in Premiere effectively by providing a full instructional approach.
Best 4 DVD Players to Play All-region DVDs (Software&Hardware)
Have you met with DVD playback issues restrained from DVD region codes? Here is a list of best all region players to play DVDs without region code restrictions.