Correct Video Color Using 3 Best Color Correction Video Editing Programs

September 22, 2023 10:40Posted by Selena Thomas to Edit Video
Correcting a video color can bring big changes to a video. It can express emotions that can satisfy the viewers. Also, if you have a video with an unsatisfying color, editing and changing the video color is the best solution. In that case, the article might be useful for you. In this guidepost, you will learn various ways to change video color using various software. So, come here and discover how to do video color correction.
When watching a video, its color plays a vital role in giving more impact to its viewers. It can add additional effect and bring the emotion that the viewers can engage in. So, editing the video color is perfect to make the video more satisfying and engaging. But what is the video color correction? Well, video color correction is fixing and balancing a video color. It involves editing the video’s brightness, saturation, hue, exposure, and contrast. Balancing the video color is useful and helpful in acquiring more perfect video.
Correcting a video color is needed to give more effects or balance the color. For example, if the video is not that bright, you must color-correct it by adjusting the brightness. Also, if you want to make the video in black-and-white mode, you can do so. You can tell that color-correcting a video is necessary to achieve your desired video.
Now, you may wonder what are the differences between color correction and color grading. The color correction is a process during the post-production phase. It is about using editing software to adjust the color of a video. It includes adjusting the exposure or contrast of a video to make it more natural to view. On the other hand, color grading is the process of designing or stylizing the color scheme of a video. After the color correction process, editors can start the process of color grading the video. During the color grading procedure, it is time to stylize the video. It includes adjusting the visual tone and the atmosphere of a video. It is also the time to make the video more cinematic.
The best color correction video editing software is the Video Converter Ultimate. Correcting a video color is simple when using the downloadable program. It is because its user interface is easier to understand compared with other editors. This way, all users can utilize the Video Converter Ultimate without difficulties. Also, the program lets you modify the video’s saturation, hue, brightness, and contrast. With that, you can edit and improve your video your preferred way. Moreover, Video Converter Ultimate is suitable for both Mac and Windows computers. No matter what device you have, you can access the program anywhere and everywhere. So, check the process below to learn how to color-correct a video.
Download the Video Converter Ultimate on your device. You can tick the Download button below to access the video editing software. After installing it, launch and begin the color correction process.
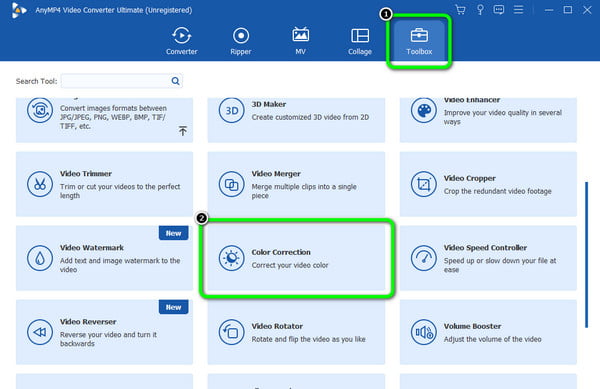
Then, choose the Toolbox option from the upper interface and navigate to the Color Correction feature. After that, another mini interface will appear on the computer screen.
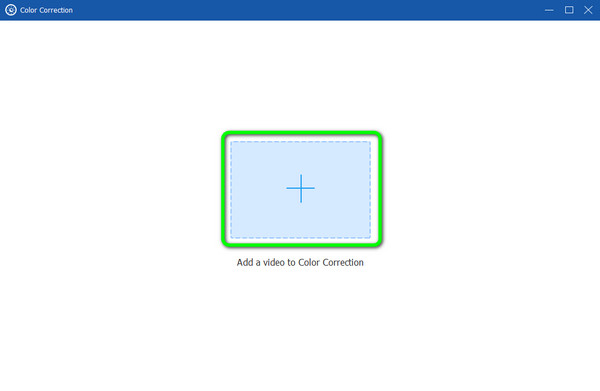
Click the Plus sign from the middle interface. When the file folder shows up, browse the video file you want to color correct.
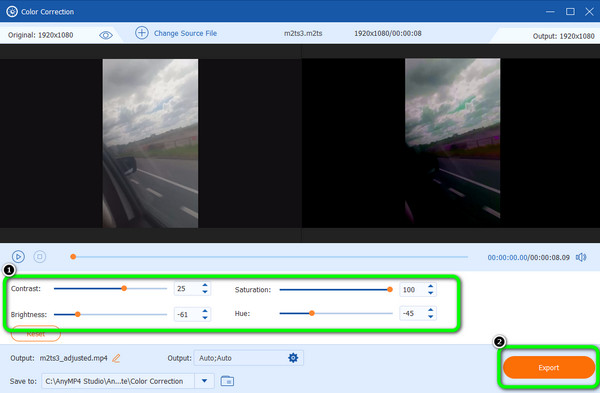
After that, you can proceed with editing the video color. You can adjust the slider from the video’s saturation, brightness, hue, and saturation to do that. When done, hit the Export button below. Finally, you can have your edited video.
Another best color correction software for video is After Effects. It is capable of balancing the video color if you need it. With the help of its Color Correction function, enhancing the video color is possible and can make big changes. Additionally, you can adjust the video color, like changing the video’s brightness. It also includes modifying the video’s saturation, hue, and contrast. Aside from that function, there are more ways to change and improve the video color if you explore more about operating the program. And After Effects can help you make split-screen videos. But, we want to inform you that After Effects also has some disadvantages when changing the video color. Since After Effects is among the advanced video editing software, it becomes unsuitable for beginners. Only skilled users can have a great time utilizing the program. Also, its interface is complicated to view, making it more challenging when editing a video. Lastly, it is not free video editing software. It requires a subscription plan to use the program and enjoy all its features. You can use the method below to know how to color-correct video.
Download and Install After Effects to your computer. You can access the 7-day free trial version if you want. Run the program after installing it on your computer.
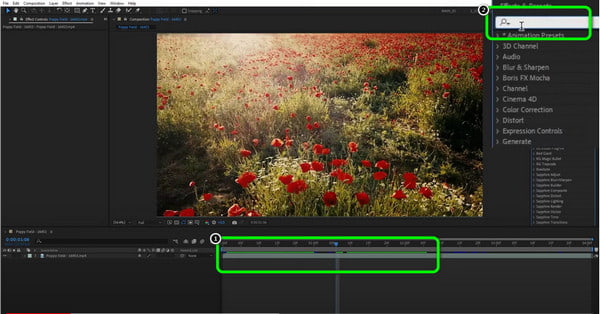
After you add the video, put it on the timeline. Then, go to the Effects and Presets option from the right interface and type Change Color.
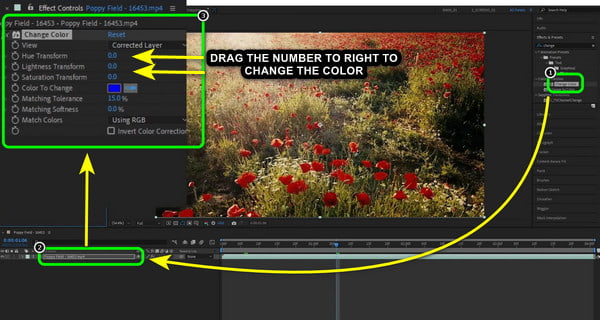
Then, click and drag the Change Color to your video file from the lower interface. After that, you will see a mini section to the left interface. You can see the Hue, Light, and Hue Transform options. Besides the number, click and drag the cursor to the right to change the video’s color.
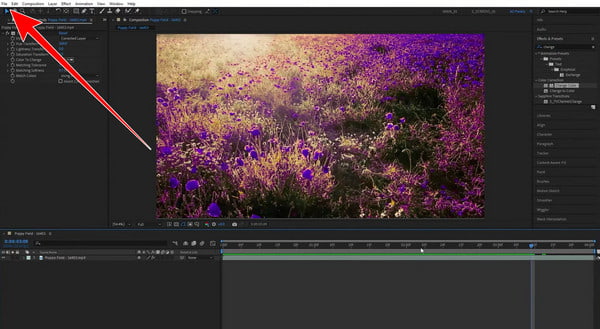
When you are done changing the video color, Go to the File section and select Save as an option to save and keep the edited video on your computer.
Let’s say you want to color-correct the video automatically. In that case, you can use Premiere Pro as your video color editor. The Premiere Pro auto color correction function can help you solve your problem when adjusting or changing the video color. Also, the program can give you excellent video color quality, making it more satisfying after getting the final output. And you can use it to speed up videos. Aside from that, Premiere Pro is available on both Windows and Mac operating systems. So you don’t have to worry about its accessibility on various platforms. However, you can’t just operate the program. It needs a subscription plan to use it continuously. It can only offer a free version that is good for seven days. After that, the software will charge you based on your chosen subscription. You can follow the ways below to learn how to correctly use the auto color correction video function.
Access the Premiere Pro on your computer. Then, run it after the installation process.
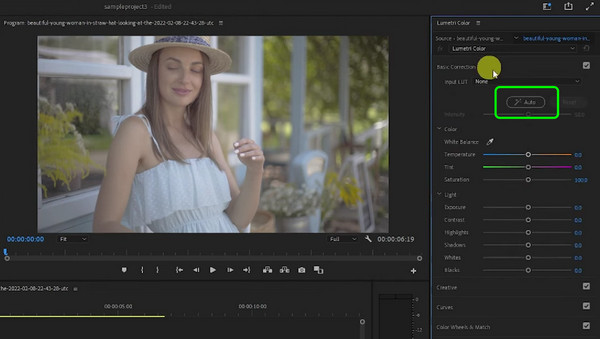
After that, put the video file on the timeline to proceed with the main process. Then, go to the right interface and select the Lumetri section.
To automatically change the color, click the Auto option. After that, you will see some changes in your video. You can also use the sliders below to manually change the video’s color. Then, you can already change the video.
1. How does color correction work?
It depends on the software you use. Color correction is a process of correcting and balancing colors. You can color-correct a video using the sliders or color options the program can provide. Then, when choosing the color, the program will process it and change the video.
2. Is color correction really necessary?
Yes, it is. Correcting video color helps create an amazing video. We all know that video color has an essential role in the video.
3. Why do I need a color correction?
You need it if you want to improve or enhance the video color. For example, color correcting is one of the best solutions if you have a video with poor lighting.
4. What is the best color correction software for video?
The best color correction software is Video Converter Ultimate. This is because it can offer a trouble-free method when adjusting the video color. Also, its interface is perfect and easy to understand, making it accessible to all users.
5. What is the difference between color timing and color grading?
Color timing is the procedure of balancing the density and color of each shot in a motion image. Color grading is more about stylizing the color scheme of a video.
To know how to do video color correction, you can use the article as your basis. We provided the best three ways to color correct a video using three video editing software. But, if you prefer a program with a hassle-free method, the suitable tool is Video Converter Ultimate.
More Reading
5 Greatest Video Color Editors To Use [Pros and Cons]
See various video color editor apps and software to use for fixing video color. Then, we will include their advantages and disadvantages to gain more insights.
Top 3 Efficient Ways to Change the Color of A Video
To change color in a video, you must have reliable video editing software. So, read the post to discover the best three ways to change the video color.
Outstanding Ways on How to Make a Video on All Platforms
Master the methods on how to make a video using your computer, web browser, and iPhone. Read the entire post to know more about these easy-to-follow ways.
6 Exceptional Photo Slideshow Makers for Desktop & Mobile
Discover the different picture slideshow makers you can get on your computer and smartphone for free. These apps are trusted and effective in slideshow making.