How to Do Split Screen on Windows PC

September 07, 2022 09:00Posted by Selena Thomas to Tips
If you are among the productivity masters, you probably understand the true power of multitasking. One of the features we can use to become productive is the split-screen Windows feature, which lets users to view up to four windows at once. In addition, it is a significant selling point for the operating system. It is ideal for analytical work or any task requiring multiple sources to be live and visible simultaneously. Also, it is a great money saver for budget users or mobile workers who need to optimize that valuable screen space without investing in a second screen.
For that being said, this article is here to help you learn the things and guides we need to know on how to split screen on Windows. We will tackle the guideline in doing it to Windows 10 and 11. As a bonus tip, we will also show you how to make split-screen videos using a great tool on your PC. Let us see how to make it possible, starting with the guidelines below.
As we all know, the Windows 10 version is one of the most functional and most used operating systems among Windows users. That is why we shall begin the guideline by giving you the instructions to make a split screen on Windows 10. Reminder, follow the steps below correctly to prevent any complications.
This one is obvious, on the first step, you must have your applications open before you can use the split screen Windows 10 feature. You can launch your web browser, spreadsheets, and whatever else is required as long as the application supports a Split screen feature.
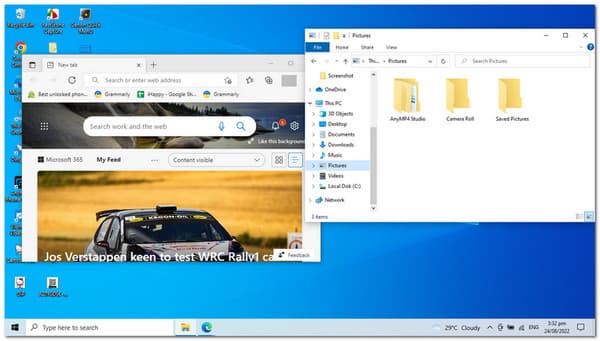
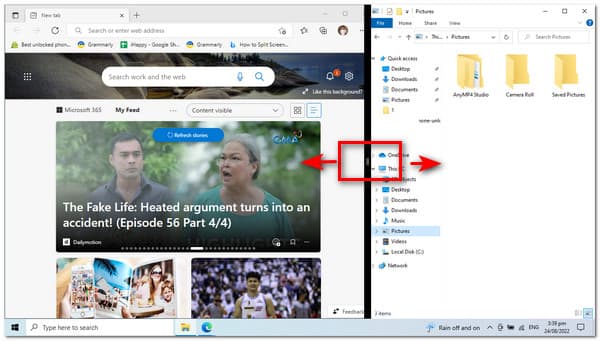
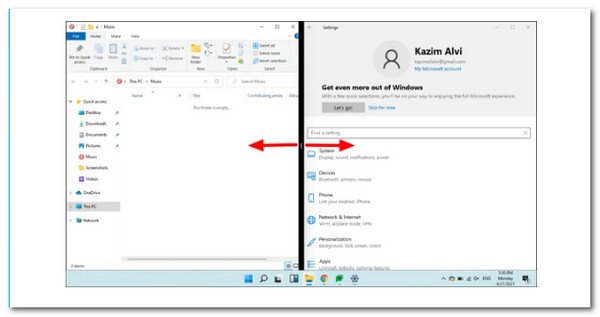
In the next step, please continue dragging a Window’s Title Bar to the left or right side of the screen. As for tips, you can use the keyboard shortcut of the Windows key plus the button for the Left or Right arrow. As you do this, a pale outline of the Window position will appear. Then, to snap the Window into place, release your click.
As we proceed, you will notice that all other applications should now appear in small boxes on the opposite side. From there, click the other one, and Windows 10’s split-screen feature will snap it into place.
In addition, if you require a Window larger than the others. Hovering the mouse cursor between the Windows will transform it into a double-headed arrow, allowing you to adjust window sizes. Please make it follow your preferred size to make a better multi-tasking process.
Mac users come here to see how to split screen on Mac computer.
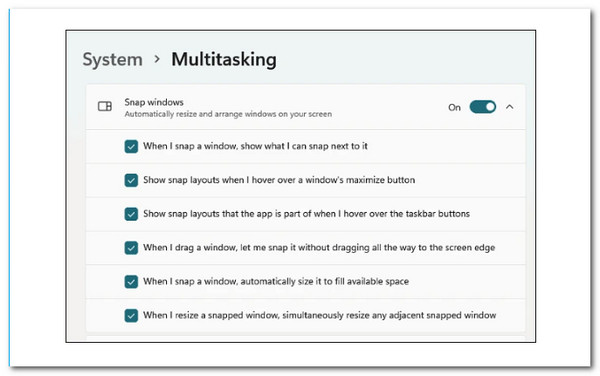
The Snap windows option is enabled by default in Windows 11, but double-checking before proceeding is a good idea.
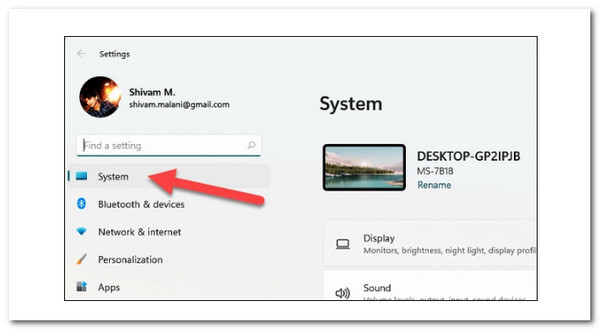
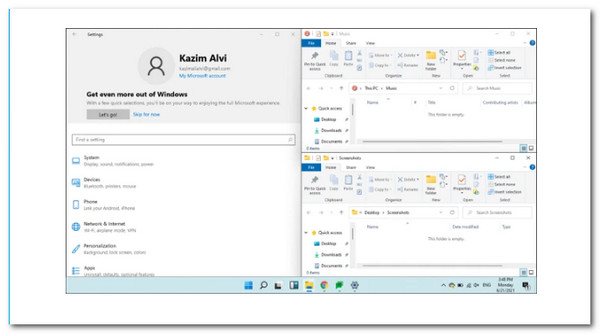
As we begin the process, we need to see if the Snap Windows feature is enabled. This process is possible if we launch the Settings app on your PC by pressing the key for Windows and the letter I key. From there, we need to navigate the Settings and go to the System on the options we see on the left side corner of the Windows.
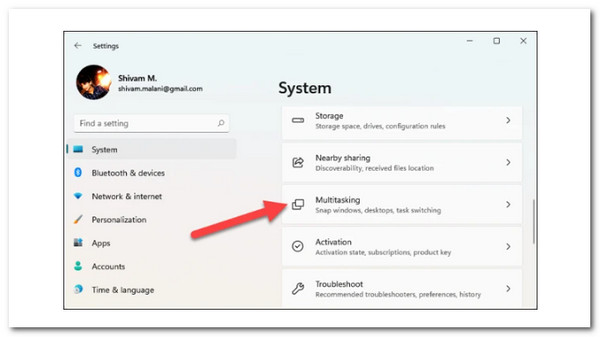
After that, we must scroll down in System settings and click on the Multitasking option on the right panel of the settings window. Kindly click it as we proceed with the next step.
A new set of options will appear on your screen. That means we need to check and see if the Snap windows Toggle is turned on. If it is not yet functioning, click the Toggle to allow it.
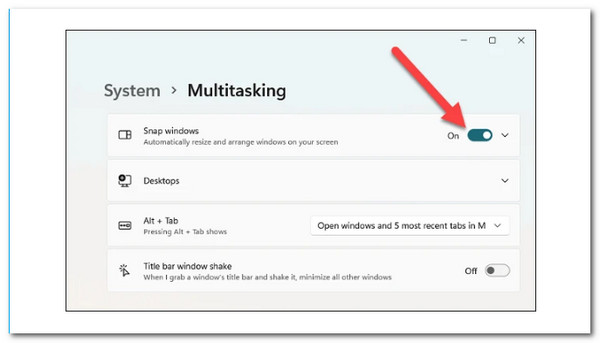
Furthermore, explore the various options listed under it and check or uncheck as needed. However, it is suggested that you leave the default settings alone until you understand the concept well.
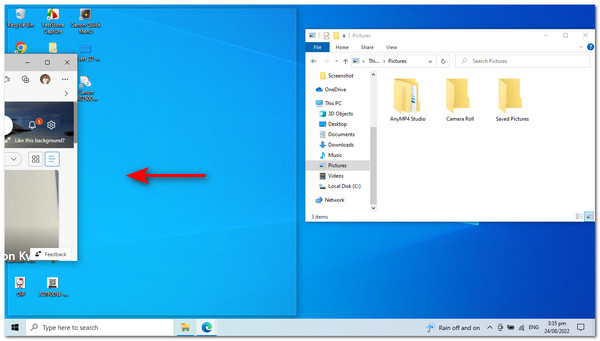
Launch the app windows you want to split, then hover your mouse over the maximize button. Now, please select one of the first option’s parts.
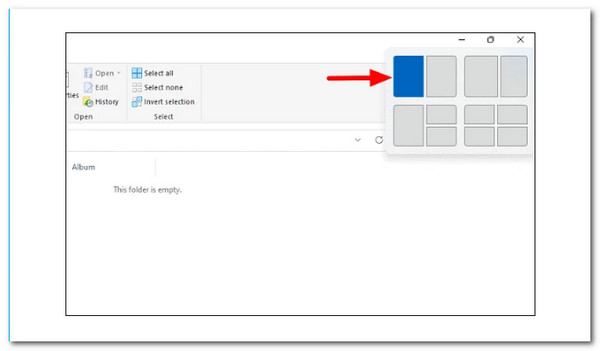
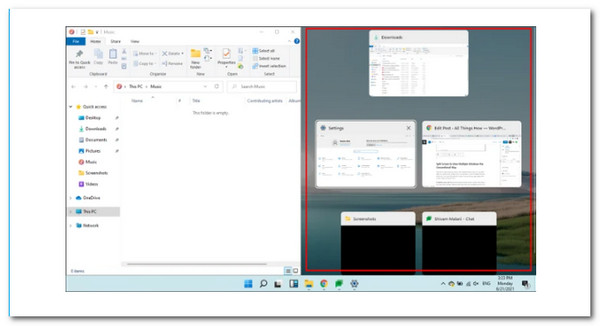
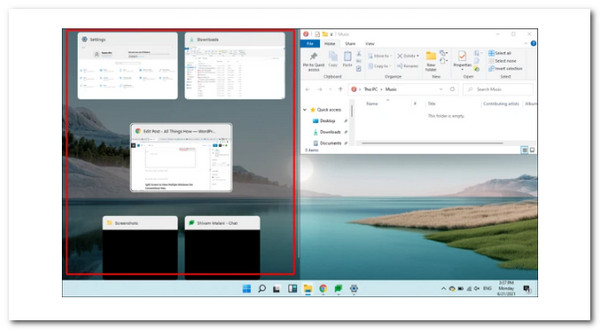
The current app window will snap into the screen’s chosen half, and other open apps will appear as thumbnails in the other half. Choose the one you want to add to the bottom half of the screen.
You now have two app windows on the screen that you can access and work on simultaneously.
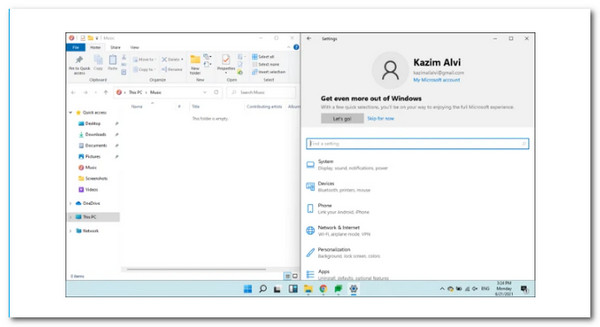
You can also change the size of the windows. Move the cursor to the line separating the two windows, and a thick dark line will appear. To resize the bar, hold and drag it in either direction.
You can split the Windows screen and resize the windows as needed with the second option.
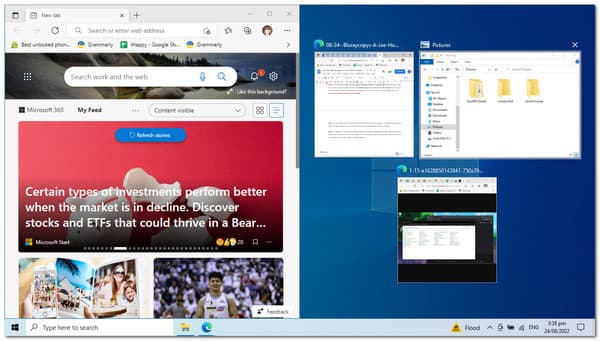
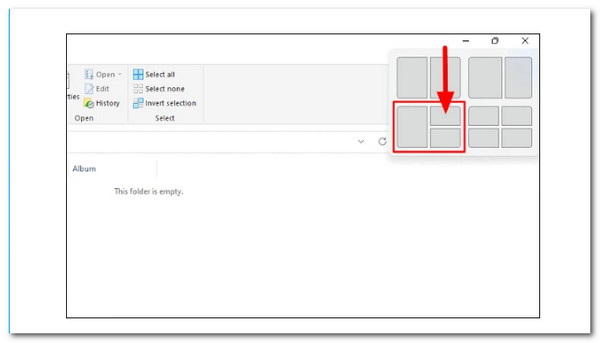
If you want to work on three apps at the same time, you can divide the screen into three sections. Here’s what to do in doing it.
Hover your mouse on the maximize button and choose one of the three parts in the third option. Although the concept remains the same, we have chosen a quarter for your convenience.
The current app window will snap into the screen’s chosen half, and other open apps will appear as thumbnails in the other half. Select the one app you want to add to the bottom half of the screen.
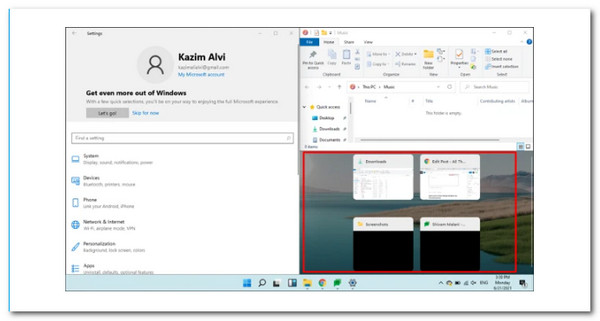
After you select the second window, it will take up the left half of the screen, with the other open windows displayed as thumbnails in the remaining quarter. Choose the desired app, and it will occupy the third quarter.
You can also modify the frame size of the windows. Move the cursor to the line separating the two windows, and a thick dark line will appear. To resize the bar, hold and drag it in either direction.
Blu-ray Master picked Video Converter Ultimate can mix multiple movies and images simultaneously. Select a design to make your split-screen video and insert video clips or photographs into the frame. You can also easily modify each screen. Once you have finished editing your video collage, you can share it on TikTok, Instagram, and other social media platforms. As a result, please inform us of the steps necessary to make it happen. Indeed, it is a great tool that we can use to have split screen videos for computer presentations, especially with the Windows operating system. In line with that, let us see how much performance it can give to all of us.
Install the excellent Video Converter Ultimate on your Windows or Mac computer.
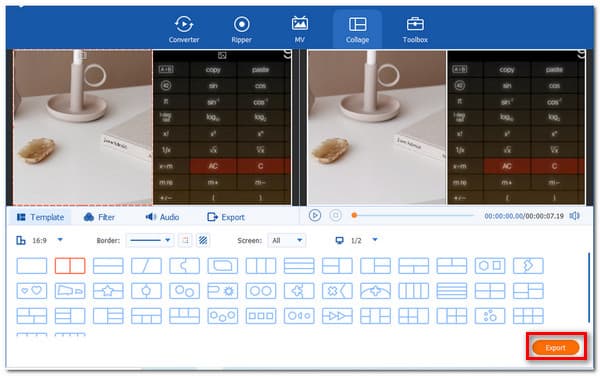
From there, you can access the Collage feature menu of the tool.
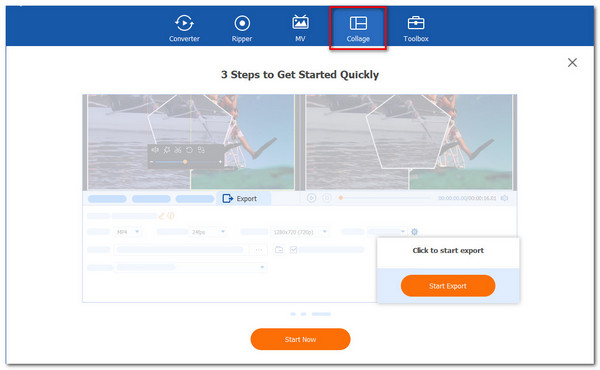
Please click the Start button in the new tab to formally begin the procedure. Then, choose the Two Cell or Four Cell, or other templates from the available templates or another.
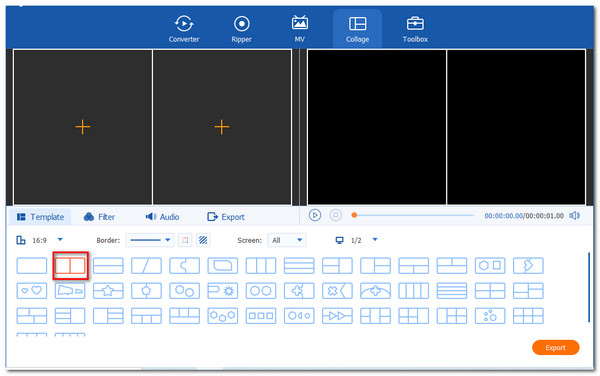
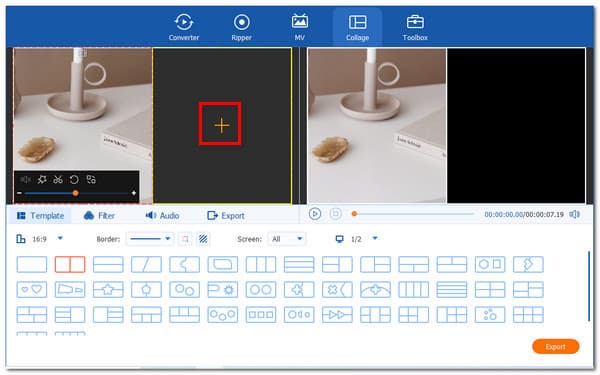
Click the Add button to create the split screen vision. Choose two media files and decide which should be on the right and the left.
If you have already placed the files, click the Export option to save your file. Following that, we must enable the tools to begin exporting and await the results.
What is the disadvantage of having a four Window screen?
The disadvantage of splitting the screen into four windows reduces visibility and clarity, effectively defeating the purpose. As an output, it is recommended that you only do it on a larger display.
On my keyboard, how do I split a window?
There is a helpful shortcut for splitting windows. Hold down the Windows key in an open window and then press the Left or Right Arrow keys. The active window should be snapped to the left or right automatically.
How to split screen Fortnite on PC?
Please, launch Fortnite and navigate to the Main Menu. Then, check that both controllers are connected to the console and powered On. After joining both controllers, the first player must invite the second player to select their account. The next player will appear in the lobby once they have signed into their account, and split-screen mode will be enabled automatically when you start a game.
Splitting the screen on our Windows PC is undoubtedly beneficial. That is why, the guidelines above are essential to read in making the process possible. We can do the splitting process with Windows 10 and 11. You can now do it on your own. Also, if you need more help with your devices, visit our website and see more of them.
More Reading
[Solved] How to Make Split Screen-video for YouTube/TikTok
Follow the step-by-step guide in this article to put multiple videos side by side for making a split-screen video with the best video editor in easy steps.
[Solved] How to Make Split Screen-video for YouTube/TikTok
Follow the step-by-step guide in this article to put multiple videos side by side for making a split-screen video with the best video editor in easy steps.
iMovie Split Screen – How to Split Video in iMovie on iPhone/iPad/Mac
How to put two videos side by side in iMovie? How to split video in iMovie? Can I combine two videos side by side on iPhone or iPad with iMovie? Read this post.
[Full Guide] Crop/Scale to Split Screen in Adobe Premiere Pro
A split-screen video can tell multiple stories at the same time. You can learn how to split screen with cropping and scaling step by step in this article.
Split Screen