How to Reverse a Video with Ultimate Tools on a Computer and Phone

January 13, 2023 13:35Posted by Selena Thomas to Edit Video
There are different reasons to reverse a video. Some may want to reverse their videos to have a unique way of telling a story or just simply to spook their friends. This kind of concept is undeniably extraordinary and could turn your ordinary videos into exceptional ones. As time goes by, tactics for reversing a video have become creative. Today, you can combine multiple storyboards to present your story uniquely and add various elements to your creation to make your idea perfect. But, how to reverse a video and come up with a beautiful outcome will all fall to one root, and that is to have a gloriously powerful tool. Good thing this article will provide you with impressive guidelines using the best tools for this matter. Therefore, as excited as we are, please proceed to read the content below and determine the perfect tool for you.

Want to know how to put a video in reverse with a non-intimidating tool? Have yourself indulge with the simple yet powerful functions of Video Converter Ultimate. It is a fantastic software that offers great features without requiring technical mastery from its users. As it is given in its name, this software is intently used for accelerated video conversion but also has the powerful ability to do other video editing tasks. In addition, it has been providing excellent tools within its toolbox, including the video reversing tool. Make way to the lightest and easiest video reversing to perform, making beginners comfortable and confident in doing it. Besides that, this tool comes with artificial intelligence technology that helps work in the proficiency of the procedure.
Moreover, you will be amazed at the advancement of the technologies it has. Aside from artificial intelligence, it also comes with hardware and GPU acceleration making it more dominant than its competitor. What is more impressive about this Video Converter Ultimate is that it supports many various video formats allowing you to work on any kind of video from your gallery. For this reason, let us all see how to reverse a video using the tool below.
Key Features
First and foremost, acquire the latest software version by clicking the Free Download button above. Then, quickly install it on your computer and launch it.
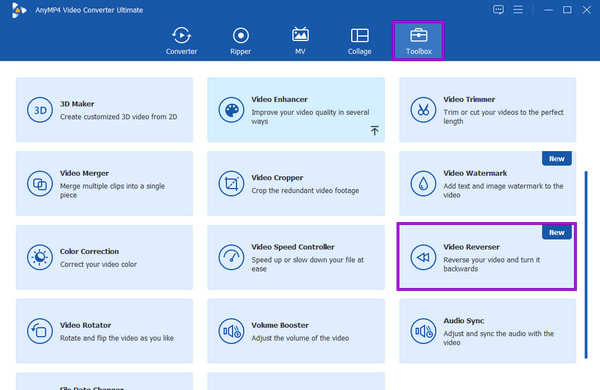
Upon reaching the tool's main interface, you will see four menu tabs in the upper portion. From there, click on the Toolbox tab to see the collection of tools. Then, look for the Video Reverser tool and click it.
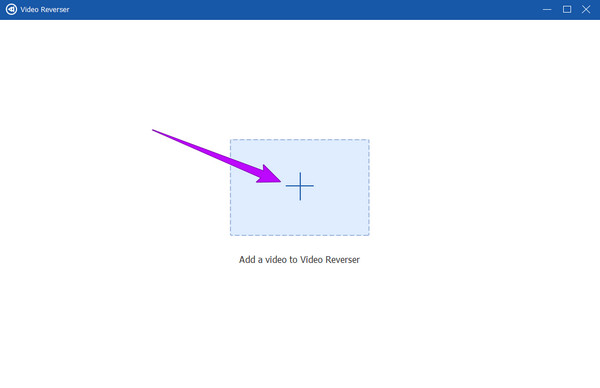
After that, you can now upload the video you want to reverse. To do so, click the Add button at the center of the popped-up window. Then, select your target video file from your local folder.
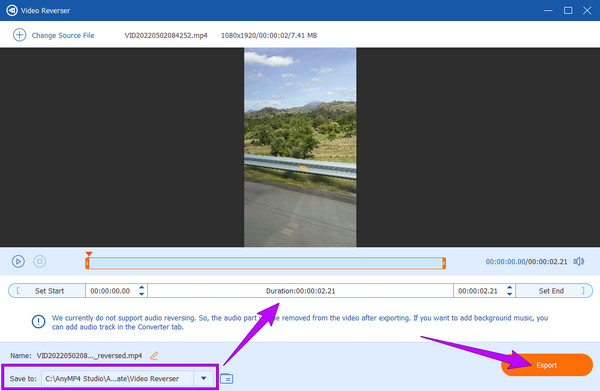
This time, before you reverse the clip, you can determine and adjust the time of the video according to your desired duration. Also, you can hit the Save To section to decide where to save the output. After that, you can finally hit the Export button at the bottom of the interface to reverse the video. Amazingly, the reversing procedure will only take a few seconds. Then you can already check and enjoy your output.
How to reverse a clip in Premiere? This question has probably visited your thoughts already. And yes, this software is quite viable for reversing a video. Adobe Premiere Pro is, in fact, a non-linear video editing software that comes with many functions. Furthermore, it is a famous video editing software that works progressively for professional editors. It has various powerful editing tools that they can use to create unique effects and enhancements on their videos. With this Adobe Premiere Pro, professionals can come up with multiple audio assignments and camera sequences, and they can also add transitions and make artistic animations exporting their projects in high quality. However, as this tool may look so simple to the expert, it intimidates beginners. Nevertheless, here is a comprehensive guideline on how to reverse a clip in Premiere.
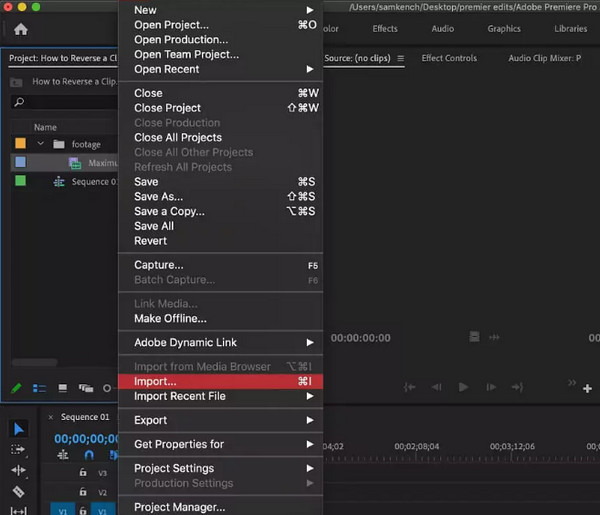
Initially, download Adobe Premiere Pro on your desktop, and open it. Then, begin to upload the video file that you want to reverse. To upload the video, click the File tab and then the Import option after. Otherwise, you can simply drag your video file and drop it into the project bin.
Once the video is uploaded, drag it to the timeline. Then, begin reversing the video by separating the parts you want to reverse from your video via the split function. There are various ways to split your videos using this tool, and the easiest one is by pressing CTRL+K for desktop users and Command+K for Mac.
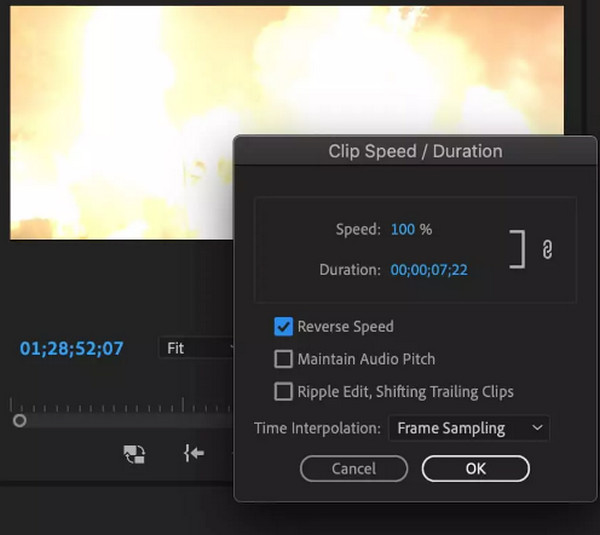
This time, let us do the actual reversing. To do so, you must right-click the video clip and click the Speed/Duration option. Upon doing that, a new window will prompt, where you will see a checkbox with a Reverse Speed dialogue, tick the box to apply the reverse function of Premiere Pro. After that, click the OK tab to apply the changes you made.
Next on the line is the amazing Openshot. Openshot is another software popular with professionals due to its amazing features. Furthermore, you can acquire this software using popular platforms such as Windows, Mac, and Linux. If you are looking for a swift and user-friendly tool, consider using Openshot. Moreover, it has versatile video editing tools and features, including a curve-based time mapping where you can repeatedly speed up or down your videos for reversing. Another impressive trait of Openshot is its advanced editing feature for innovative video and audio effects. Therefore, if you want to create a 3D animation, you can easily create one with this software. Undeniably, many users cling to using Openshot. However, as good as it is, there are still issues that are evident, such as issues about the stability of its performance. Nevertheless, here is the process to play a clip in reverse Openshot.
The first thing to do is to download and install this software on your computer. Then, launch the tool and immediately upload the video you want to see playing in reverse by dropping it into the interface.
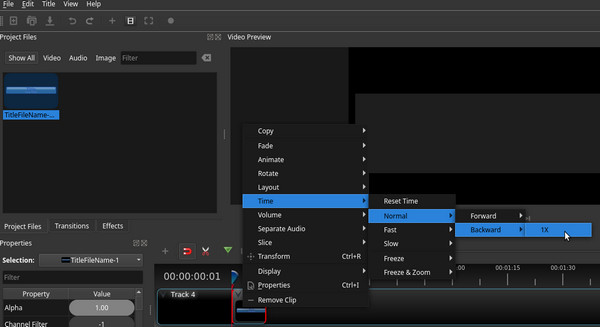
Once the video is uploaded, right-click the file on the track where the video is placed. Then, select the Time option, followed by clicking the Normal selection, then the Backward tab. After that, click to select the 1X selection.
And now you can see that the video is playing in reverse. However, as you notice, the audio is not playing in reverse. Hence, if you want to reverse or mute the audio, you can still do so. Go to the Properties panel by clicking the video to see the Properties option. Then, scroll down to see the Volume option and click it. After clicking, adjust it to reach the 0(Zero) option, and proceed to save the video after.
Here comes After Effects, the leading 2.5D animation tool worldwide. After Effects is used for animation, motion picture compositing, and creating visual effects that every professional video editor knows. Along with the said functions, this software also comes with many helpful features that even beginners will appreciate, primarily the tool for reversing a video. Hence, you will learn how to reverse a clip in After Effects to grasp it quickly before using the tool. As a beginner at video editing, you should know that navigating After Effects is not as simple as your favorite software.
To begin with, you will need to install the Adobe After Effects software on your desktop successfully. Then, go to the File menu and open the video file you wish to reverse. Then, to secure the progress of your project, make it a habit to save every application you make.
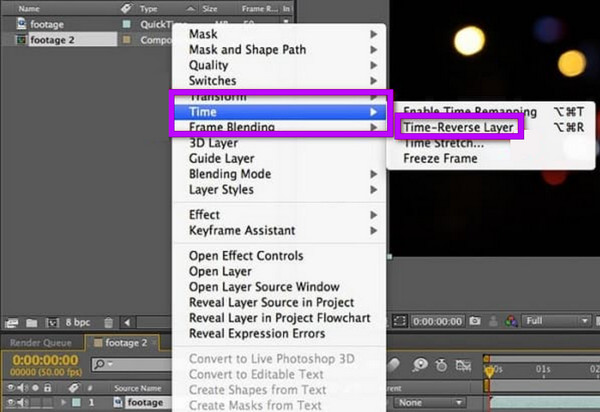
Once the video file is uploaded, drag and drop it to the New Composition section, then right-click the layer you wish to use for your reverse video effect. After that, a drop-down menu will appear. So, click the Time option, then the Time Reverse Layer, to launch another window. From this new window, adjust the speed according to your desired rate for your video.
This time, you need to click the Apply Effect option and wait until the process finishes. Afterward, you can check your video in the preview section and play it to ensure that it was reversed. Then, once the output is good, you can save it.
You may also consider this DaVinci Resolve to reverse the clip. It is a video editing program with full features, free usage, and is undeniably powerful. Furthermore, DaVinci Resolve is infused with advanced video editing features, such as FX filters, stereoscopic 3D tools, advanced HDR grading, Fairlight FX audio plugins, HDR scopes, and many more. On top of that, it has an interface with a clear, intuitive, and professional look that is similar to Adobe Premiere Pro. In addition, this said interface comes with various pages of Color, Deliver, Cut, Edit, Fusion, Fairlight, and Media. Not to mention the numerous transitions that can help you elevate the display of your video. Meanwhile, regarding its ability to reverse a video, DaVinci Resolve allows you to reverse the entire clip or just a part of it. However, some things may disappoint you when using it: its navigation complexity and high demand for system resources. On the other hand, here's how to reverse clip DaVinci Resolve.
After downloading and installing the DaVinci Resolve on your computer, open it. Then, start importing the video file. You need to reverse and select the video clip on your timeline.
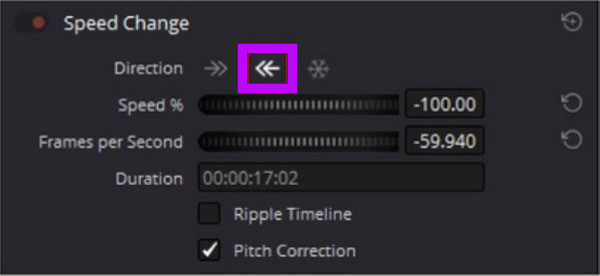
Next, go to the Inspector tab on the left side of the playback area and scroll down to click the Speed Change option.
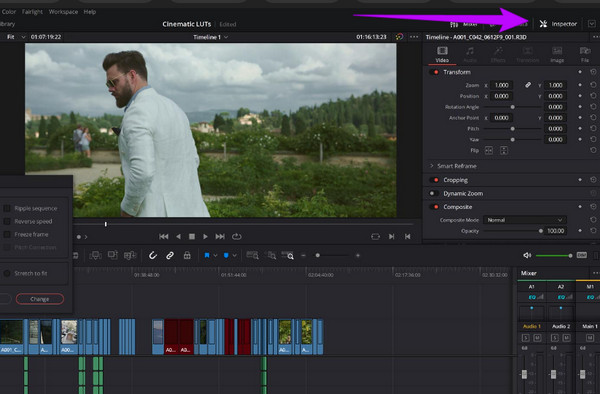
After that, you will see the Direction section, and you must click the arrows showing the left direction. Clicking these arrows will enable you to play your video clip in reverse. In the same section, you can find the settings to adjust the speed and the frames per second.
Here is an online way to reverse a video. Make way to EZGIF, a web-based tool that contains effective video editing tools, including reversing. What is amazing about this tool is that it can reverse the video sound and mutate the sound of your video. On top of that, this online tool is free, despite the full features of editing such as crop, rotate, split optimize, GIF maker effects, and more. However, since it is a free online tool, expect some advertisements along your navigation process. Hence, here are the steps on how to reverse your video on the web.
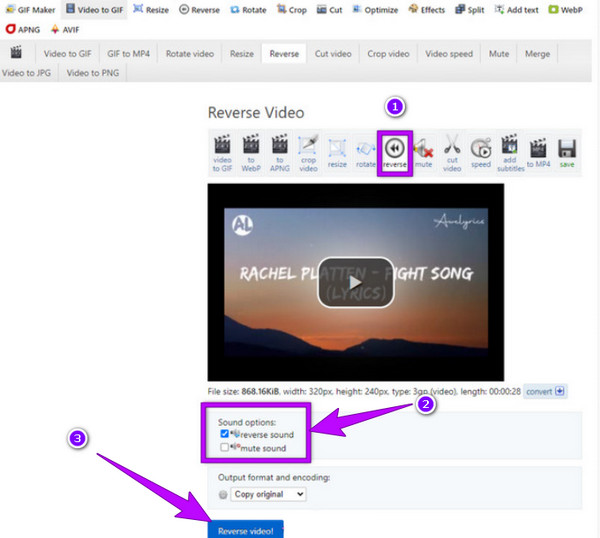
Using your browser, visit the official website of EZGIF. Upon reaching the main interface, look and click for the Reverse option among the tools.
Once selected, hit the Choose File button to attach the video file you need to reverse. Another way to upload is to copy the URL of your video and paste it on the interface. Then, hit the Upload Video button to bring the video in.
It's time to reverse the video now by clicking on the Reverse button above the attached video. Then, tick the Reverse Sound or the Mute Sound, whichever you want. Finally, click the Reverse Video button at the bottom part. Wait till the process finishes, and download the output after.
This part will show you the ways to reverse a video using the built-in editors of your favorite social media apps. We have gathered the most commonly used video apps like Snapchat, TikTok, and Instagram. So, if you also want to learn the task using your phone on the said social media apps, then see the information below.
Snapchat is an app that connects every family, friend, and loved one together by sharing photos and videos. Furthermore, this app lets you capture your videos by using your phone camera directly to the app instantly. In addition, it is packed with many beautiful effects that you can use in your video snaps. One of these beautiful effects is the video reverse, which can turn your snaps into stunning ones when applied right. However, this feature only allows you to work on a video with at most ten seconds long. For this reason, we would like to teach you the right procedure on how to do it.
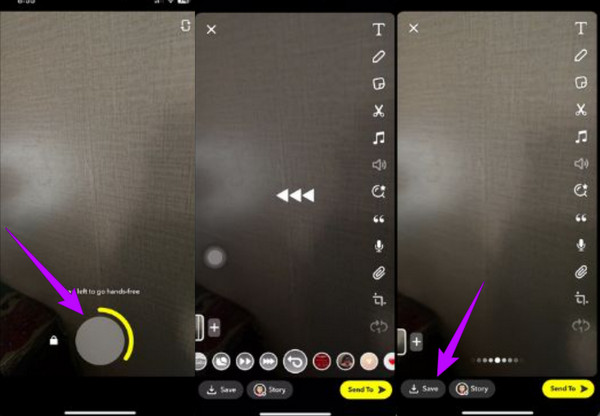
Launch Snapchat on your mobile, and begin to record a video snap. To do so, you need to tap and hold the circle record button at the center bottom part of the screen.
When the recorded video snap is ready, swipe the filters left until you see the three reverse arrow icons. Tap the icon to apply the filter.
After that, tap the Save icon at the bottom left corner of the screen for you to be able to export the video.
We cannot deny how popular TikTok is worldwide. It is one of the top most downloaded apps around the globe. With tons of beautiful, funny, and creative filters, you can easily customize your videos using TikTok. Similar to the first video app, TikTok allows you to record a new video directly, and make you edit the video by applying filters, effects, and other editing techniques. Part of these techniques is the addition of texts, music, icons, and background and the reverse of the video. However, this app also has a limitation in editing a video, especially in length. Still, here are the steps to follow in reversing a video with TikTok.
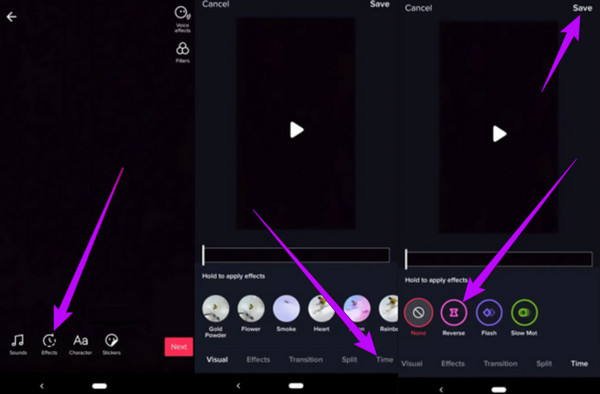
Open the TikTok app on your phone, and tap the Plus icon at the center bottom part of the screen. By tapping this icon, the app will let you record a new video for TikTok or upload an existing video from your photo gallery
After that, tap the Effects option that you will see among the options given on the right part or at the bottom part of the screen. Now, look and tap the Time icon among the Effects options, and then tap the Reverse effect.
After tapping the Reverse effect, the app will already allow you to see the preview of the reversed video. Good thing that it will also reverse even the audio. Then, tap the Save tab to keep your video.
Instagram has been very useful nowadays, for it is one of the most used social media apps artists use. Before even reversing video trends, Instagram has already given users an effect where they can reverse their videos effectively. As a matter of fact, before they press the recording button using Instagram, they already have the option to reverse their video. With this being said, many have been looking for the said effect. However, Instagram has reportedly removed this reverse effect for some reasons. This is why we have decided to provide you with an app that you can use for your Instagram videos, and that is through CapCut.
CapCut is an effective app that comes with a straightforward interface. For this reason, reversing a video with this app will let you do it the most smoothly. Hence, here is how to reverse the video on CapCut.
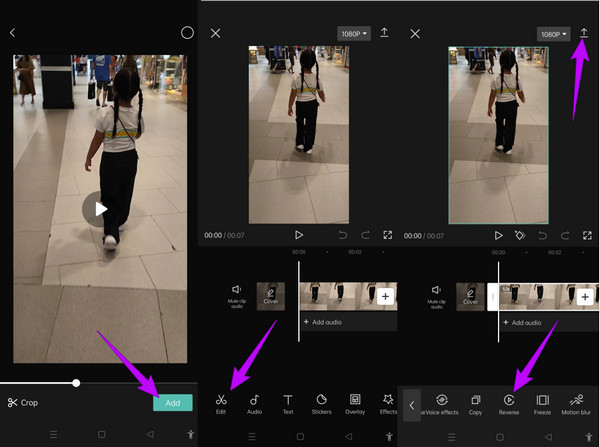
Launch the CapCut after successfully installing it on your mobile phone. Then, upload the video by creating a new project. Once the video is uploaded, tap the Add tab that you will see at the bottom right corner of the screen.
After tapping the said tab, next to tap is the Edit option. Then, swipe right the arrays of the editing tools until you reach the Reverse option.
After tapping the said option, the app will process the video reversing. Finally, tap the Export icon to save the video.
Will my video lose its quality if I reverse it?
To be honest, there are video editing tools that affect video quality uncontrollably. Thus, if you want a guaranteed tool to have a lossless reversing function, use Video Converter Ultimate.
Can I save the reversed video in 4K?
Yes. To do so, you need to upscale the video into 4K after the reversing function.
Can I reverse the video on iPhone without a third-party app?
Yes. You can use the iMovie on your iPhone to reverse your video.
With the multiple tools given above, you will no longer ask how to reverse a video. We hope you have found the right one to use among the provided programs in this post. Hence, if you still don't know which one to pick, we highly recommend using the Video Converter Ultimate. This software is best for professionals and beginners, providing you with the same great tools and features as the others have.
More Reading
Find out the 2 Methods To Reverse a GIF Online & Offline
By reading this post, we'll give you a comprehensive walkthrough tutorial on how to reverse a GIF using the most efficient GIF reverser offline and on the web.
Overview of the 6 Best Video Stabilizers [Apps and Software]
Get to know the best six online, offline, Android, and iPhone video stabilizers reviewed in this article. Let's learn their features, boons, and banes.
How to Denoise Videos in Four Ways [Step-by-Step Guide]
Are your videos grainy? This article has the perfect solutions with complete instructions on how to denoise videos remarkably. Thus, hit this post now to see!
How to Add Text to a Video with Four Effective Methods
Add text to the video to express your feelings to the viewers. Say your thousand words on your video using the four effective solutions in this article.