Part 1. Preparation
Download&Installation
Go to the official website to download Free Blu-ray Ripper, and install it on your computer by following the onscreen instructions. Then, open the software.
Update
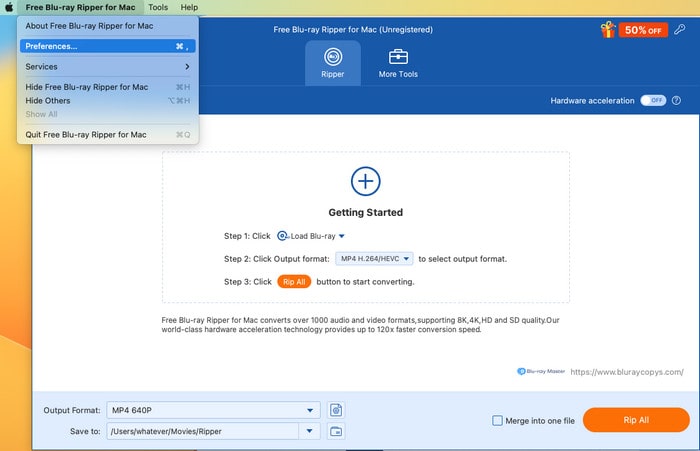
Click the Menu button at the top right corner to select the Check Update option to check the latest version. And then you can follow the instructions to update the software.
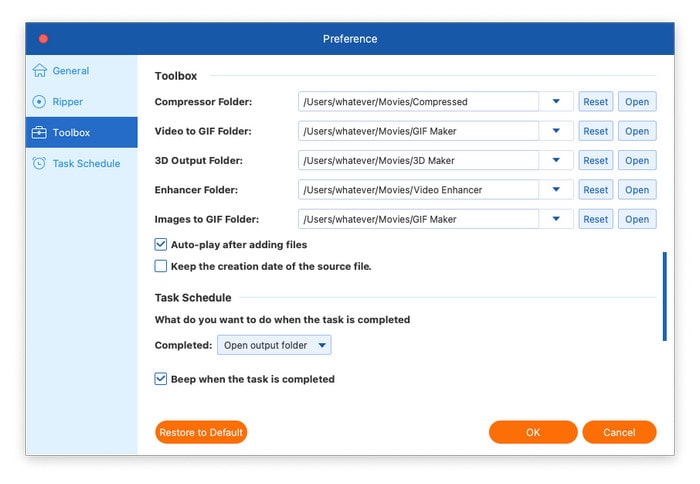
Preference Settings
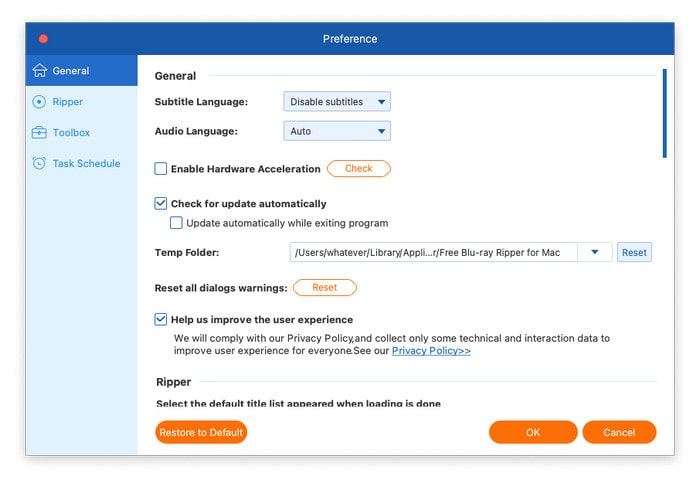
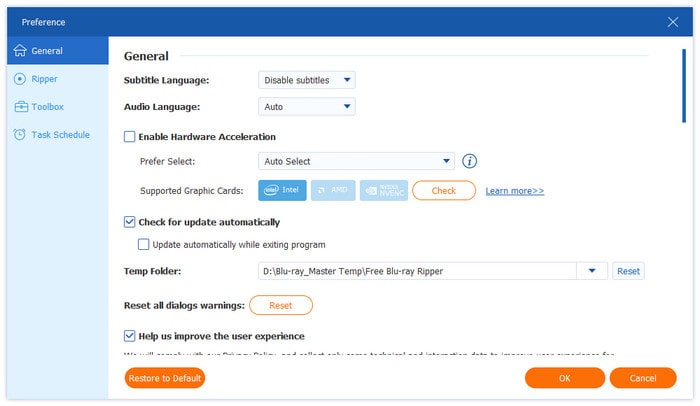
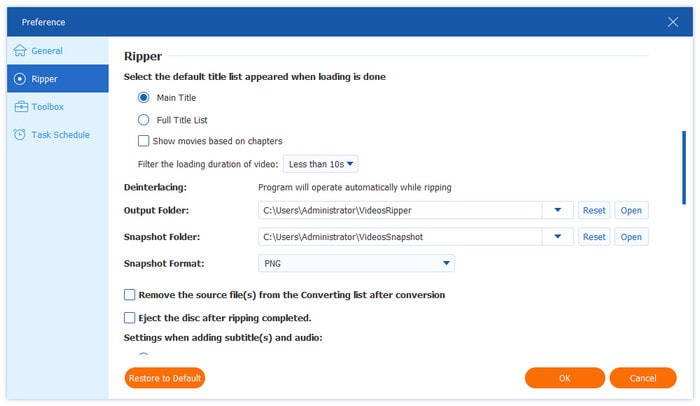
Before ripping Blu-rays, you can adjust the preference settings based on your habits by clicking the Preference button under the Menu option. The preference settings allow you to change the general preference, ripper preference, toolbox preference and task schedule preference.
• General: Navigate to the General tab, where you can choose the subtitle language, audio language, and temp folder. Also, it allows you to enable hardware acceleration, check for updates automatically, and reset all dialog warnings.
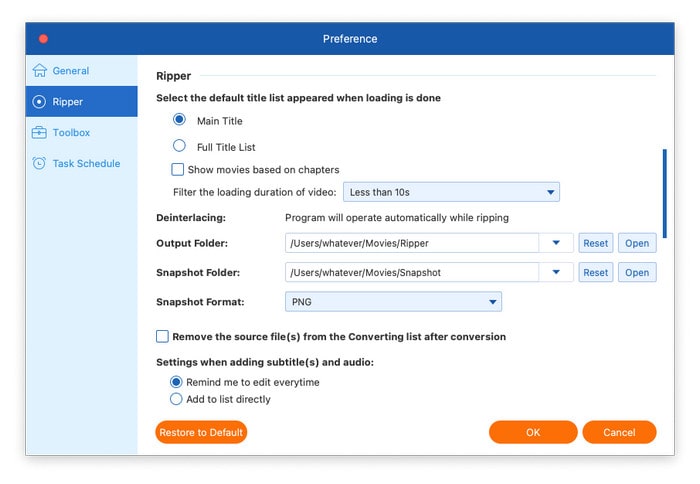
• Ripper: Navigate to the Ripper tab, where you can select the default title list, output folder, snapshot folder, snapshot format, and settings when adding subtitles and audio, as well as whether to remove the source file after conversion and eject the disc after ripping.
• Toolbox: The Toolbox tab enables you to adjust the compressor folder, video to GIF folder, 3D output folder, enhancer folder, and images to GIF folder. You can determine whether to auto-play after adding files and whether to keep the creation date of the source file.
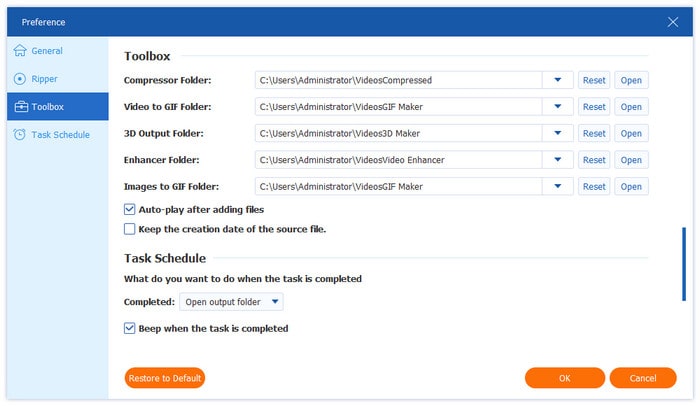
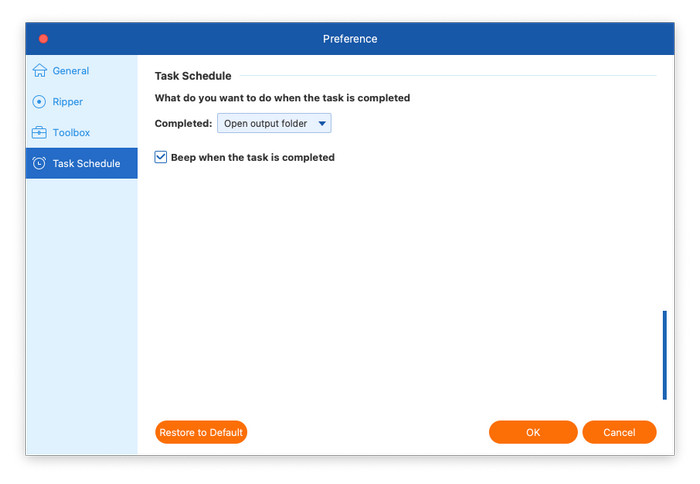
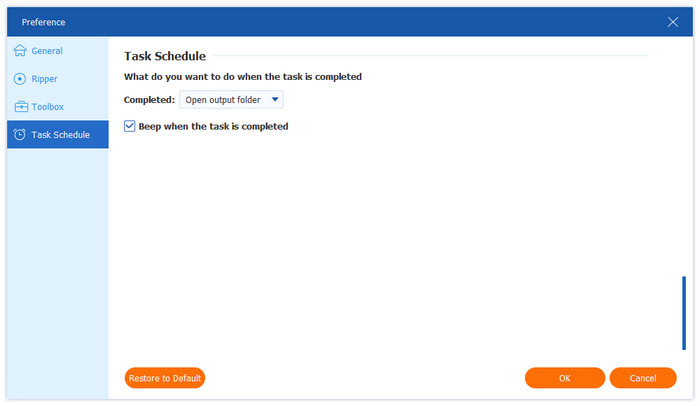
• Task Schedule: The Task Schedule tab offers several options about what you want to do after the task is completed: open the output folder, shut down the computer, sleep the computer, exit the program, or do nothing. And you can choose whether to beep when the task is completed.
Part 2. Rip Blu-ray
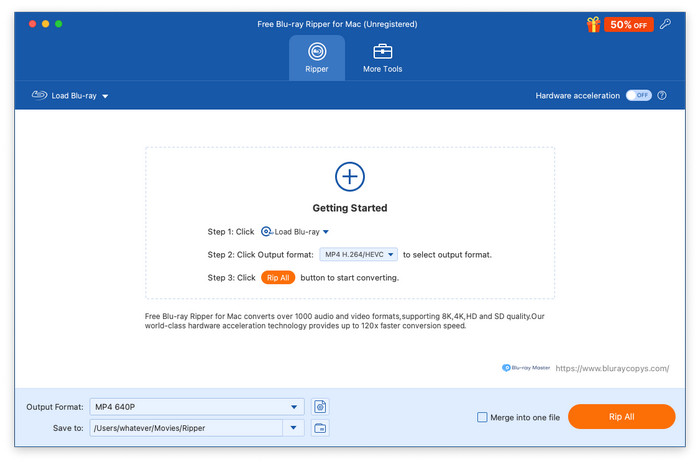
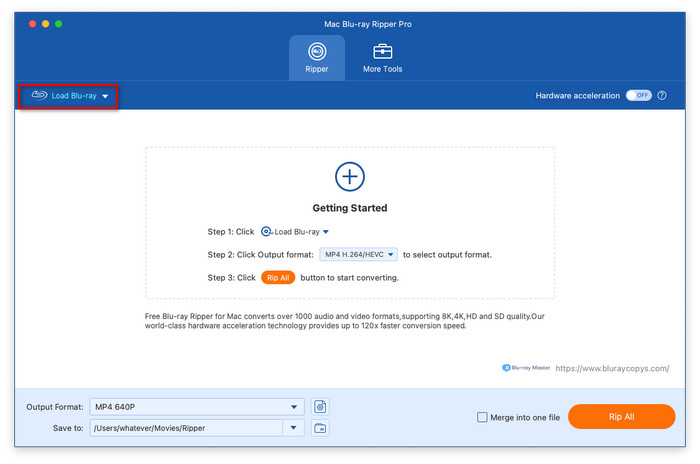
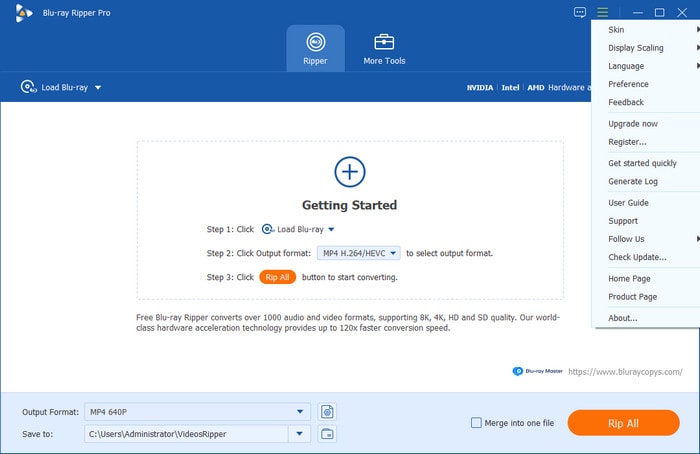
Step 1. Load Blu-ray Files
Click the Load Blu-ray button to open the drop-down list, then select from Load Blu-ray Disc, Load Blu-ray ISO, Load Blu-ray Folder, Load AVCHD Disc, or Load AVCHD Folder. Also, you can click the + icon to upload the Blu-ray files you want to rip.
Note: If it is a Blu-ray disc, please remember to insert the Blu-ray disc into your PC.
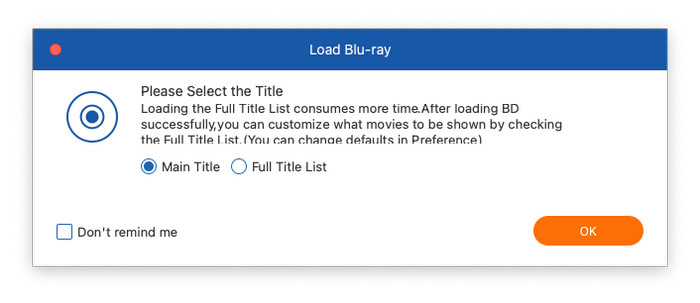
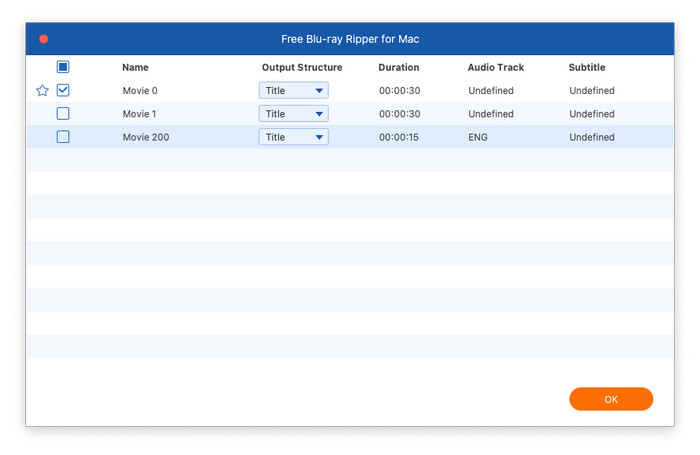
Step 2. Select Titles
After that, it will show a pop-up window about Blu-ray files’ primary titles, where you can select to show Main Title or Full Title List, then click OK.
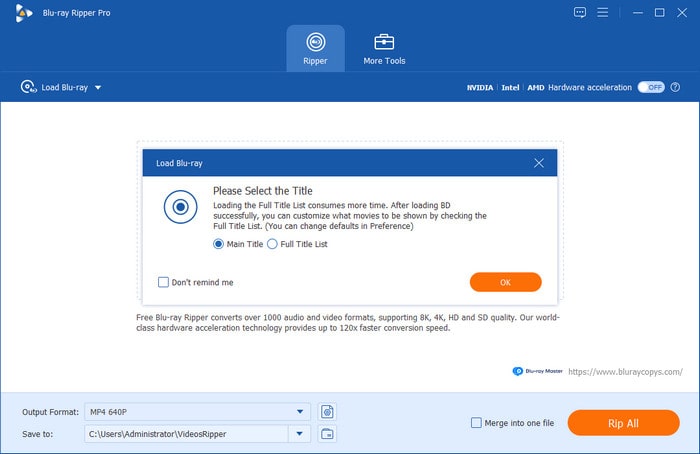
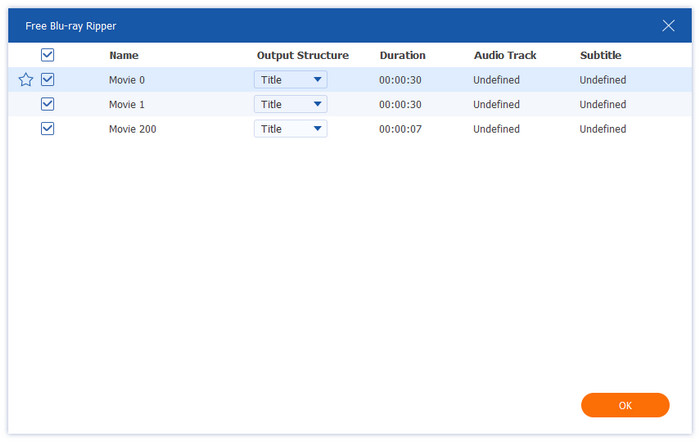
Either click the Full Movie List button to select the titles you wish to add, and then click OK to continue.
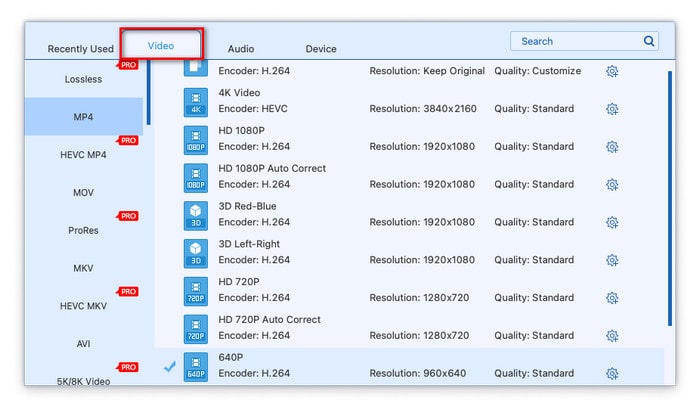
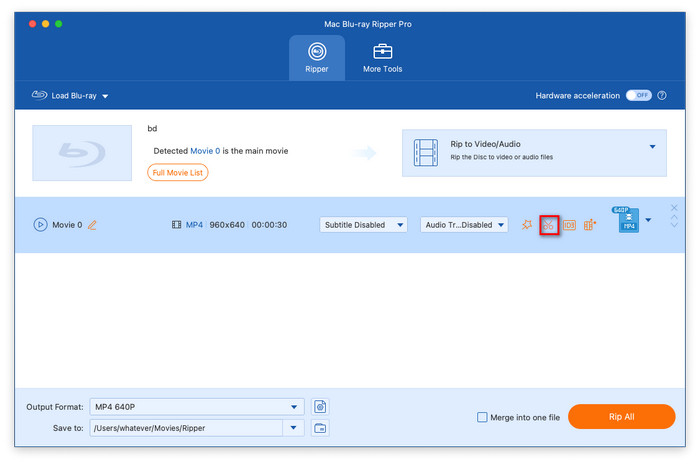
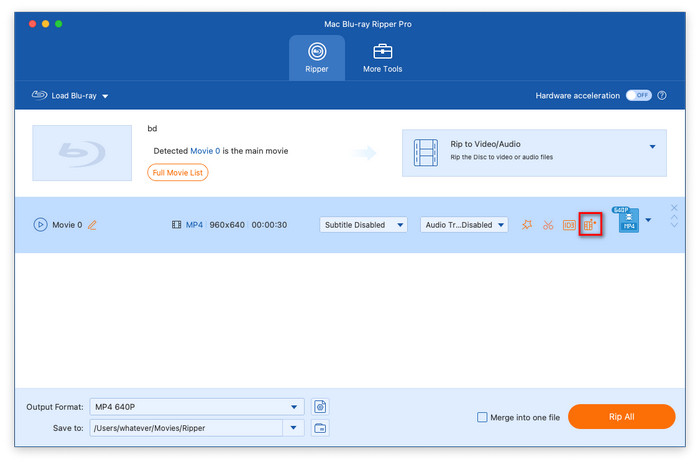
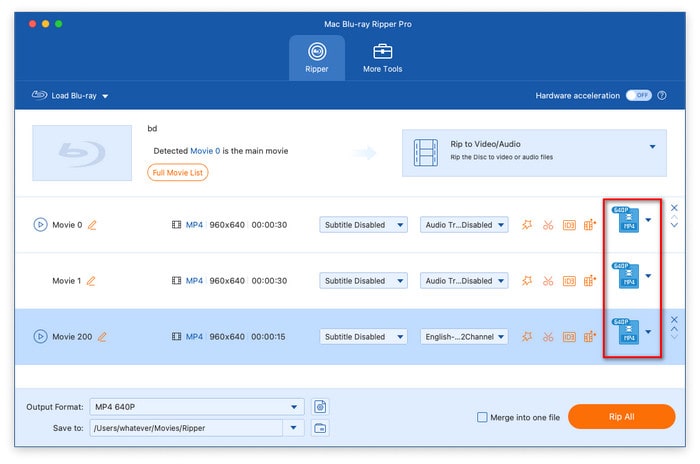
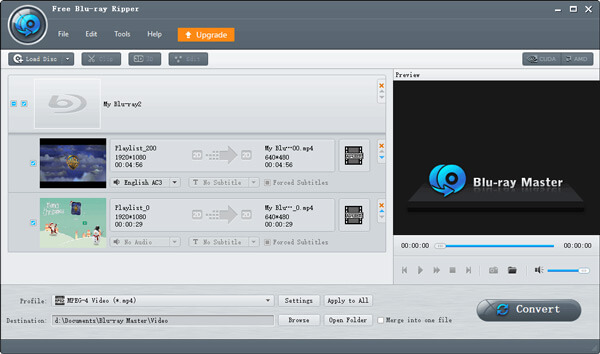
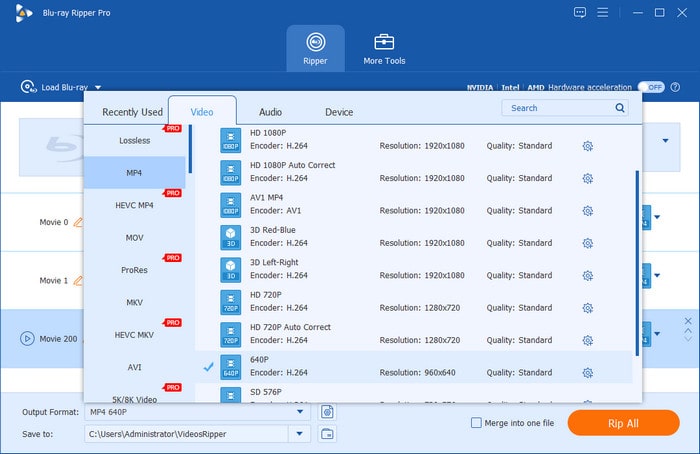
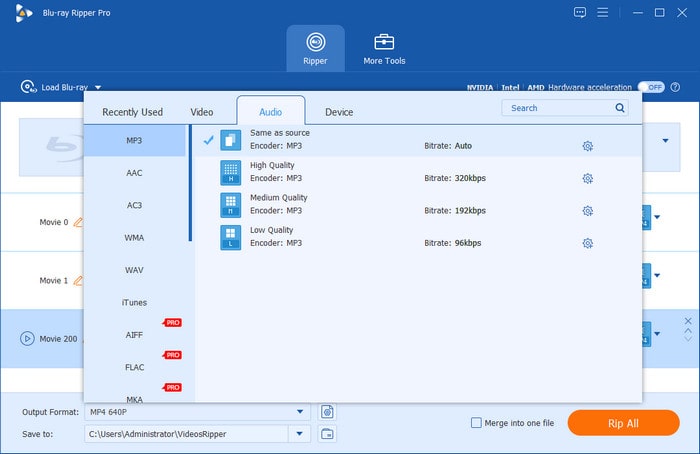
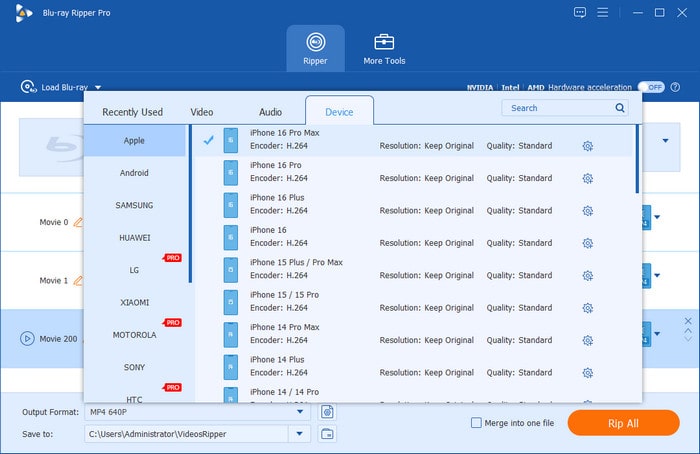
Step 3. Select the Output Format
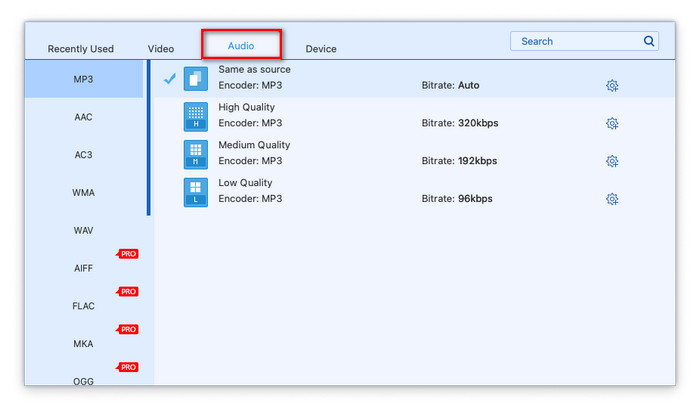
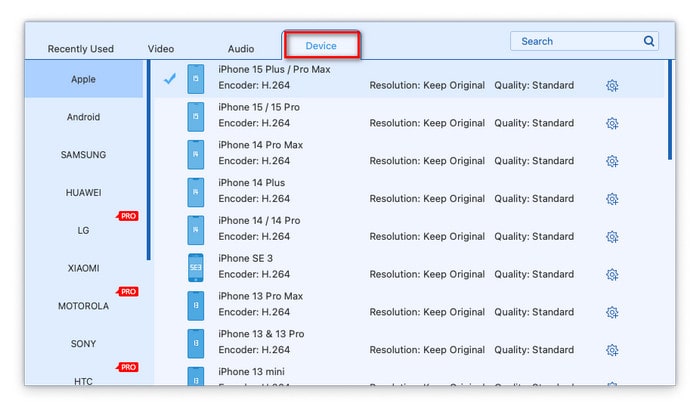
Click the Output Format button at the bottom left corner to choose a suitable output format. There are 3 types of formats offered.
• Video formats: Navigate to the Video tab, where a lot of video formats allow you to select, such as MP4, MOV, MKV, AVI, and M4V. And it will show you the relevant encoder, resolution, and quality.
• Audio formats: Click the Audio tab to choose the audio format you want, including WAV, WMA, FLAC, AAC, AC3, etc. Also, you can see the encoder and bitrate.
• Formats based on device: Navigate to the right-side tab, where you are capable of directly select the format compatible with various devices, such as Samsung, Apple, Sony, Android, and so on
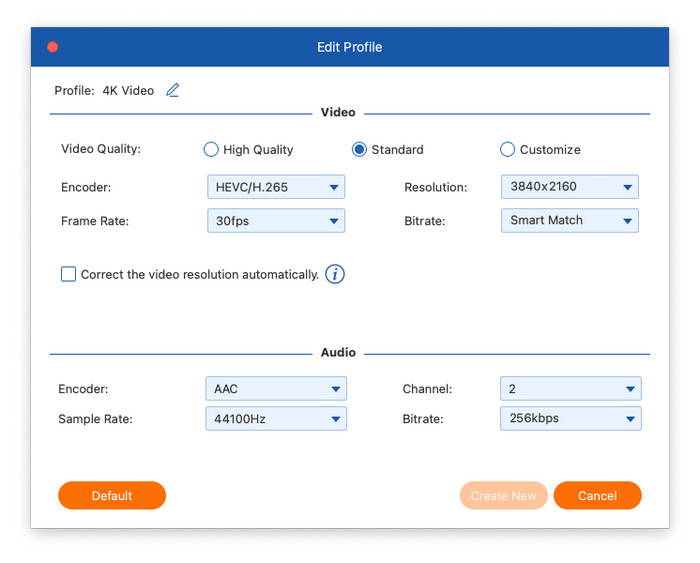
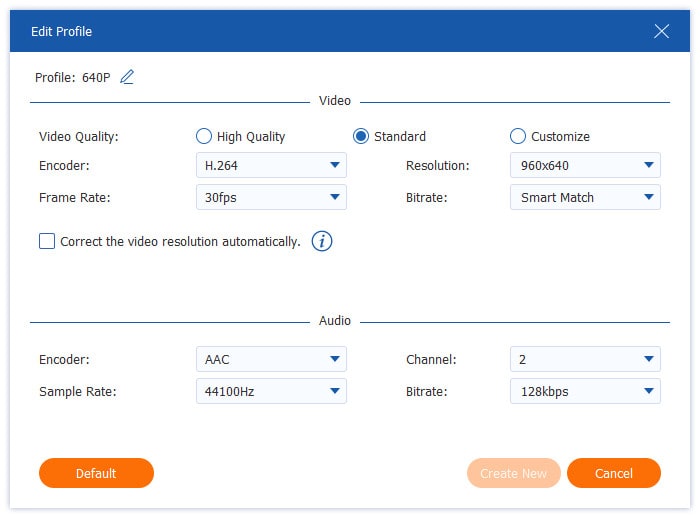
Next, click the Output Format Settings button to enter the Edit Profile window.
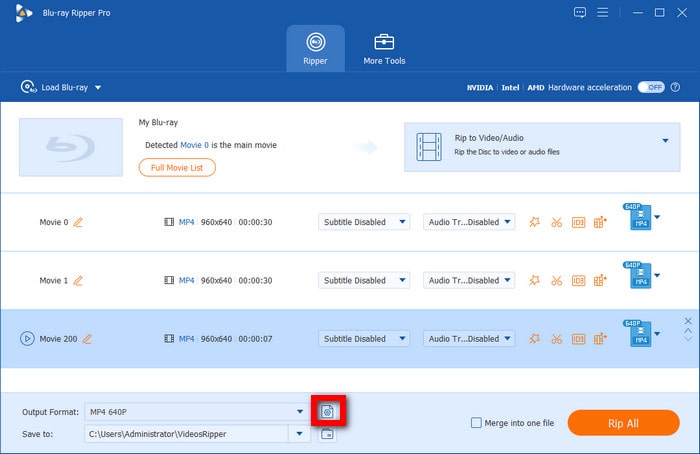
Here you can edit the video profile, including video quality, encoder, resolution, frame rate, and bitrate. Also, it allows you to adjust the audio encoder, channel, sample rate, and bitrate.
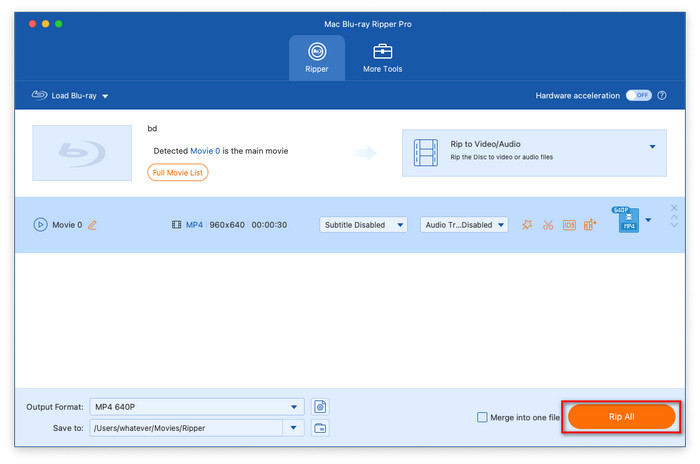
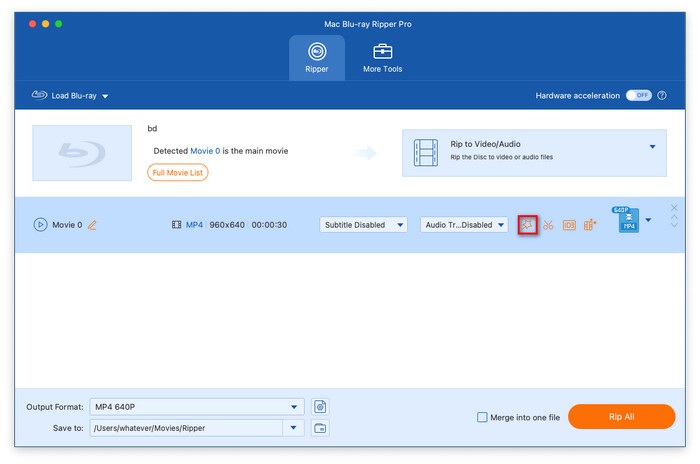
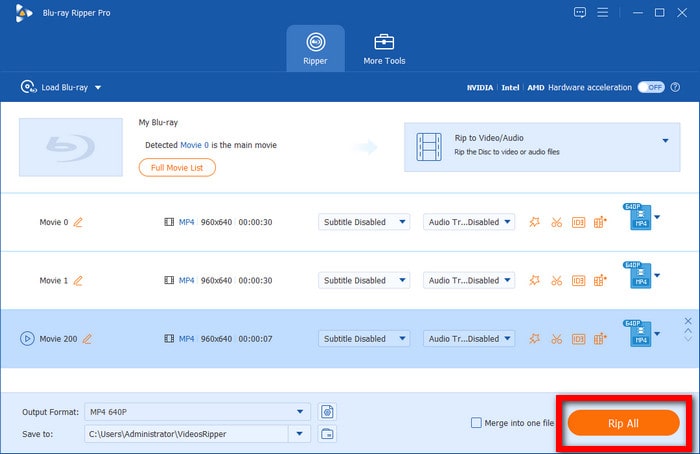
Step 4. Rip Blu-ray
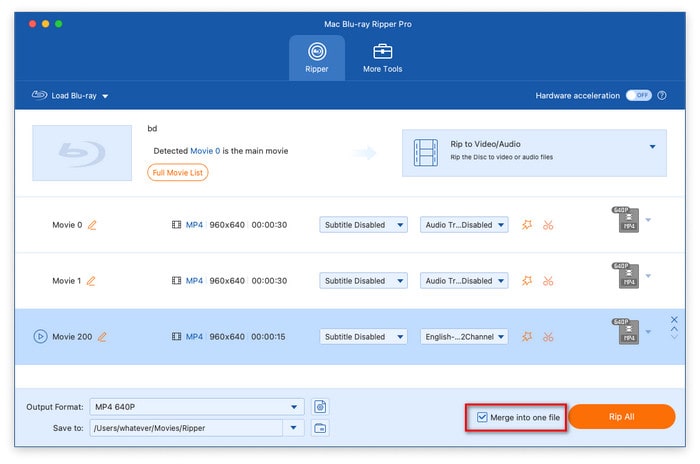
After finishing the above steps, click the Save to option to choose the destination file. Finally, click the Rip All button to rip your Blu-ray. After a few seconds, the ripping process will be finished. Then, click the Open output folder button to find the ripped file.
Part 3. Edit Blu-ray Video
Free Blu-ray Ripper provides a variety of editing tools to edit Blu-ray videos before ripping to digital formats.
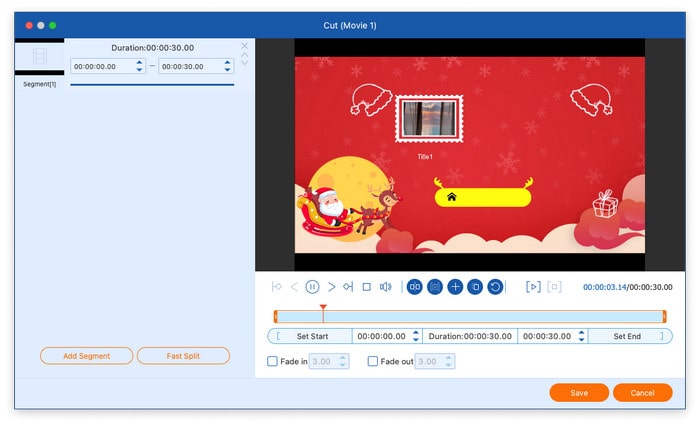
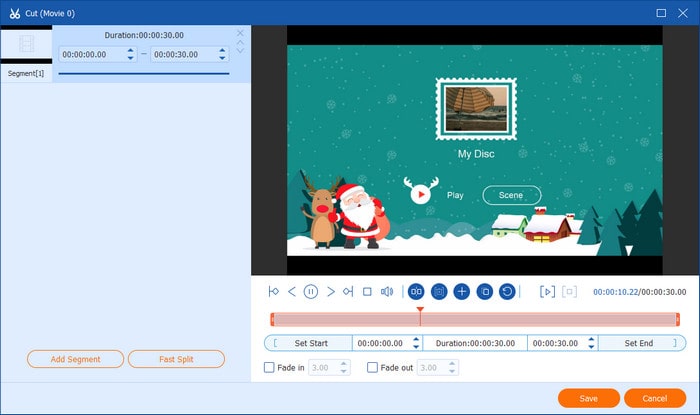
Cut Video
Click the scissors icon to use the cutting tools. It allows you to cut the video into several segments by clicking the Add Segment button. You can also click the Fast Split button to evenly cut a video file into multiple segments by setting the average time or the number of files.
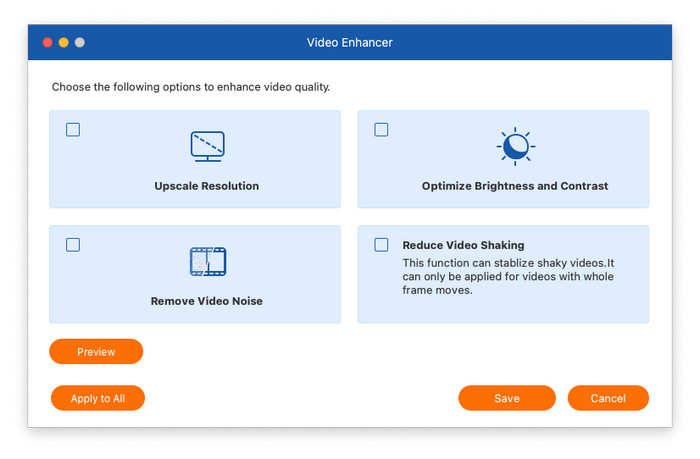
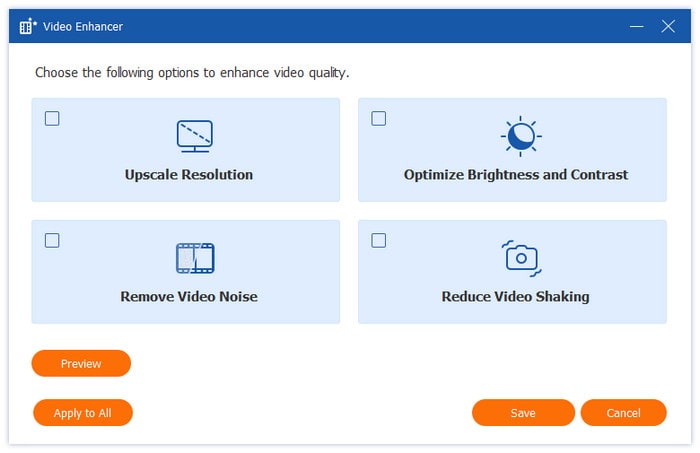
Enhance Video
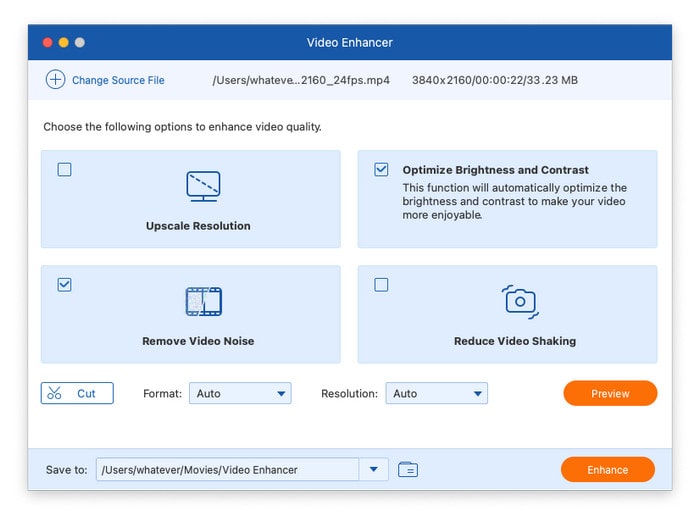
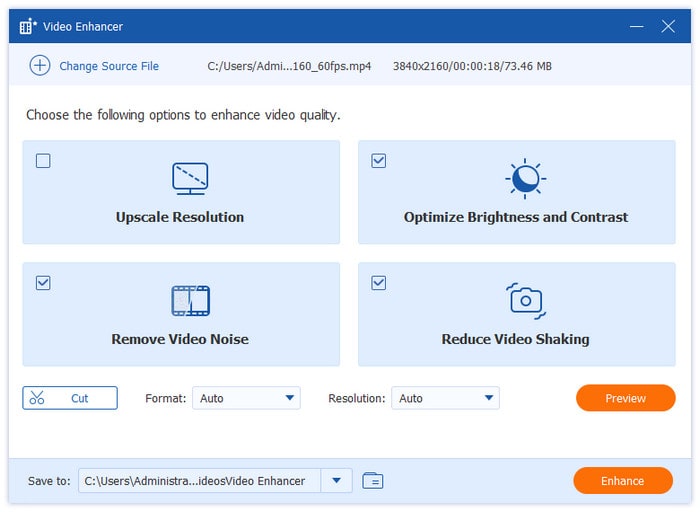
Click the Enhance Video button to open the video enhancer. It offers four options to enhance the video effects: Upscale Resolution, Optimize Brightness and Contrast, Remove Video Noise, and Reduce Video Shaking. After choosing the options according to your needs, you can preview the effects by clicking the Preview button.
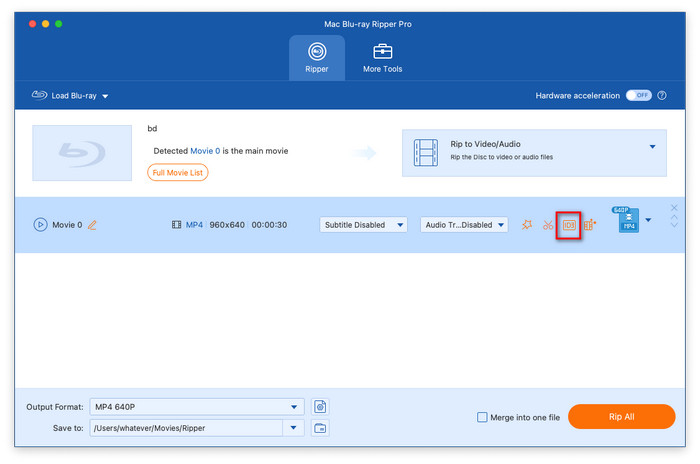
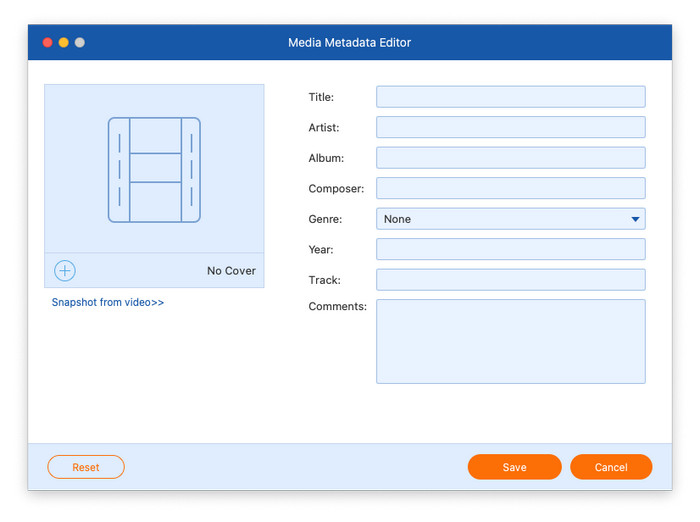
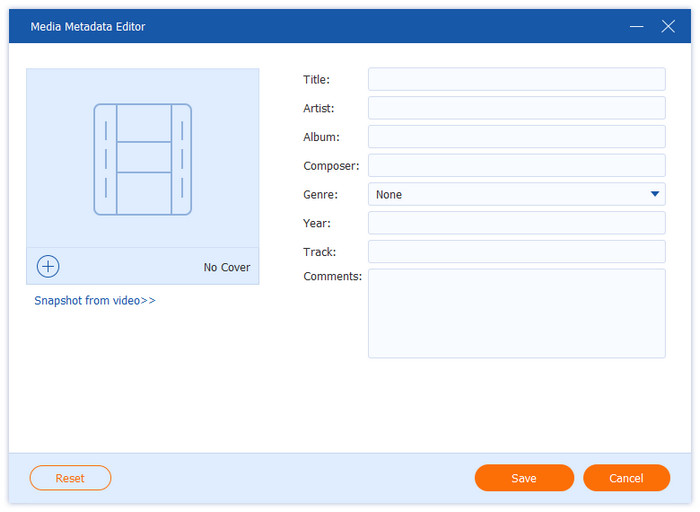
Edit Media Metadata
Click the Edit Media Metadata button to access the metadata editor. Here you can add the video thumbnail and edit various details, including the title, artist, album, composer, genre, year, track, and comments.
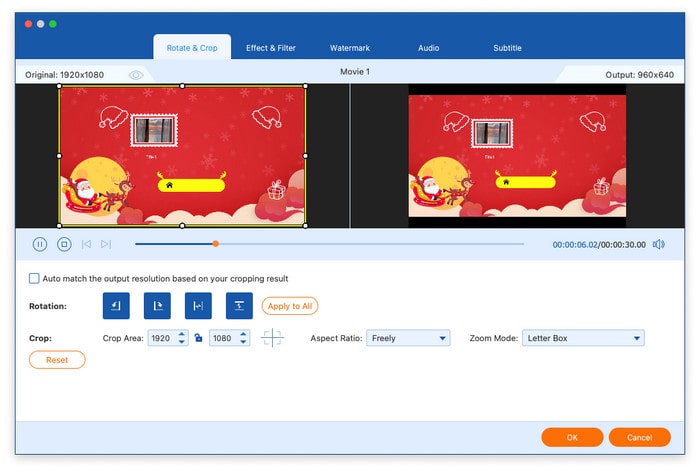
Rotate&Crop Video
Select the Rotate&Crop tab after clicking the Edit button. Videos can be flipped vertically or horizontally by rotating them by 90, 180, or 270 degrees. Additionally, you can crop the video by dragging the mouse directly or by selecting the crop area. Moreover, you can alter the zoom mode and aspect ratio.

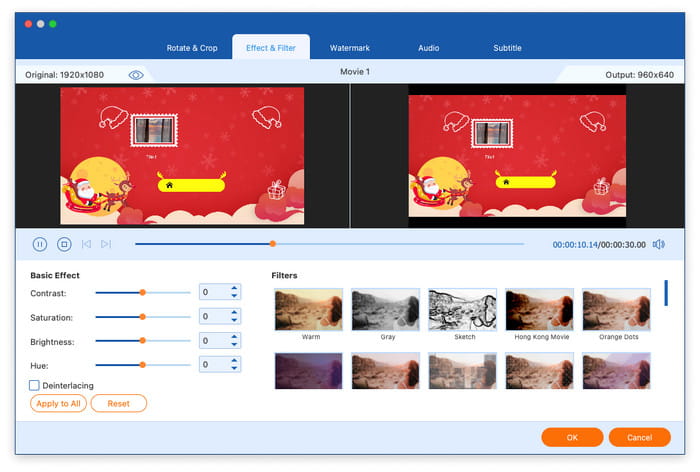
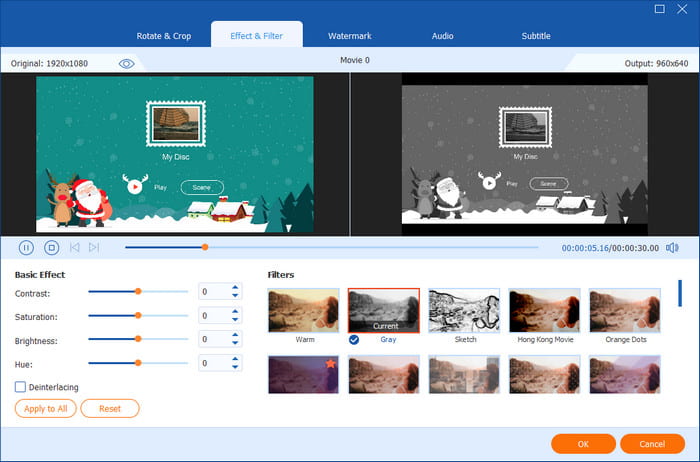
Add Effect & Filter
Go to the Effect&Filter tab after clicking the Edit button. Next, make adjustments to contrast, saturation, brightness and hue in the left section and select the filter in the right section.
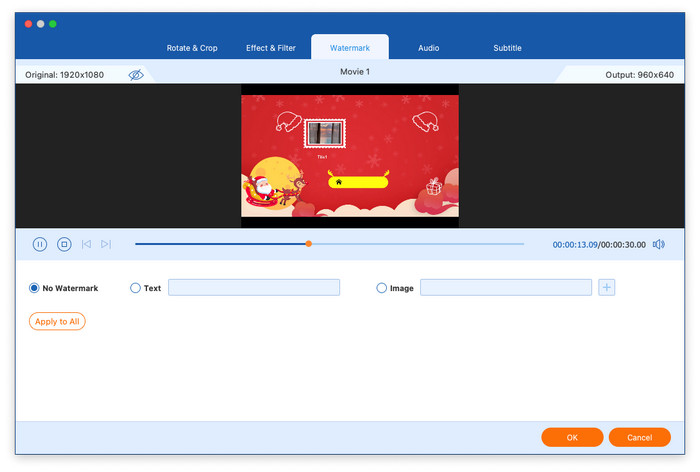
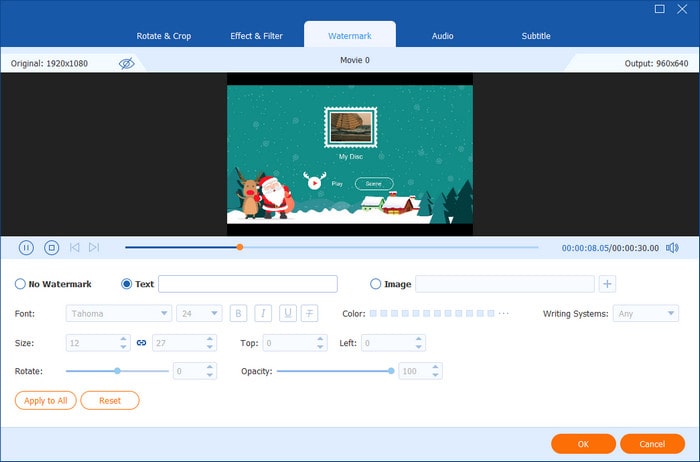
Add a Watermark
Click the Edit button, then navigate to the Watermark tab. Next, you can add a text or an image as a watermark to your video by clicking the front circle of Text or Image. Additionally, you are allowed to change the watermark’s size, color, opacity, and position.
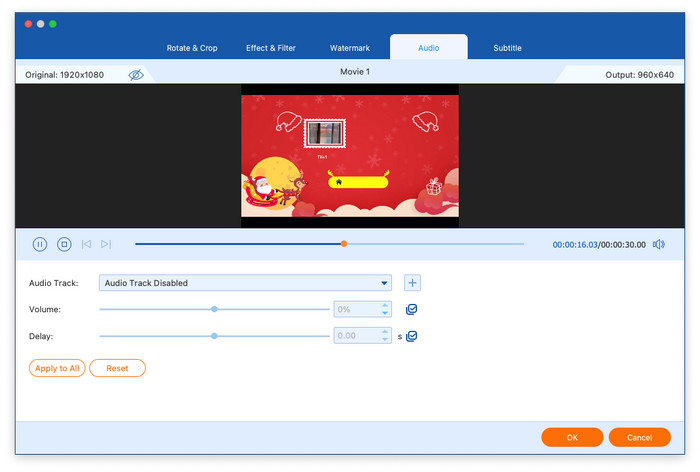
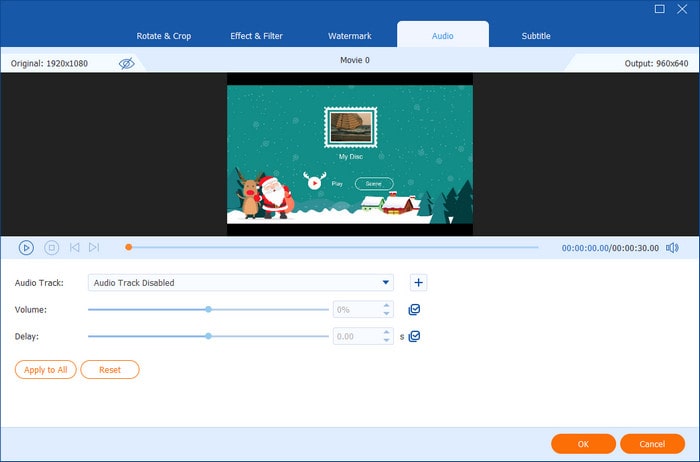
Edit Audio
Similarly, click the Edit button to go to the Audio tab, where you are able to add an audio track, adjust the volume, and change the delay time.
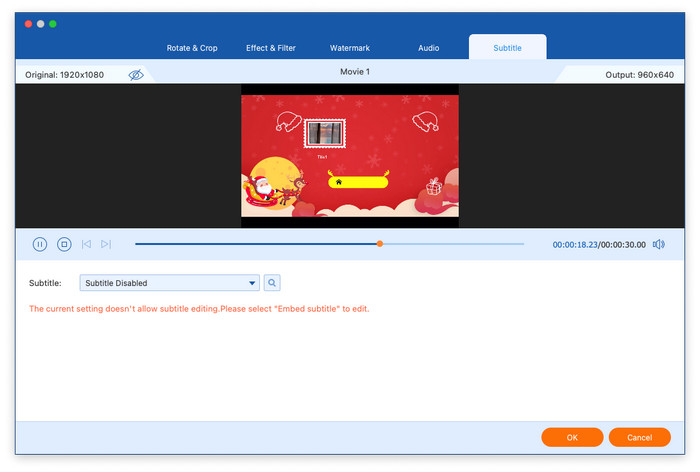
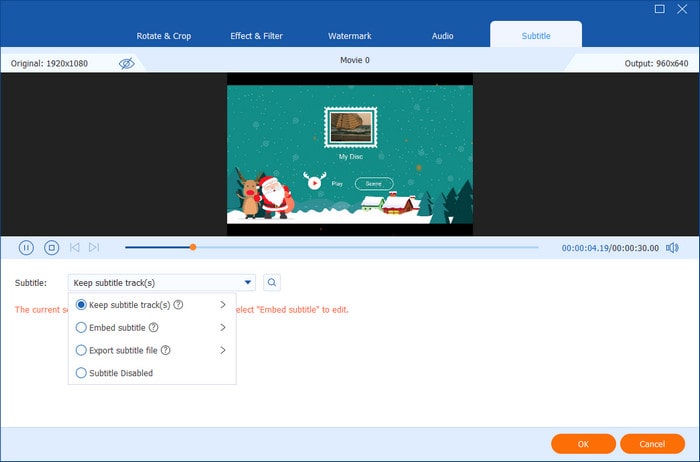
Edit Subtitles
Choose the final tab, Subtitle, to change the subtitle settings. There are four choices about subtitles: exporting subtitle file, keeping subtitle tracks, embedding subtitle, or subtitle disabled. Select the most suitable choice based on your needs.
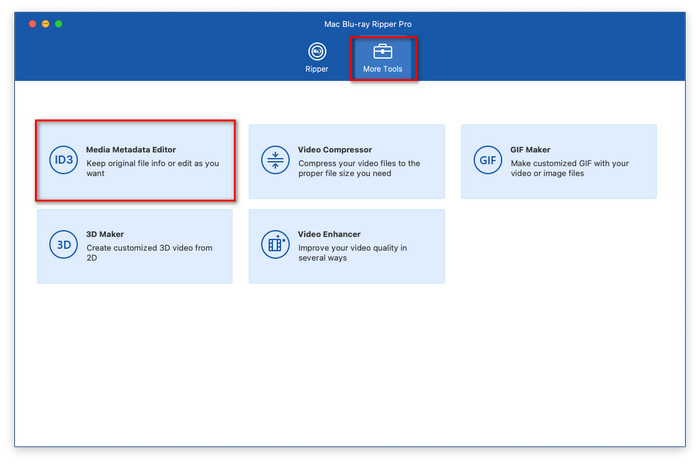
Part 4. More Tools
Click the More Tools button in the main interface to access the additional features, including Media Metadata Editor, Video Compressor, GIF Maker, 3D Maker, and Video Enhancer.

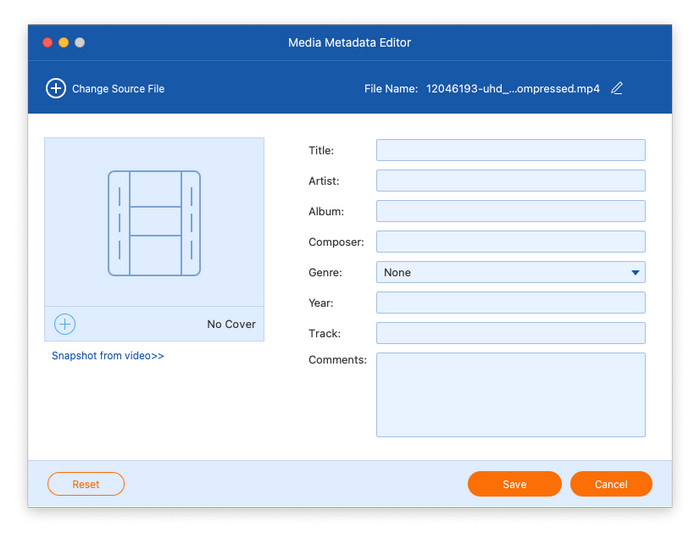
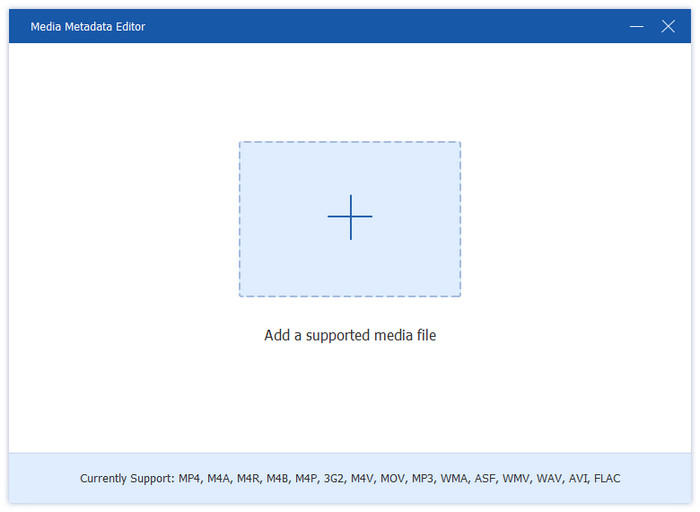
Media Metadata Editor
Step 1: Open the Media Metadata Editor, and add the video file you wish to edit.
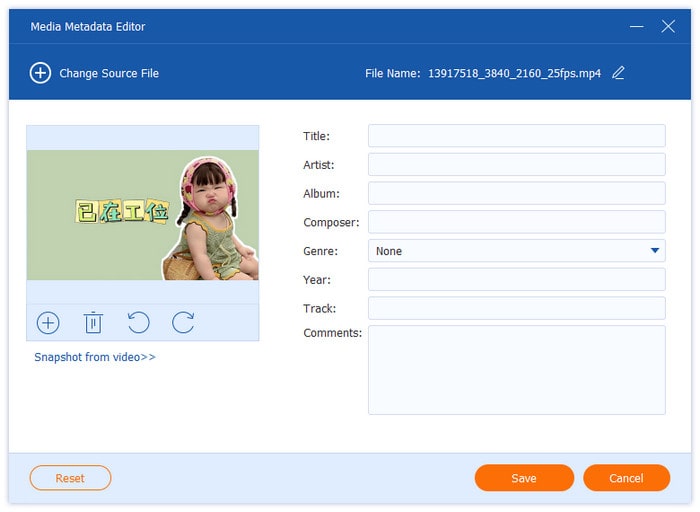
Step 2: After loading, you can edit various metadata information, including the cover image, title, artist, album information, composer, genre, year, track, and any additional comments.
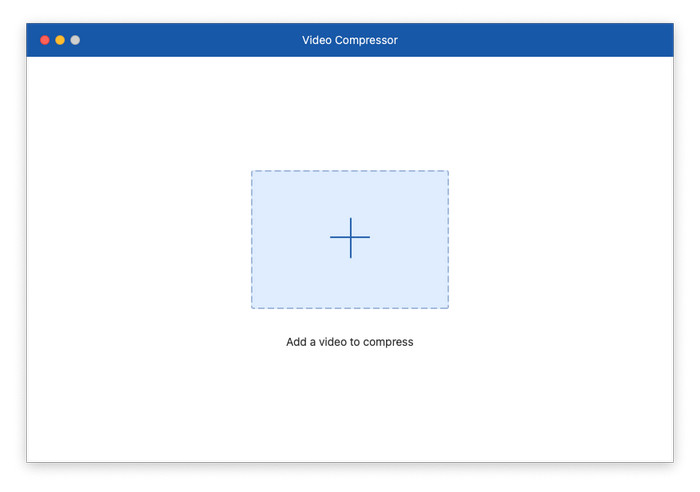
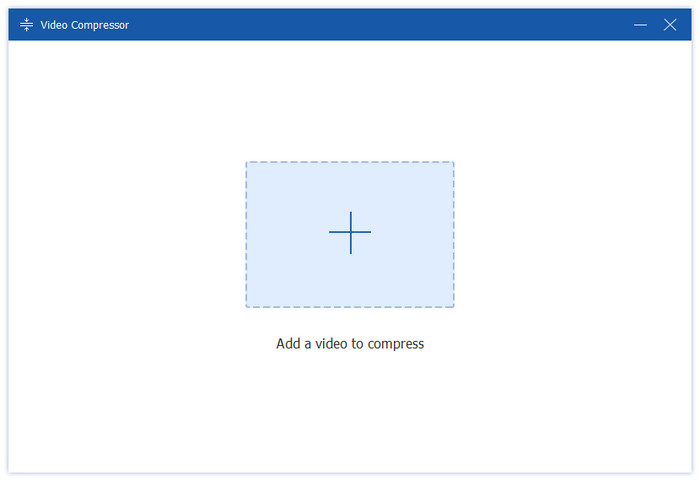
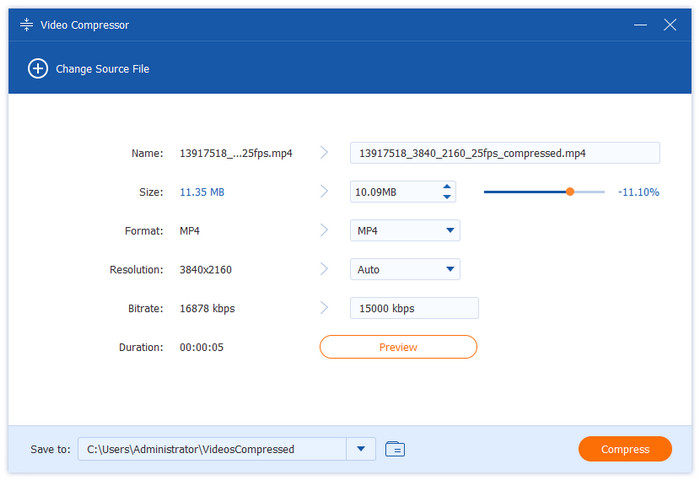
Video Compressor
Step 1: Open the Video Compressor, and add a video that needs to be compressed.
Step 2: Choose the size, format, resolution, and bitrate for the compressed video. It also supports renaming the output file. And then, click the Compress button to start the compressing process.
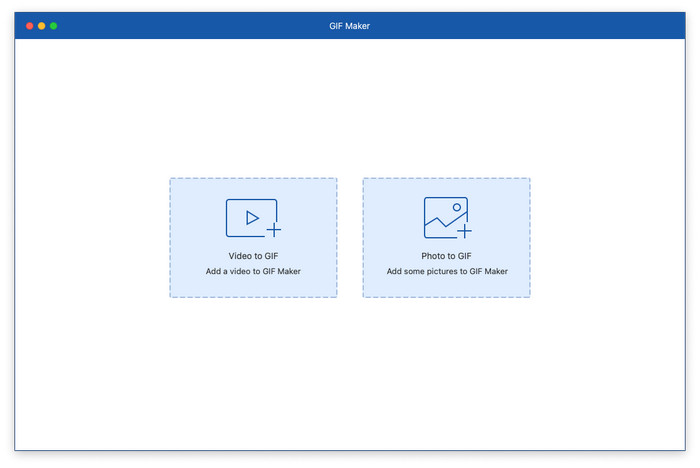
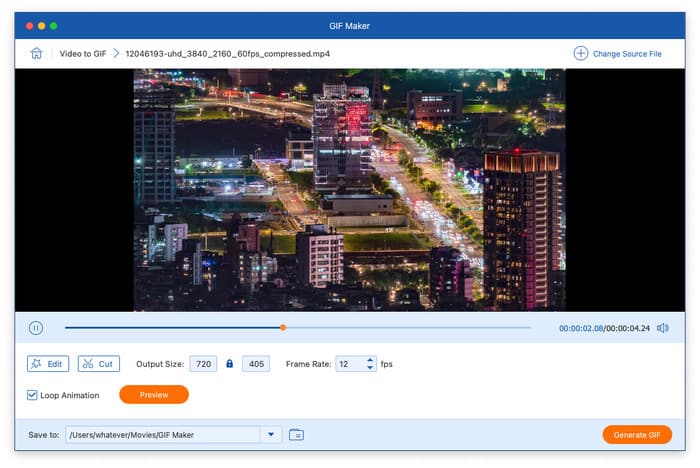
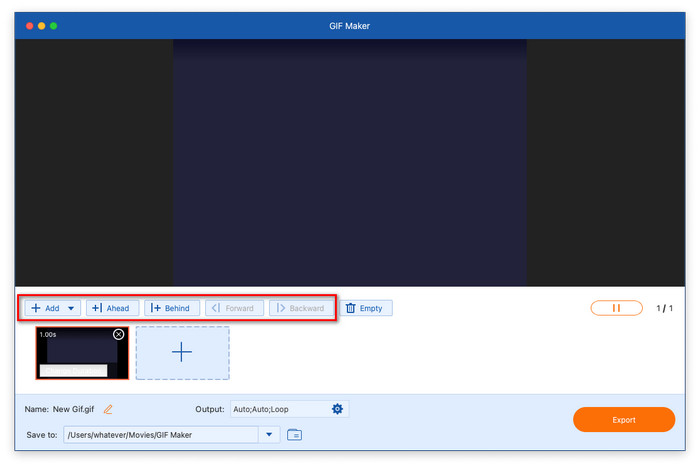
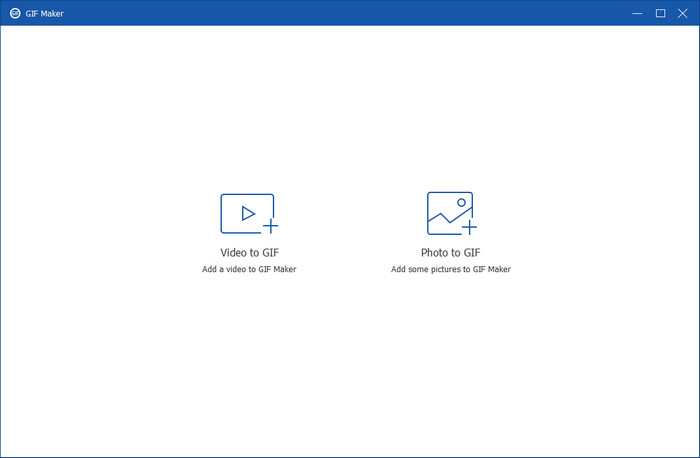
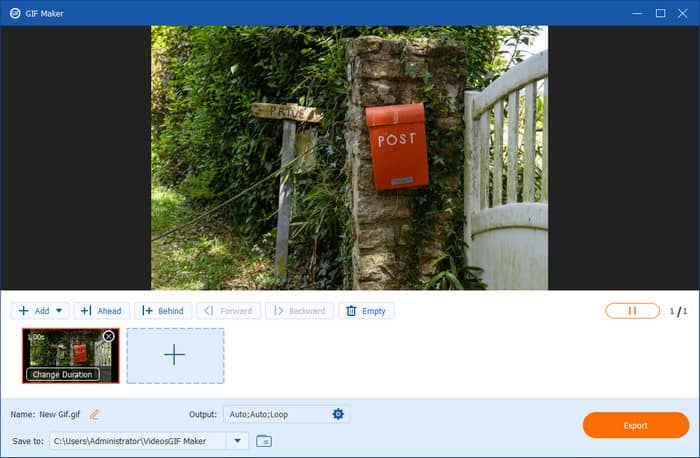
GIF Maker
Step 1: Select GIF Maker in Toolbox and click Video to GIF or Photo to GIF option to upload a video or a photo file.
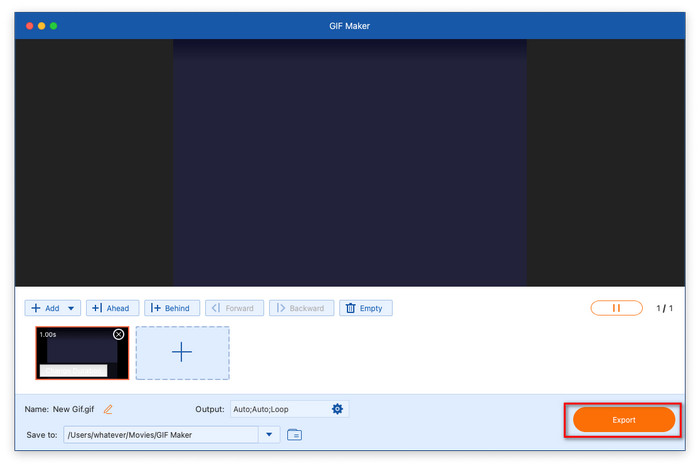
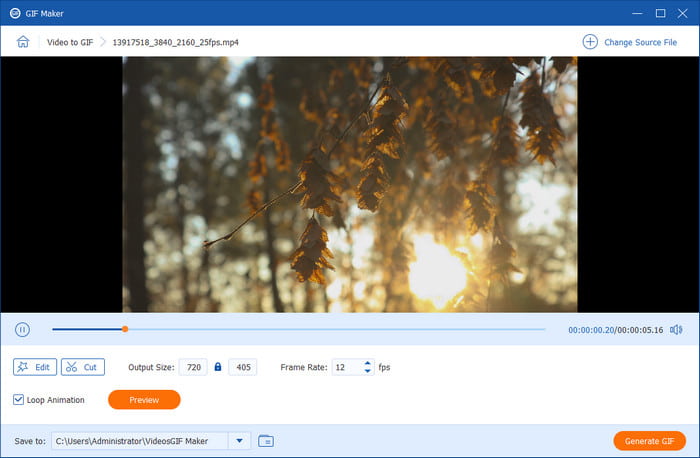
Step 2: Turn Video to GIF: You can edit the video by clicking the Edit button, including changing the contrast, saturation, brightness, hue and adding a filter. And click the Cut button to cut the video. You are also allowed to set the output size, frame rate and loop animation. Finally, click the Generate GIF button to finish the process.
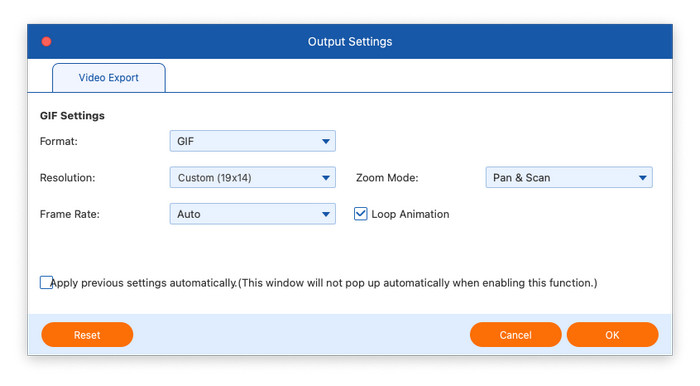
Step 3: Turn Photo to GIF: After uploading a photo, change the resolution, frame rate, and Zoom mode if needed. Then, click the Export button to make a GIF.
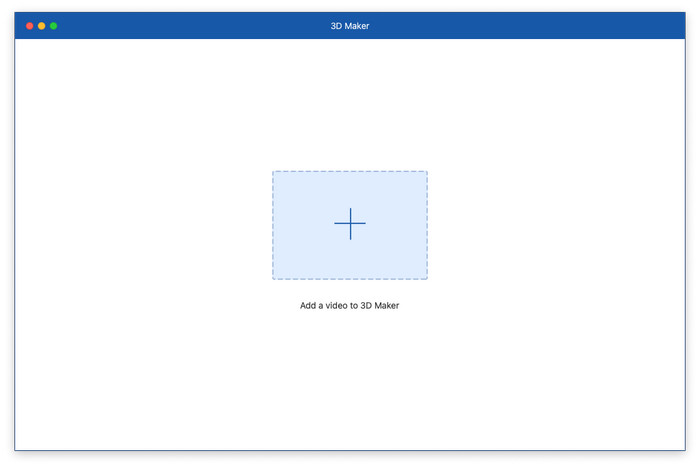
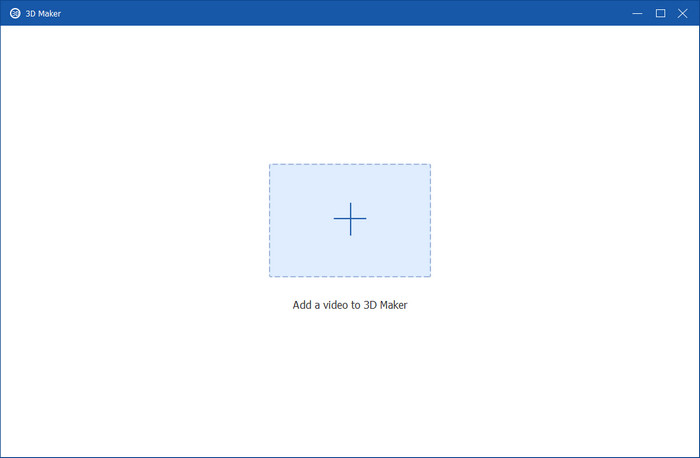
3D Maker
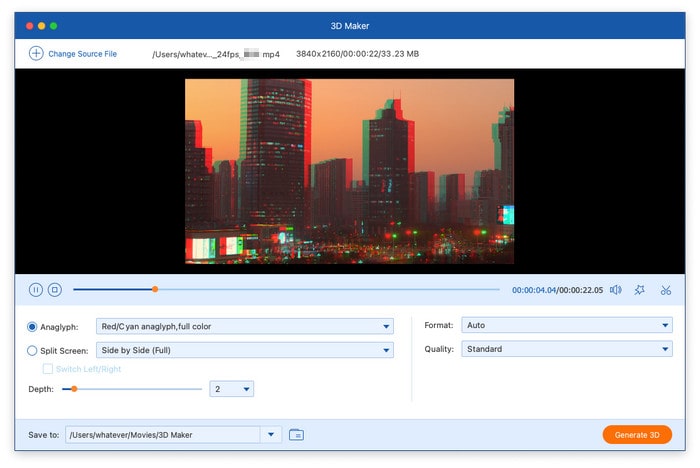
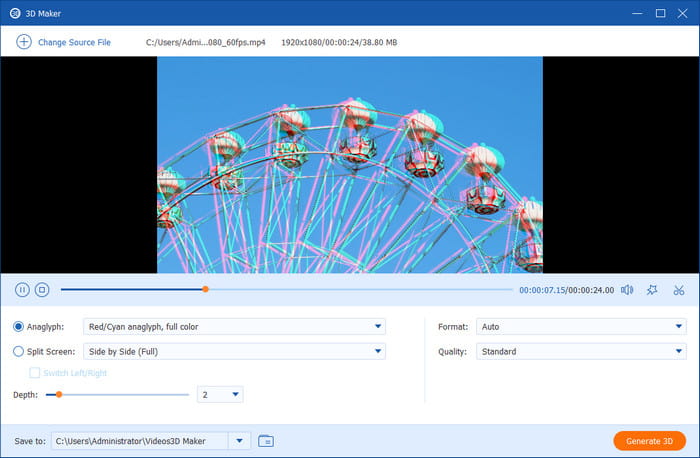
Step 1: Click the 3D Maker, and add a video file to 3D Maker.
Step 2: After loading the file, you can either use the split-screen feature or select an anaglyph from the pre-set templates. Finally, select your preferred output format and quality, then click Generate 3D to produce your customised 3D video.
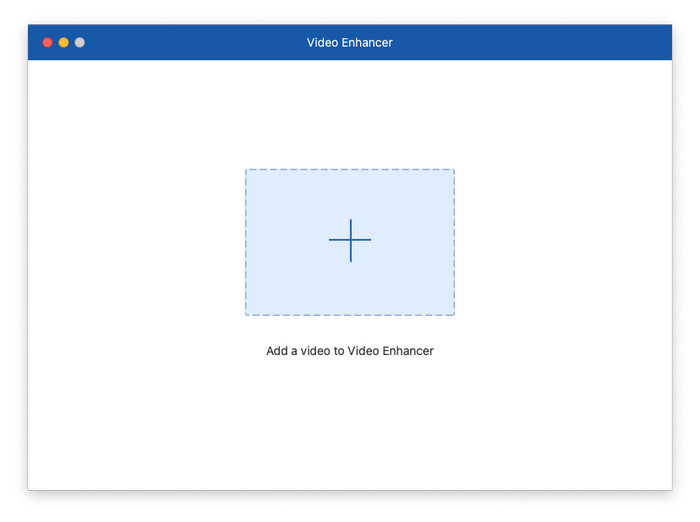
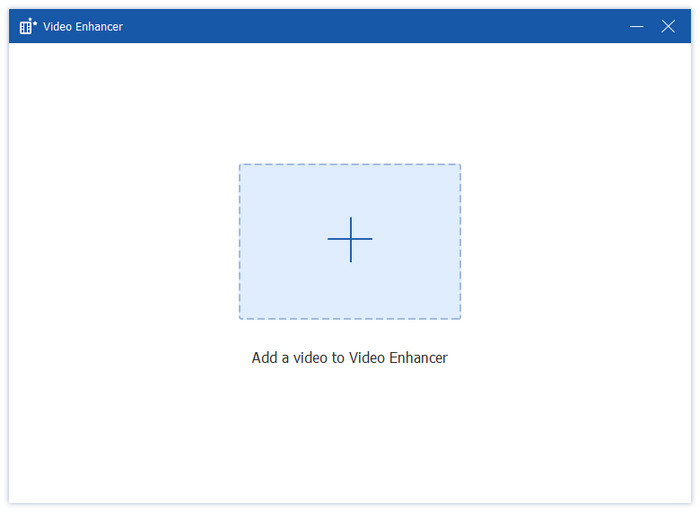
Video Enhancer
Step 1: Open the Video Enhancer, and add a video file that needs to be enhanced.
Step 2: There are 4 options to improve your video quality: Upscale Resolution, Optimize Brightness and Contrast, Remove Video Noise, and Reduce Video Shaking. You can select a few from them to enhance your video quality. It also supports cutting the video and selecting the output format and resolution. After that, click the Enhance button to start the enhancing process.

 Blu-ray Player
 Blu-ray Ripper
 Blu-ray Copy Platinum
 DVD Creator