Sep 11, 2025Posted by Kevin Miller to Create DVD
Can you burn MOV files to DVD? Throughout the years, mobile devices and streaming sites have enabled people to watch movies offline and online. As a result, DVDs have become less popular. Yet, it doesn’t mean that DVDs are phased out. In fact, some people prefer to watch movies in DVD format and play them on the big screen.
Burning QuickTime MOV files to DVD can serve a variety of meaningful purposes - from archiving memories like weddings, vacations, or childhood milestones in a physical format that feels more permanent, to gifting a video to family members who may prefer a tangible keepsake over digital links. So, through this post, learn how to convert MOV to DVD easily and effectively. We have provided the best workarounds you can perform for your QuickTime movie.
- Part 1. How to Burn a QuickTime Movie to DVD on Mac Using Finder
- Part 2. How to Burn MOV to DVD on Windows Using Blu-ray Master DVD Creator
- Part 3. Bonus Tips for DVD Burning
- Part 4. FAQs About How to Burn QuickTime Movies to DVD
Part 1. How to Burn a QuickTime Movie to DVD on Mac Using Finder
Apple sells an external optical drive, which is called the USB SuperDrive. It is a portable drive that reads, writes, and burns CDs and DVDs. It is designed for Apple computers without built-in CD or DVD drives. It is popular for its compact, sleek design and simplicity. It makes tasks convenient, like creating backup discs, installing software from physical discs, and more. In addition, you can burn mov files to DVD using it. The Apple USB SuperDrive can be a straightforward choice for Mac users. It also delivers good DVD-burning quality. However, there are drawbacks to consider. The portable drive has limited functionality. Also, you will be unable to burn Blu-ray discs. Another thing, it tends to be more expensive than third-party alternatives. The dependence on USB can be limiting for newer Mac models with different ports. Finally, it may not be the fastest option for burning DVDs.
Nevertheless, if you have it already use it to burn your QuickTime movie to DVD. To know how to convert mov to dvd format, follow the steps below.
Pros
- It is a built-in tool on Mac computers, eliminating the need to install other tools.
- Its operations are easy and intuitive.
- It is ideal for storing large files like videos or archives.
Cons
- It lacks advanced settings for DVD burning, like audio and subtitle selection.
- It is only suitable for data disc burning.
Step 1.Firstly, ensure that you have available blank DVD-R or DVD+R discs. Also, prepare the QuickTime movie you want to burn. Launch the Finder app on your Mac to open its window. Then, insert the blank DVD into your Apple USB SuperDrive.
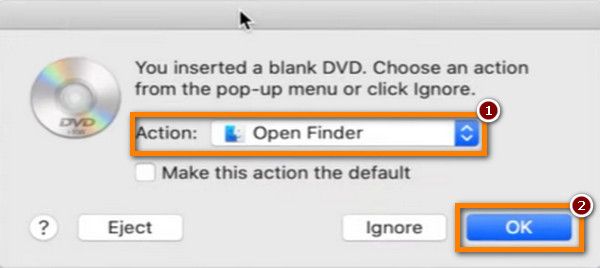
Step 2.Wait until the pop-up window menu appears. Choose an action – Open Finder. Then, hit the OK button. Then, you’ll be able to see your inserted disc on Finder.
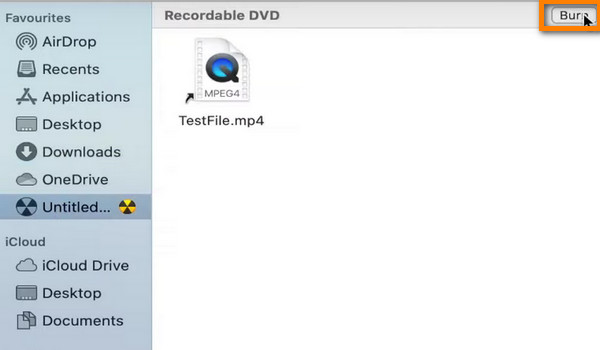
Step 3.Next, select the QuickTime MOV file you want to burn. Afterward, copy and paste it on your inserted blank DVD. Then, hit the Burn button in the upper left corner.
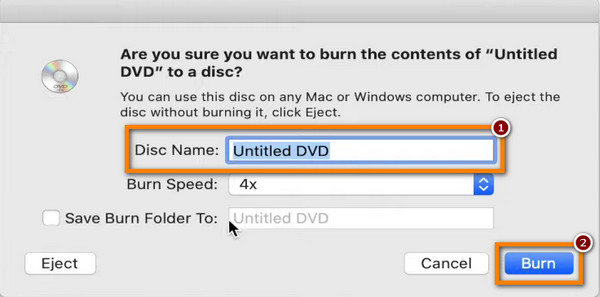
Step 4.On the window prompt, customize the name of your DVD. Follow the onscreen instructions and hit the Burn button to execute the process. Once the burning is complete, eject the DVD from the SuperDrive. And that’s it.
Through the above steps, you are capable of burning movies to DVD on the Mac.
For short backups or file sharing, Finder is a handy tool for making basic data DVDs. However, if you want to produce video DVDs that look professional, or if you require dependable archival features, you are better off using professional DVD creation programs like Blu-ray Master DVD Creator, BurnAware, etc.
Part 2. How to Burn MOV to DVD on Windows Using Blu-ray Master DVD Creator
To burn MOV files to DVD on a Windows computer easily and effectively, use DVD Creator, chosen by Blu-ray Master. It is a handy tool and is considered one of the best MOV to DVD converters. The tool supports various video formats, such as MOV, MP4, FLV, MKV, and more. Thus allowing you to burn any video to DVD in a much easier way. What’s more, it can create ISO files and Blu-ray folders. It also offers high-quality video, photo, and audio output. Moreover, the program has customizable menu options and pre-made themes. You can choose from themes like Holiday, Wedding, Family, Travel, and more. If you’re not content with the provided ones, you can create and design a personalized template. Further, editing, cutting, merging, and splitting your MOV file before burning it is also possible with the tool.
Given its extensive features, it makes users choose it to burn mov to playable DVD. Not only you can use DVD Creator on Windows, but also on Mac. So, if you have a QuickTime MOV file on your Mac, use the tool and burn it to DVD. To learn how to burn with DVD Creator, follow the steps below.
Pros
- You are allowed to import video files that are up to 5GB and burn them together.
- It provides multiple video editing tools for you to adjust video effects, edit audio tracks, and add subtitles.
- It offers many menu templates to enrich your DVD creation.
Cons
- Its free trial version provides limited usage times.
- When processing large files, its burning speed will be slow.
Step 1.To start with, download DVD Creator on your computer. Follow the on-screen guide prompts to install the tool. Launch it afterward.
Free Download
For Windows
Secure Download
Free Download
for macOS
Secure Download
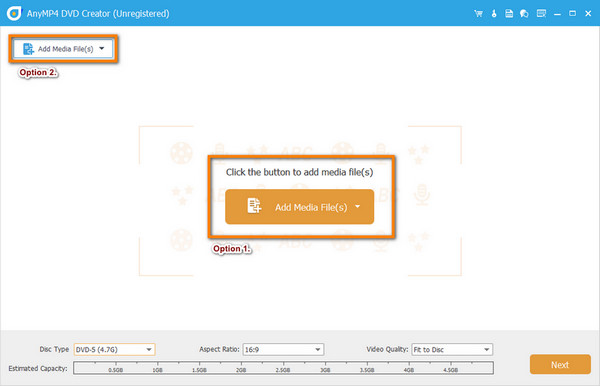
Step 2.Next, insert a blank DVD into your DVD drive. Next, select the DVD Disc type on the window that appears. Click the Add Media File(s) button to add the MOV file you want to burn.
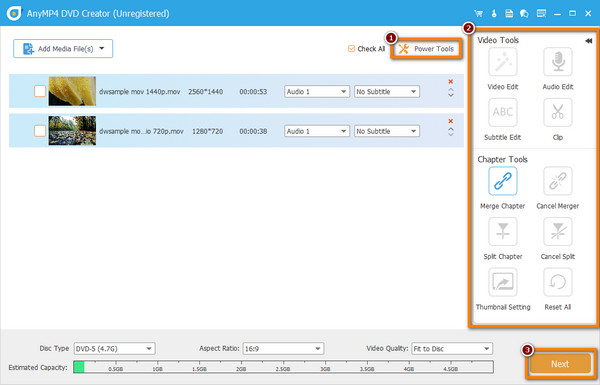
Step 3.Alternatively, click the Power Tools option to edit your MOV video file. In this part, you can crop, rotate, clip, add effects, and more on your video. After customizing your video, hit the Next button.
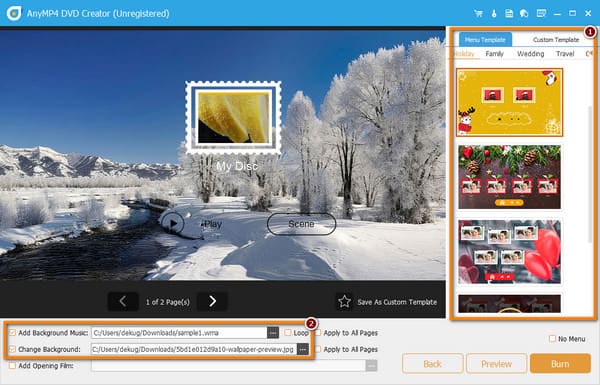
Step 4.In the following window, you can choose the Menu Template that you desire. Suppose nothing from the provided template satisfies your needs; you can customize your template. Change the background and hit the Star button to Save As Custom Template. You can also add background music if you wish.
Step 5.Once you’re done, click the Preview button to check the output. If you’re satisfied, click the Burn button, followed by hitting the Start button to initiate the burning process. Now, you are able to make a DVD from an MOV file.
For consumers looking for a simple method of burning DVDs with customisable menus and wide format compatibility, Blu-ray Master DVD Creator is a good option. With its clear and intuitive interface, everyone can easily burn DVDs easily and safely. It's particularly helpful for offline content sharing and video archiving. The free trial version provides limited features, and if you want full Blu-ray authoring or more sophisticated editing features, you need to pay for the premium edition for complete functionality.
Part 3. Bonus Tips for DVD Burning
Choosing the right type of blank disc
There are lots of DVD disc types with different features and different capacities, and you need to choose according to your needs.
- DVD-R: Write-once format, widely compatible with most DVD players. Ideal for permanent storage.
- DVD+R: Also write-once, but offers better error management and faster writing speeds on some drives.
- DVD-RW / DVD+RW: Rewritable formats for temporary or frequently updated content.
- Dual-layer (DL) discs: Offer more storage (up to 8.5GB) but may not be compatible with older players.
Additionally, there are DVD-5 and DVD-9 DVD types based on the DVD capacity, with the capacity of DVD-5 being 4.7 GB and DVD-9 being 8.5GB.
Burning at a slow speed to prevent errors
Burning at 4x or 8x (instead of max speed) reduces the chance of write errors and improves playback quality. It is especially important for video DVDs, where glitches can ruin the viewing experience.
Understanding the difference between a data DVD and a video DVD
There are data DVDs and video DVDs. Check the information below to understand the difference between them.
- Data DVD: Stores files like a USB drive—great for backups, but not playable on standard DVD players.
- Video DVD: Structured with menus and chapters, formatted to play on home DVD players. Requires authoring software to create properly.
Part 4. FAQs About How to Burn QuickTime Movies to DVD
-
Can DVD players play MOV files?
Unfortunately, no. standard DVD players cannot play MOV files directly. To play MOV files on a DVD player, you would need to convert them to a compatible format. Then, burn them onto a DVD. You may use DVD Creator to create a DVD from MOV.
-
Will QuickTime play DVDs?
Yes. QuickTime can play some DVD content, such as media files that are on the DVD (like video files). However, it cannot play the full interactive DVD menus.
-
Is there a DVD Player for Mac?
Yes, macOS used to come with a built-in DVD Player app that allowed you to play DVDs. However, starting with macOS Catalina (released in 2019), Apple removed that application. Yet, you can use DVD Player software to play DVDs on Mac.
-
What is the best video format for burning to DVD?
The best video format for burning DVDs is MPEG-2 with an H. 262 codec. It provides good video quality and compatibility with most DVD players.
-
Why will DVDs not play on Mac?
There are several reasons why you can’t play DVDs on a Mac. It could be due to the Mac having no built-in DVD drive. Another thing, because of the region code, dirty or damaged drive or DVD, and so on.
Conclusion
This guide explored the 2 best ways to burn QuickTime MOV files to DVD on Windows and Mac computers. Also, to convert MOV to DVD, ensure to follow the step-by-step guide process provided. Among the two, the DVD Creator chosen by Blu-ray Master is the best one. Its vast supported formats and video editing capabilities prove that it stands out. Moreover, it has a straightforward interface, making it suitable for every type of user.
More from Blu-ray Master
Videos to DVD