Sep 08, 2025Posted by Kevin Miller to Create DVD
Adobe Premiere Pro has long been regarded as the go-to tool for professional creators, not only for its powerful editing capabilities but also for its flexibility in output and format control. While users can not create a DVD from Adobe Premiere Pro directly, it can still help users create playable DVDs from their carefully edited videos by setting up the right configurations and using third-party tools. This article will show you how to use it to create a DVD. Let's get started!
- Part 1. How to Create DVD from Premiere Pro
- Part 2. Easier Way to Create a DVD than Using Premiere Pro
- Part 3. Tips About Creating a DVD Using Premiere
- Part 4. FAQs About Adobe Premiere Pro
Part 1. How to Create DVD from Premiere Pro (Detailed Guide)
Before converting M4V files to DVDs, thorough preparations are essential to ensure the process runs smoothly. Below are the detailed hardware and software requirements that need to be met.
Adobe Premiere Pro is considered the most sought software for manipulating videos. Countless YouTubers, content creators, and even filmmakers rely on this because of its diversity and comprehensive set of tools. You can trim, add subtitles, edit, rotate, and compile your clips through this software. Not only that, it offers special transitional effects and themes, turning simple footage into a professional-looking masterpiece.
But, can you burn a DVD from Adobe Premiere Pro? The answer to that is yes but with the help of a plug-in called Adobe Encore CS6. And so, after editing your video clips, you can go straight to burning them on a compact disc and have a permanent copy of your footage. We have provided easy peasy steps below on how to make a DVD in Premiere Pro.
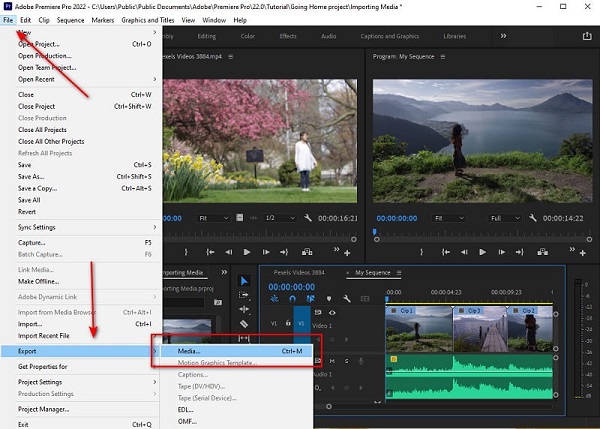
Step 1. First, you must import your video files on Adobe Premiere Pro. After doing this, drop down the File > export > media.
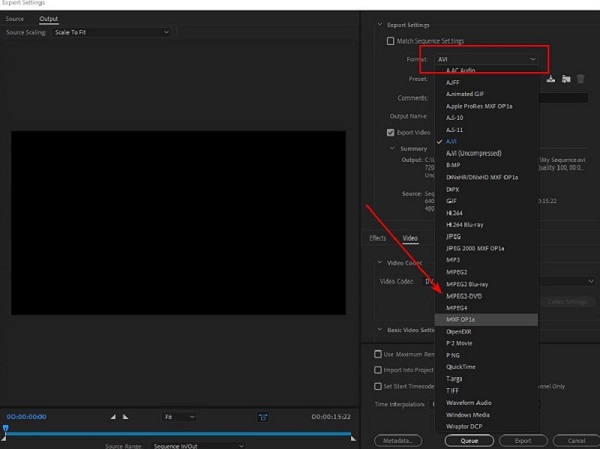
Step 2. When the Export Settings Panel appears, change the format of your footage into MPEG2-DVD. On the same Panel, go to the Multiplexer section and choose DVD in the Basic Settings. After that, move on to the Video section and check Render at Maximum Depth and Use Maximum Render Quality.
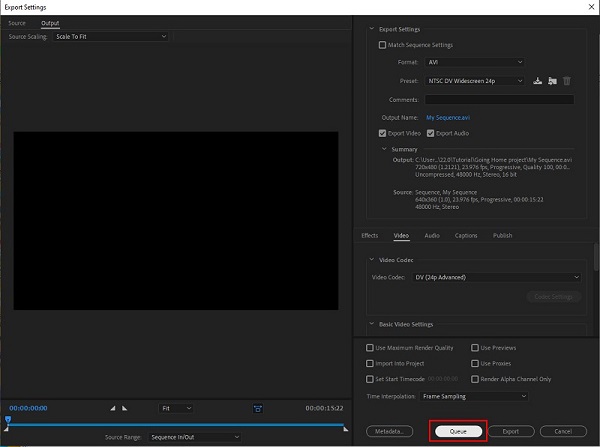
Step 3. Once done configuring the settings, hit Queue to transfer the footage on Adobe Encoder to convert the footage to DVD-compatible format. After that, launch the Adobe Encore CS6. From there, start a new project and select DVD as your authoring mode.
Step 4. Finally, import the files you rendered in the Adobe Encoder. After that, press Ctrl+T to add the files on the timeline panel. After that, mount your DVD on the tray and go to the build section. When all is set, hit the Build button to start the burning process.
All the above are the detailed usage steps of Adobe Premiere Pro. As a user of video archiving and disc authoring, I have frequently utilized Adobe Premiere Pro and Encore CS6 to complete DVD projects. For users familiar with the Adobe series, the operation is clear and the output quality is stable, which makes it particularly suitable for users who require custom menus or chapters. However, it is important to note that Adobe Encore CS6 was discontinued in 2013 and is no longer available through Creative Cloud. If you are using a newer version of Premiere Pro, you may need to manually install the older version of Encore or consider using alternative tools.
Part 2. Easier Way to Create a DVD than Using Premiere Pro
It is worth noting that although Adobe Premiere Pro used to be able to burn DVDs through the Adobe Encore CS6 plug-in, Adobe officially stopped updating and supporting Encore in 2013. Therefore, if you are using a newer version of Premiere Pro (such as the CC series), you will not be able to use Encore directly for DVD authoring unless you have an older installation package and configure it manually. This means that for most modern users, relying on Encore to burn DVDs is no longer a viable or recommended option. If you want to burn videos to playable DVDs more easily, using a dedicated DVD creation tool such as DVD Creator is more efficient and stable.
With DVD Creator, you burn DVDs from any file format like MTS, TS, MP4, and MOV. Not just that, it contains a built-in video editor which allows you to trim, rotate and merge clips. What is more, this tool provides a variety of templates for your DVD files that you can put in the title menu.
Step 1. Install DVD Creator
First, you need to install DVD Creator on your Device. To do this, you can click the buttons downloads below, run the software and follow the setup wizard.
Free Download
For Windows
Secure Download
Free Download
for macOS
Secure Download
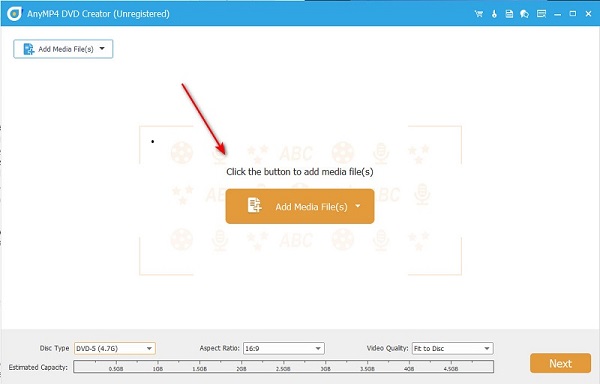
Step 2. Add Media Files
After you open the tool, select the DVD Disc as your disc type and then hit ok. After that, import the video file you want to burn by selecting the Add Media File(s) at the center of the interface.
Step 3. Configure the Settings
Once done importing the file, drop down the Disc Type according to the storage capacity of your DVD. Then, move on to the Aspect Ratio and set the frame size of your footage, and you can have the Video Quality in its default. Click Next right after configuring these settings.
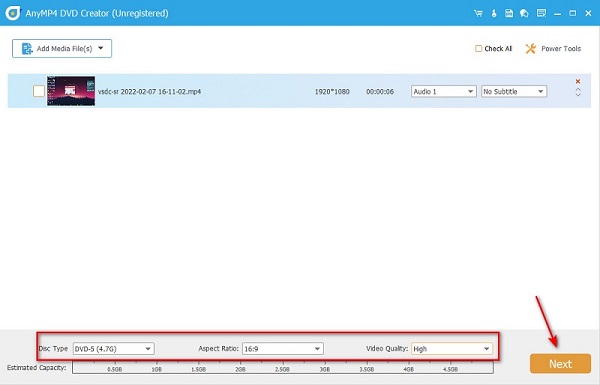
Note: Clicking the Power Tools button, you will be able to edit your videos before burning, such as clipping, cropping, rotating, adding watermarks, and adjusting visual effects.
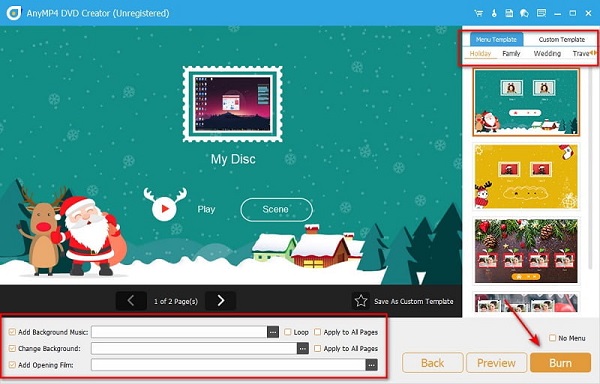
Step 4. Add Templates
Before hitting the burn button, you can modify the DVD by adding templates. By templates, this means that when you insert the DVD on the player, the title menu will have a design.
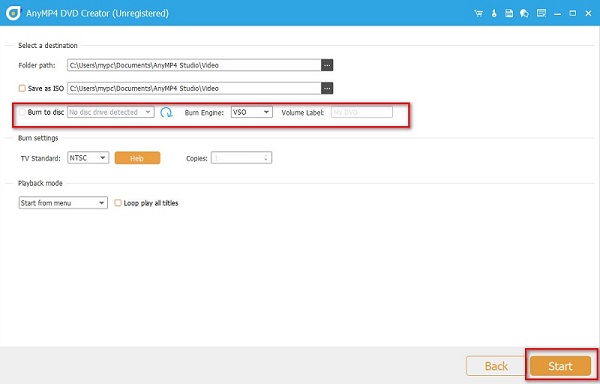
Step 5. Burning Process
Lastly, insert the disc on the drive tray and tick the Burn to Disc option. Then, hit Start for the tool to burn the file onto your DVD Disc.
Once you’ve completed these five steps, your DVD will be ready to use. The entire process with DVD Creator is refreshingly straightforward, even for users who aren’t tech-savvy. From installation to burning, the interface guides you through each stage without overwhelming you with options. In my own experience, what stands out most is the balance between simplicity and flexibility. You can edit and adjust your clips directly within the software, then personalize the disc with themed templates. Compared to more complex workflows like Adobe Premiere Pro, this tool offers a much faster and more accessible way to get your videos onto a playable DVD.
Part 3. Tips About Creating a DVD Using Premiere
If burning DVD with Adobe Premiere Pro is like learning a new language for you right now, don't lose hope yet. Whether you are just a newbie or an aspiring video editor in the making, you are in the right place to learn. So, we have gathered these tips and techniques for you to follow and acquire basic to pro-level skills in a short period. In that way, before burning your clips into DVD, you will leave an impressive remark with your audience.
1. First, you do not want a video output of low quality. But, you have to check the estimated file size of your videos that they should not be larger than the storage capacity of your disc.
2. Sometimes, there are pesky and noticeable transitions when the shotted scenes are at different angles. Before authoring your footage, you can make the clip appear in seamless transition through the flip effect. On the search bar of Adobe premiere, simply type flip, and drop down the Video Effects. Options are either a vertical or horizontal flip; choose what fits your footage the best.
3. Lastly, if you want to have special hotkeys while using Adobe Premiere, you may do so. For example, you can apply a shortcut instead of navigating the eraser tool first and doing the right clicks to delete the clip. To customize this, go to the top of the interface and drop down the Premiere Pro C. After that, select the Keyboard Shortcuts, and it is up to you whatever character you want to use as a shortcut.
Part 4. FAQs About Adobe Premiere Pro
-
What is the advantage of using Adobe Premiere Pro?
If you are looking for a high-end tool for your professional services, Adobe Premiere is your best choice. This software provides various tools to make your clips a fantastic work of art. However, if burning DVDs is your ultimate purpose above video editing, you can opt for other trusted programs like DVD Creator.
-
Is it illegal to rip copyrighted movies on DVD?
Absolutely, yes. Ripping materials that do not belong to you is considered copyright infringement and may lead to legal sanctions. But it is legal if you only want to convert your DVD to MP4 or other video formats.
-
Is it long to burn files on your DVD?
It will depend on the size of your footage. The bigger it is, the longer the burning process will take. Usually, great DVD burners will estimate the time needed, and you may rely on that.
Conclusion
Throughout this article, we have explained how to create a DVD from Adobe Premiere Pro, which is suitable for users who want a high degree of customization. However, since Encore is no longer being updated, its compatibility and complexity make it less user-friendly for ordinary users. In contrast, DVD Creator offers a simpler and more efficient solution because it supports multiple format imports, has built-in editing tools, and can quickly generate high-quality discs without complicated settings. If you are looking for a time-saving and effortless DVD creation software, download and try DVD Creator now!
More from Blu-ray Master
Videos to DVD