Jul 01, 2025Posted by Kevin Miller to Create DVD
In the late 1990s and early 2000s, MiniDV was a popular format among home videographers. These compact tapes recorded high-quality digital footage using camcorders, which are commonly used for events such as weddings, birthdays, and travel. However, with the decline of tape-based recording, MiniDV tapes have become outdated. This raises a common question: Can MiniDV tapes be transferred to DVD? The answer is yes. The post will provide a detailed, step-by-step process for playing, capturing, and burning your MiniDV to DVD. With the right tools, you can keep your memories for years to come.

- Preparation Before MiniDV to DVD
- Step 1. Play MiniDV on the Computer
- Step 2. Capture the Content of MiniDV
- Step 3. Burn Recorded MiniDV Video to DVD
Preparation Before MiniDV to DVD
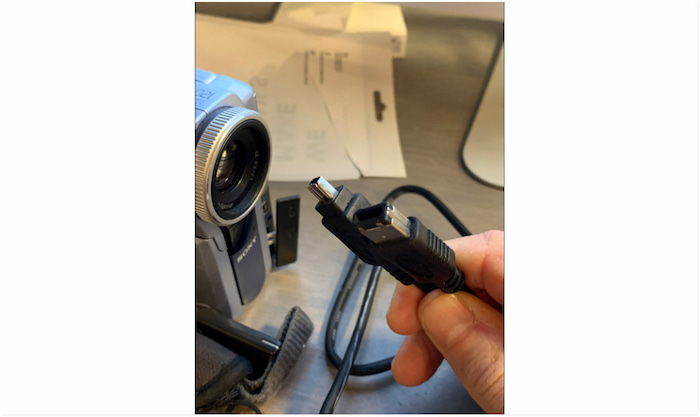
Prepare the FireWire and Cable
Most MiniDV camcorders use a FireWire connection to transfer the video data to a computer. This type of connection allows high-speed data transmission with minimal quality loss during the transfer. However, modern computers and laptops lack a built-in FireWire port. In such cases, you need to install a PCI-to-IEEE 1394 (FireWire) card or use a FireWire-to-USB adapter.
Prepare the Proper Recording Software
After preparing the equipment needed, you'll need video capture software to record the MiniDV footage. Such software will help you create a digital copy of the MiniDV content. Before you begin recording, test it to confirm that both picture and sound are being captured correctly.
Prepare the DVD Burning Software
Once the MiniDV footage is recorded, the next step is to burn it to a DVD. You'll need reliable DVD authoring or burning software to convert MiniDV to DVD. Check that your disc drive supports burning (not just reading), and prepare blank DVDs.
Got spare time? Check out the best free DVD player software available here!
Step 1. Play MiniDV on the Computer
The first step in digitizing video footage is playing MiniDV tapes on a PC. You'll need to establish connections between devices and use compatible software. Since MiniDV uses a digital format stored on physical tape, it requires specialized hardware and the right connection.
Step 1.Use an appropriate cable to establish a connection between the MiniDVD camcorder and the computer. Once connected, turn on the MiniDV device and switch it to playback mode. Place the MiniDV cassette into the camcorder or tape deck.
Step 2.Launch a video playback software and navigate to the Settings or Preferences menu. Select the connected MiniDV camcorder as your input source for playback. Next, press the Play button on the MiniDV device to play the footage.

Playing MiniDV tapes on your computer doesn't have to be complicated. You'll just need the right equipment and to know the correct playback settings. By following these steps, your playback software will be able to receive the signal and display the footage as expected.
Step 2. Capture the Content of MiniDV
After verifying that the video plays properly, the next step is to capture the footage digitally. Blu-ray Master preferred Screen Recorder to capture MiniDV footage and create a permanent digital file. It provides a simple, flexible, and high-quality way to record what's playing on your screen. This multifunctional video capture software enables the simultaneous recording of both video and audio in real-time. Additionally, it can save video recordings in various formats with resolutions of up to 4 K.
Here's how to copy MiniDV to DVD on a computer through screen recording:
Step 1.Start by downloading the Screen Recorder, recommended by Blu-ray Master, for free. It's available for both Windows and Mac, so please select the correct Download button for your system. Install the video capture software, complete the installation, and then run the software.
Free Download
For Windows
Secure Download
Free Download
for macOS
Secure Download
Step 2.Upon opening the software, you will be taken into the Screen Recorder mode by default. In the Display tab, choose your preferred recording area to capture the MiniDV footage. Toggle on the System Sound tab to capture the internal sound/audio from the MiniDV video.

Step 3.Now, go to the video playback software and cue the MiniDV footage. Pause the tape at the starting point. Return to the screen recorder software and click the big REC button. Immediately after the recording starts, press Play on your MiniDV camcorder.

Step 4.When the MiniDV tape finishes playing, click the Red Square button to end the recording. A preview window will open, allowing you to review the MiniDV recording. You can also trim the video directly within the preview screen to remove unwanted content.

Blu-ray Master's Screen Recorder provides a reliable solution for capturing high-quality screen captures. It's your best companion for preparing MiniDV tapes to DVD conversion. Once captured, the video will be ready for burning to DVD in the next stage of the process.
Step 3. Burn Recorded MiniDV Video to DVD
The final step after creating a digital copy of the MiniDV is to burn it to a DVD. Blu-ray Master recommends using DVD Creator to create a physical copy of your recorded MiniDV footage. With it, you can add multiple clips and burn MiniDV to DVD with ease. It supports various media formats, including MP4, MKV, MOV, 3GP, FLAC, and others. Additionally, it allows you to add multiple audio tracks and subtitles for an enhanced viewing.
Step 1.Beforehand, get a free download of the DVD Creator, picked by Blu-ray Master for free. Install the DVD-burning software and complete the installation process. Once finished, insert a blank DVD into the disc drive and open the software.
Free Download
For Windows
Secure Download
Free Download
for macOS
Secure Download
Step 2.Upon startup, select the DVD Disc option as your disc type. Click the Add Media File(s) button to load the recorded MiniDV footage. Once added, set the disc type (DVD-5 or DVD-9), aspect ratio, and video quality before proceeding.

Step 3.In the DVD Menu window, choose a DVD menu template that suits your style. You can also add background music, upload an image, and insert an intro film to customize the menu. If you prefer to burn DVDs without a menu, check No Menu and click Burn to proceed.

Step 4.In the Burning Settings window, specify your output directory in the Folder Path field. Then, check Burn to Disc and select your disc drive from the pulldown menu. Select a TV standard to ensure error-free playback, and then click Start to convert MiniDV.

Blu-ray Master DVD Creator is the best DVD burner for creating DVDs from MiniDVs. It delivers a fast and effective way to transform your captured MiniDV recordings into playable DVDs. It also provides Video, Audio, and Subtitle Edit tools that let you enhance video before burning.
Conclusion
MiniDV to DVD conversion is about preserving personal memories before they're lost to time and outdated technology. To ensure a smooth and reliable process, use a Blu-ray Master Screen Recorder to capture high-quality footage from your MiniDV tapes. For burning the recorded MiniDV footage into a playable DVD, use Blu-ray Master DVD Creator. Both tools are user-friendly, powerful, and designed for exactly this purpose.
More from Blu-ray Master
Videos to DVD