Oct 10, 2025Posted by Kevin Miller to Create DVD
An ISO image file is a type of container that stores the exact contents of a CD, DVD, and Blu-ray. Many software companies utilize this file container as an important tool for distributing applications and other means without transporting physical discs. They will just turn the contents into ISO files to save time and money. Microsoft’s Windows 10, 11, and even 8 can mount ISO. But do you know what mounting a file means? If not, then this is your chance to learn the precise definition of ISO file mounting, with a simple tutorial on how to do it properly on your desktop. Therefore, without any further adieu, let’s start these learnings as you read the content parts below.

Table of Contents
Part 1. What is ISO and ISO Mount
Firstly, we will introduce you to what is ISO. An ISO file is a digital replica of an optical disc, such as a CD, DVD, or Blu-ray. It contains all the data and file structure of the original disc, bundled into a single file with a .iso extension. ISO files are often used to share big programs, computer systems, or collections of media. You can mount or burn them to physical discs or virtual drives. They make it easier to store, send, and install stuff, which is why both tech experts and regular users like them.
Next, let’s learn what ISO mounting is. ISO file mounting means virtually accessing or attaching the ISO image file contents as if it were an optical disc placed into an optical drive. Furthermore, this file image is a file format that contains a replica of the data found on the disc. Mounting is a method commonly used for system recovery, software distribution, and data storage. The OS creates a virtual drive by performing this process, allowing users to open the content as they access their optical or original copy from the physical disc. In addition, this method is particularly useful in events when dealing with virtualization or where physical media is impractical. This means that virtual tools can access ISO images directly, streamlining the installation process more effectively. To successfully mount an ISO file yourself, getting to know some ISO creator software is also essential. Move forward to see how to create an ISO image on Windows and Mac.
Part 2. How to Mount an ISO on Windows 11/10/8
To mount ISO files on Windows-based computers, especially the 11, 10, and 8, you must ensure the files are already available. Then, with the help of your curser, follow the instructional guide below.
Step 1.Go to your computer’s Windows logo located at the left bottom-most corner of your screen.
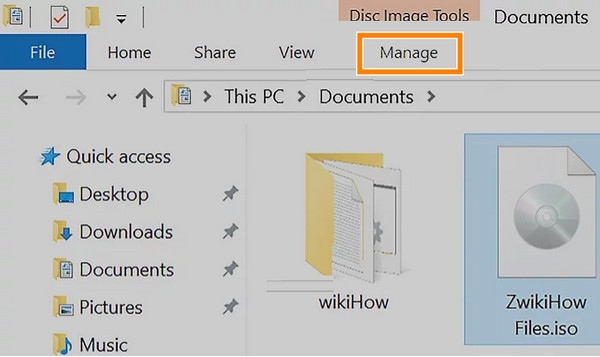
Step 2.Then, click File Explorer and find the folder where your ISO image file is located.
Step 3.Now click the Manage tab, which you will find on your window’s upper-left side. Then, wait until a toolbar appears below it.
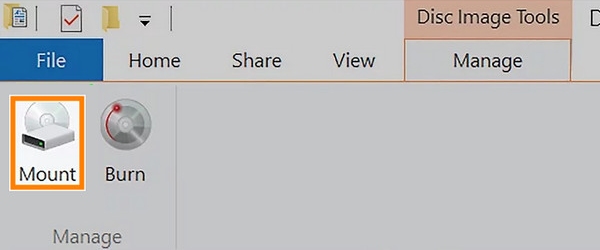
Step 4.Click the Mount option from that toolbar, and it will mount the .iso file onto your computer's CD drive.
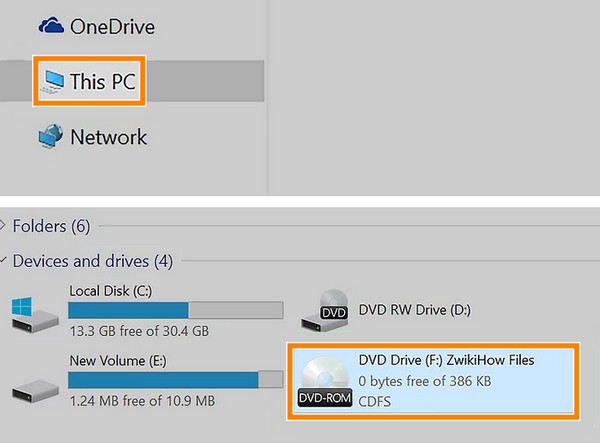
Step 5.After that, click the This PC option, then double-click the ISO located below the Devices and Drives to head to This PC option. By doing this, you will be able to open your ISO contents.
Part 3. How to Mount an ISO on Mac
To mount ISO files on Mac computers, Finder is the best choice. When you double-click an ISO file, Finder automatically mounts it as a virtual disc, displaying its contents in a new window just like inserting a physical CD or DVD. This built-in feature means you don’t need any extra software. MacOS handles it seamlessly, letting you browse, install, or copy files directly from the mounted image. It's a quick and user-friendly way to access ISO files without any hassle. Now, we will share with you the detailed steps to mount ISO files with Finder.
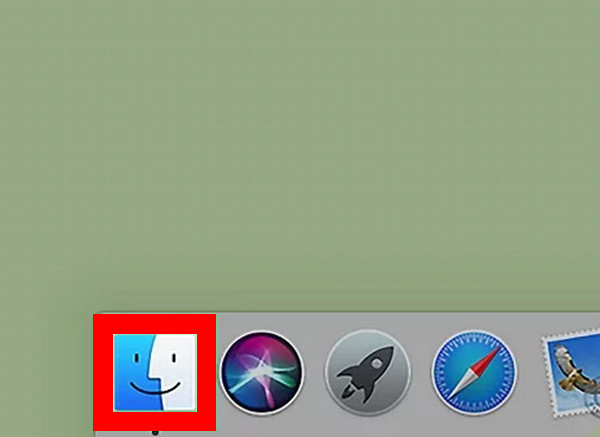
Step 1.Choose and open Finder on your Mac computer.
Step 2.Then, navigate to the folder where your ISO files are saved. Double-clicking the ISO file will mount it as a virtual disk image.
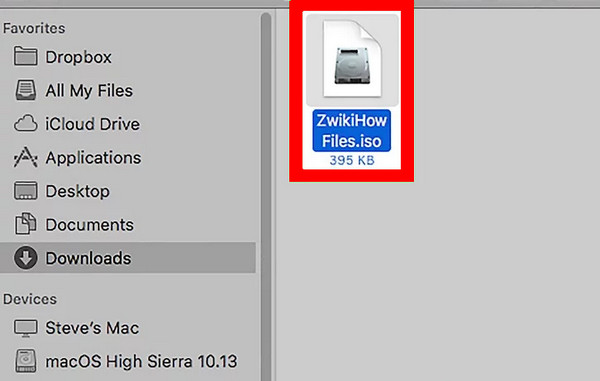
Step 3.MacOS will automatically mount it and open a new Finder window showing its contents.
In all, Finder is a reliable choice for you to mount ISO on Mac computers. It provides you with an easy and free operation. The limitation is that it has limited functions for you to adjust before mounting ISO files.
Part 4. What to Do When Mounting ISO on Windows/Mac Not Working
If you are having problems mounting your ISO files, or it is not working or processing well, then we have gathered the solutions you can use below.
- Check if the ISO is not corrupted. You can verify the file's checksum or redownload the ISO file using your trusted resource.
- Update your Windows OS or MacOS. There are times that to solve a temporary problem, you will just need to restart the device. After restarting the computer, you can retry to mount the virtual drive ISO.
- Update your Windows OS. Ensure that your desktop or the OS is up to date because updates fix problems and bugs.
- Check the conflicts of the drive letter. Ensure that your virtual drive’s letter is intendedly for your drive use only and is not used by other another drive.
- Use third-party mounting software. If your desktop’s built-in mounting tool is not working well, it would be best to use another software to do the job for you.
Part 5. Best Software to Create ISO and DVD on Windows and Mac
Suppose your last resort is to install third-party software, then the best software for mounting ISO is the Blu-ray Master DVD Creator. This program is the best recommendation for Blu-ray Master, which is dedicated to creating DVDs out of your ISO files. Thus, if you cannot mount the file, why not burn it back to a physical disc? This DVD Creator will help you do it in the easiest, quickest, and lossless way. Furthermore, it offers a wide array of functions and features to help you personalize the process of creating ISO to DVD on Windows and Mac. With such features, you can add various ISO contents and videos to a DVD that has menu templates, with added images and music to the menu.
Also, you can customize the DVD with the tools such as adding watermarks, trimming, cropping, and adjusting video effects before burning. Overall, it is an awesome program useful for sharing and preserving your ISO images. Thus, here are the quick steps to follow on how to burn mount ISO.
Key Features
• Create folder and ISO image of DVD and Blu-rays losslessly.
• Offer customizable menu templates.
• Fast burning process.
• Friendly user interface.
Step 1.First and foremost, you will need to get the software onto your computer by hitting the Free Download button above. Afterward, follow the installation procedure prompted.
Free Download
For Windows
Secure Download
Free Download
for macOS
Secure Download
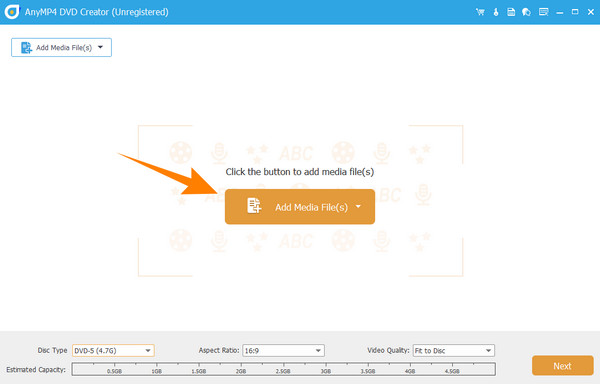
Step 2.After the installation, place the DVD on your computer's optical drive. Then, fire up your newly installed DVD Creator. On the main interface, hover over the DVD Disc tab option and click it. Then, click the Add Media File button to upload the ISO image you are about to burn.
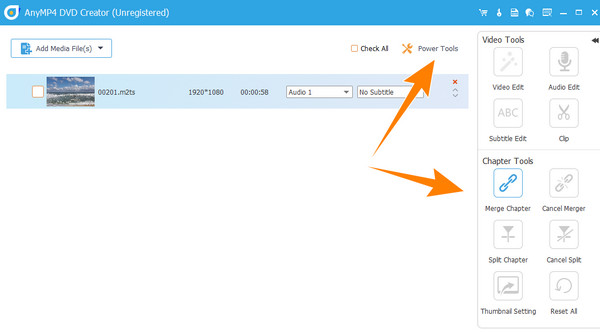
Step 3.Once the ISO image is imported, you can click the Power Tools option in the interface's upper-right corner. This action will let you see the tools you can navigate or apply to your media. Regardless, click the Next button to proceed to the next step.
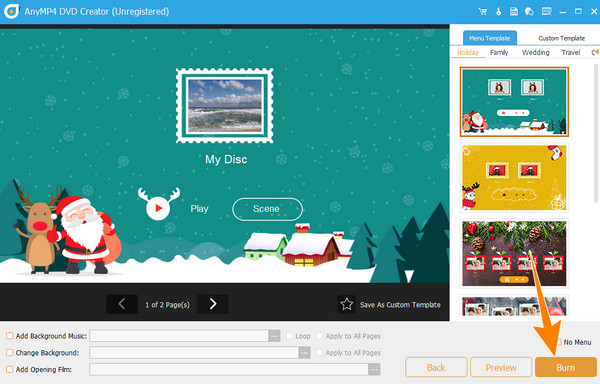
Step 4.As quick as that, you can now click the Burn button on the new window page. You just need to wait a little until the process finishes.
Part 6. FAQs About Mounting ISO
-
Does ISO have to be mounted?
The necessity of mounting the ISO depends on the situation you have. This process will be helpful in accessing the content file without burning it.
-
Can you mount ISO in Windows 7?
Yes. However, you can mount ISO on Windows 7 using third-party software. This is because Windows 7 doesn’t have built-in support for ISO mounting.
-
Can I mount an ISO file without a drive?
Yes, you can mount an ISO file without needing an optical drive. However, you can only do it if you use a virtual drive that will work to emulate the absence of a physical drive.
-
How do I know if an ISO file is mounted?
To know if the ISO is already mounted, you can check for its drive letter on your PC. If a new drive letter harmonizes your ISO file, it means the ISO is mounted.
Wrapping up
There you have it, the definition, process, and tips for ISO mounting. We provide easy ways to mount ISO files on Windows and Mac computers. With the clear illustrations, beginners can do it successfully. Remember, not all Windows desktops are capable of mounting your ISO images. If your computer lacks this built-in function, you can still count on third-party software like the Blu-ray Master DVD Creator.
More from Blu-ray Master