May 29, 2025Posted by Kevin Miller to Rip DVD
The shift from physical disc to digital media has become increasingly demanding in our modern age. Many home movie collectors want to keep and share their DVD content online, especially on platforms like YouTube. Uploading them to YouTube allows easy access, sharing, and long-term backup. However, you can’t upload DVDs directly to YouTube, which supports specific formats. How can I upload a DVD to YouTube? The answer is simple, and you will find it here. In the following sections, we’ll show you the essential steps to upload a DVD to YouTube. We will also provide tips to ensure a smooth uploading process.

- Information You Should Know Before Uploading to YouTube
- Part 1. Free Rip DVDs to YouTube-Accessible Format
- Part 2. Upload Ripped DVD to YouTube
Information You Should Know Before Uploading to YouTube
Before you upload any video to YouTube, it’s essential to understand the platform’s technical requirements. YouTube has specific standards that must be met for your content to process correctly. This section covers the critical information you need to know to ensure your uploads go smoothly and look their best.
Supported YouTube Upload Formats
YouTube accepts various video files, but the most recommended is MP4 format. Other supported formats include MOV, MPEG-1, MPEG-2, MPEG4, MPG, AVI, WMV, MPEGPS, etc. For the best results, especially when ripping DVDs, you should export them in MP4 format.
Video Duration Limits
By default, YouTube allows up to 15 mins of videos for accounts that have not been verified. However, once you verify your account, you can upload videos for over 15 minutes. It can range to 12 hours or up to 256 GB in size, whichever comes first.
Maximum File Size
As mentioned, YouTube supports video file sizes of up to 256 GB. However, huge video files may take longer to upload and process. Compressing your video using efficient encoding settings is recommended to keep the file manageable.
Copyright Compliance and Ownership
The most important thing to understand before uploading is that you must have the right to the content. This includes video, audio, and images used in your video. Uploading content from DVDs you do not own can result in copyright, video removal, and account termination.
Part 1. Free Rip DVDs to YouTube-Accessible Format
Can I upload a DVD to YouTube? Yes, you can upload a DVD to YouTube. However, you must first rip the DVD into a YouTube-accessible video format. YouTube doesn’t accept direct DVD uploads, so the content must be converted into a compatible digital file before uploading. The best way to make this possible is by using Blu-ray Master Free DVD Ripper .
As the name suggests, it is a DVD-ripping software you can use for free. It can rip DVDs to MP4, MPG, AVI, WMV, AVI, and 500+ other YouTube-accessible formats. It is compatible with Windows 11/10/7/8 and macOS 10.12 or above. What’s best about this software is that it offers professional settings to meet YouTube’s upload requirements. You can configure profile settings like encoder, resolution, bitrate, frame rate, ratio, channel, and sample rate.
Here’s how to upload a DVD video to YouTube successfully through ripping:
Step 1.Start by obtaining a free download of the Blu-ray Master Free DVD Ripper. Install the DVD-ripping software and wait for the installation process to complete. Once finished, insert the disc into your computer’s DVD tray and run the software.
Free Download
For Windows
Secure Download
Free Download
for macOS
Secure Download
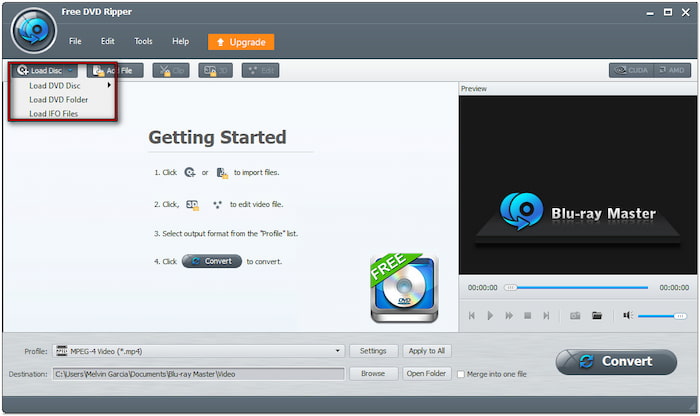
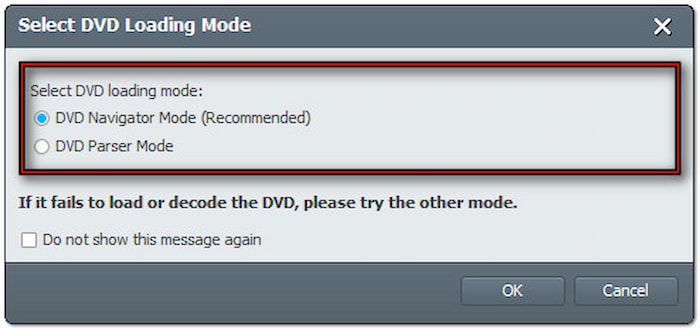
Step 2.Click Load Disc to import the DVD source into the software. Beyond physical discs, you can also load a VIDEO_TS folder and IFO files. Click the Load Disc pulldown menu to access the Load DVD Folder and Load IFO Files buttons. In the popup window, select your preferred loading mode:
- DVD Navigator Mode: This mode detects and loads the DVD content automatically. It is best used when ripping a commercial DVD with copy-protection/region codes.
- DVD Parser Mode: This mode manually parses and loads DVD files. It works when the DVD is damaged, incomplete, or has structural errors that cause DVD Navigator to fail.
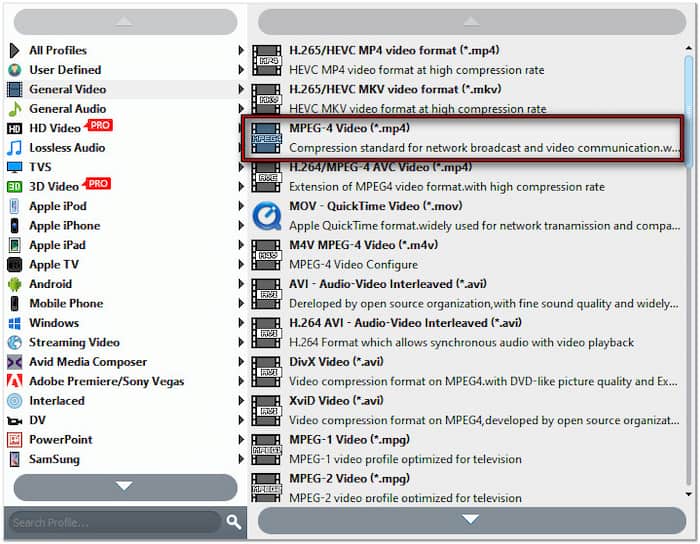
Step 3.Once the disc is recognized, put a checkmark on each title you want to rip. Proceed to the Profile section and select the General Video category for format selection. YouTube supports various formats, but MPEG-4 Video (*.mp4) is highly recommended. This format offers efficient compression with excellent video quality at lower file size.
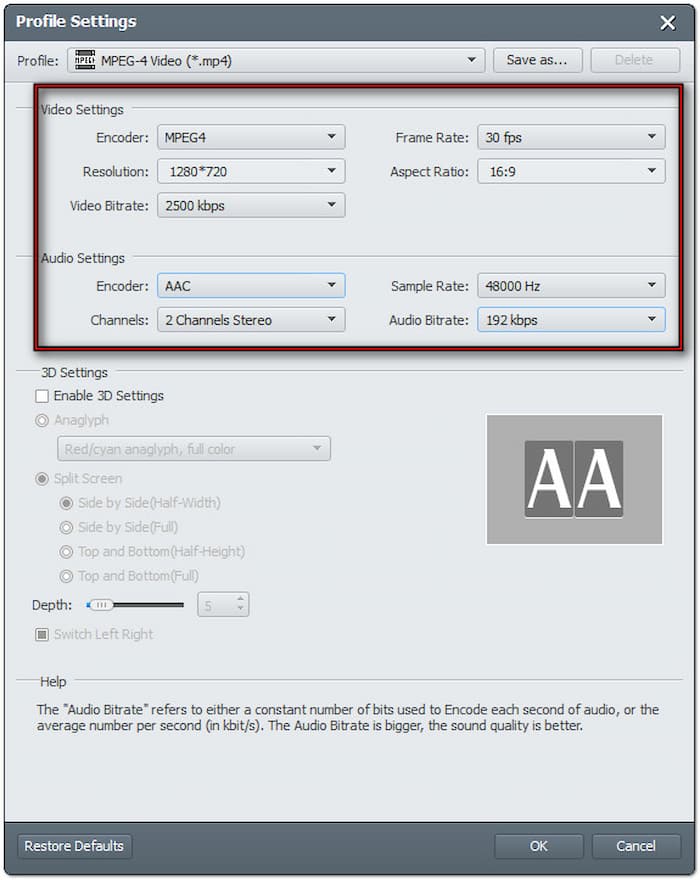
To ensure an error-free video upload, you should configure the profile settings. Click Settings next to the Profile section and follow the recommended upload setting:
Video Encoder: MPEG4
Resolution: 1280×720
Video Bitrate: 2500 kbps (YouTube re-encodes anyway)
Frame Rate: 24 fps
Aspect Ratio: 16:9 (standard for YouTube)
Audio Encoder: AAC
Channel: 2 Channel Stereo
Sample Rate: 48000 Hz
Audio Bitrate: 192 kbps
Step 4.Switch to the Destination section and click Browse to set a path destination. Once the output directory is specified, click Convert to rip the DVD to YouTube-accessible format. The software will then extract and convert the DVD content to your selected format

Blu-ray Master Free DVD Ripper is the best free DVD ripper to help you digitize your DVDs. This allows you to turn your physical media into YouTube-accessible formats. But what makes this software truly best is that it can handle regional and copy-protected DVDs.
Part 2. Upload Ripped DVD to YouTube
After you’ve ripped the DVD using Blu-ray Master Free DVD Ripper, the next step is to share it with your audience. Uploading the video to YouTube allows others to stream it online without physical access to the DVD. Below, we’ll show you how to upload a DVD on YouTube:
Step 1.On the YouTube’s homepage, click Create and select Upload Video to access the upload page. Click Select Files and browse your local files to find the MPEG-4 Video you created from the Blu-ray Master Free DVD Ripper.

Step 2.After importing the ripped DVD, check all the titles you want to upload to YouTube. Please enter a title for your video and make it clear and descriptive. Also, write a summary of the video’s content in the description box. Most importantly, don’t forget to set the visibility for the public.

Step 3.Once everything is completed, click the Update Video button in the upper-right navigation. Next, click the Edit Draft button and continue through the upload setup by modifying other settings. If you’re uploading the video for Public, click the Publish button. Meanwhile, click the Save button if you’re uploading the ripped DVD privately.

That’s how to upload a DVD to YouTube for free! Please upload DVD content that you own the rights to or content you’ve created yourself to avoid copyright violations. In such cases, you exceed the file size limit,compress the video to YouTube’s required size, and re-upload it.
Wrapping up
Knowing the essential tips and steps to upload a DVD to YouTube is a great way to keep, share, and repurpose your physical media. However, since YouTube doesn’t accept DVD files directly, ripping it to a supported format is a necessary first step. This process involves converting the disc into an MP4, which YouTube can easily recognize. The key to making this transition hassle-free lies in using a reliable tool. Blu-ray Master Free DVD Ripper is free, straightforward, and packed with features to rip DVDs into YouTube-accessible formats.
More from Blu-ray Master
DVD to Devices

Fast and free ripping software to decrypt all DVDs to digital easily on your computer.
100% Secure. No virus